We may be compensated if you purchase through links on our website. Our team is committed to delivering honest, objective, and independent reviews on home products and services.
Project details
Skill
Cost
Estimated Time
*Costs in this article sourced from contractor estimates used by Angi.
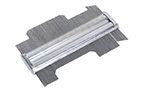
 Profile gauge
- Plastic putty-knife set
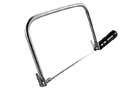
- Coping saw
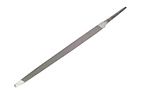
- Triangular slim-taper file
- paint brush – 1-inch
Window muntins are the strips of metal or plastic that separate the panes of glass. However, these delicate dividers can sometimes become damaged, detracting from your window’s appearance.
This guide will walk you through the process of repairing a window muntin, from assessing the damage to applying the finishing touches. Whether you’re a do-it-yourself (DIY) enthusiast or considering professional help, you’ll find valuable information on restoring your window.
Understanding Window Muntins
Before diving into repairs, it’s best to understand what muntins are and how they can become damaged. Below, we’ll explain the basics of window muntins and how they’re most commonly damaged.
What Is a Window Muntin?
A window muntin is a wood, metal, or plastic strip that divides a windowpane into smaller sections. These dividers are often found in traditional or colonial-style windows, creating a grid-like pattern that adds visual interest and architectural detail. Muntins can be purely decorative or serve a functional purpose by supporting multiple smaller panes of glass within a larger frame.
Common Muntin Damage
Muntins can suffer damage from accidental impacts, age-related wear, and environmental factors. The most common types of muntin damage include the following:
- Chips or gouges from impact
- Loose or detached sections
- Paint peeling or flaking
- Rot in wooden muntins
- Warping or splitting due to moisture exposure
Tools and Materials Needed to Repair a Window Muntin
Gathering the right tools and materials before starting your repair project will ensure a smooth and efficient process. Here’s what you’ll need to fix your damaged window muntin.
Essential Tools
- Coping saw
- Fine-grit sanding sponge
- Mixing stick
- Paintbrush
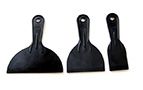
- Plastic scraper
- Profile gauge
- Triangular slim-taper file
Required Materials
- Clean rags
- Denatured alcohol
- Oil-based primer
- Painter’s tape
- Paint matching your window color
- Plastic sheet for mixing
- Talcum powder
- Two-part epoxy (with a working time of 30 minutes or more)
Having these items on hand will allow you to complete the repair without interruptions.
Preparing for Muntin Repair
Before you begin the repair process, we recommend assessing the damage and protecting the surrounding area. These steps will help ensure a successful and clean repair job.
Assessing the Damage
Carefully examine the damaged muntin to determine the extent of the repair needed. Look for any signs of rot, loose sections, or additional damage that may not be immediately visible. This assessment will help you decide whether a DIY repair is appropriate or if you need to replace the windowpane entirely.
Protecting the Surrounding Area
Before starting the repair, take steps to protect the glass and surrounding areas:
- Clean the damaged area and surrounding glass with a mild detergent solution
- Apply painter’s tape to the glass on both sides of the muntin
- Cover nearby surfaces with drop cloths or plastic sheeting
These precautions will prevent accidental damage and make cleanup easier once the repair is complete.
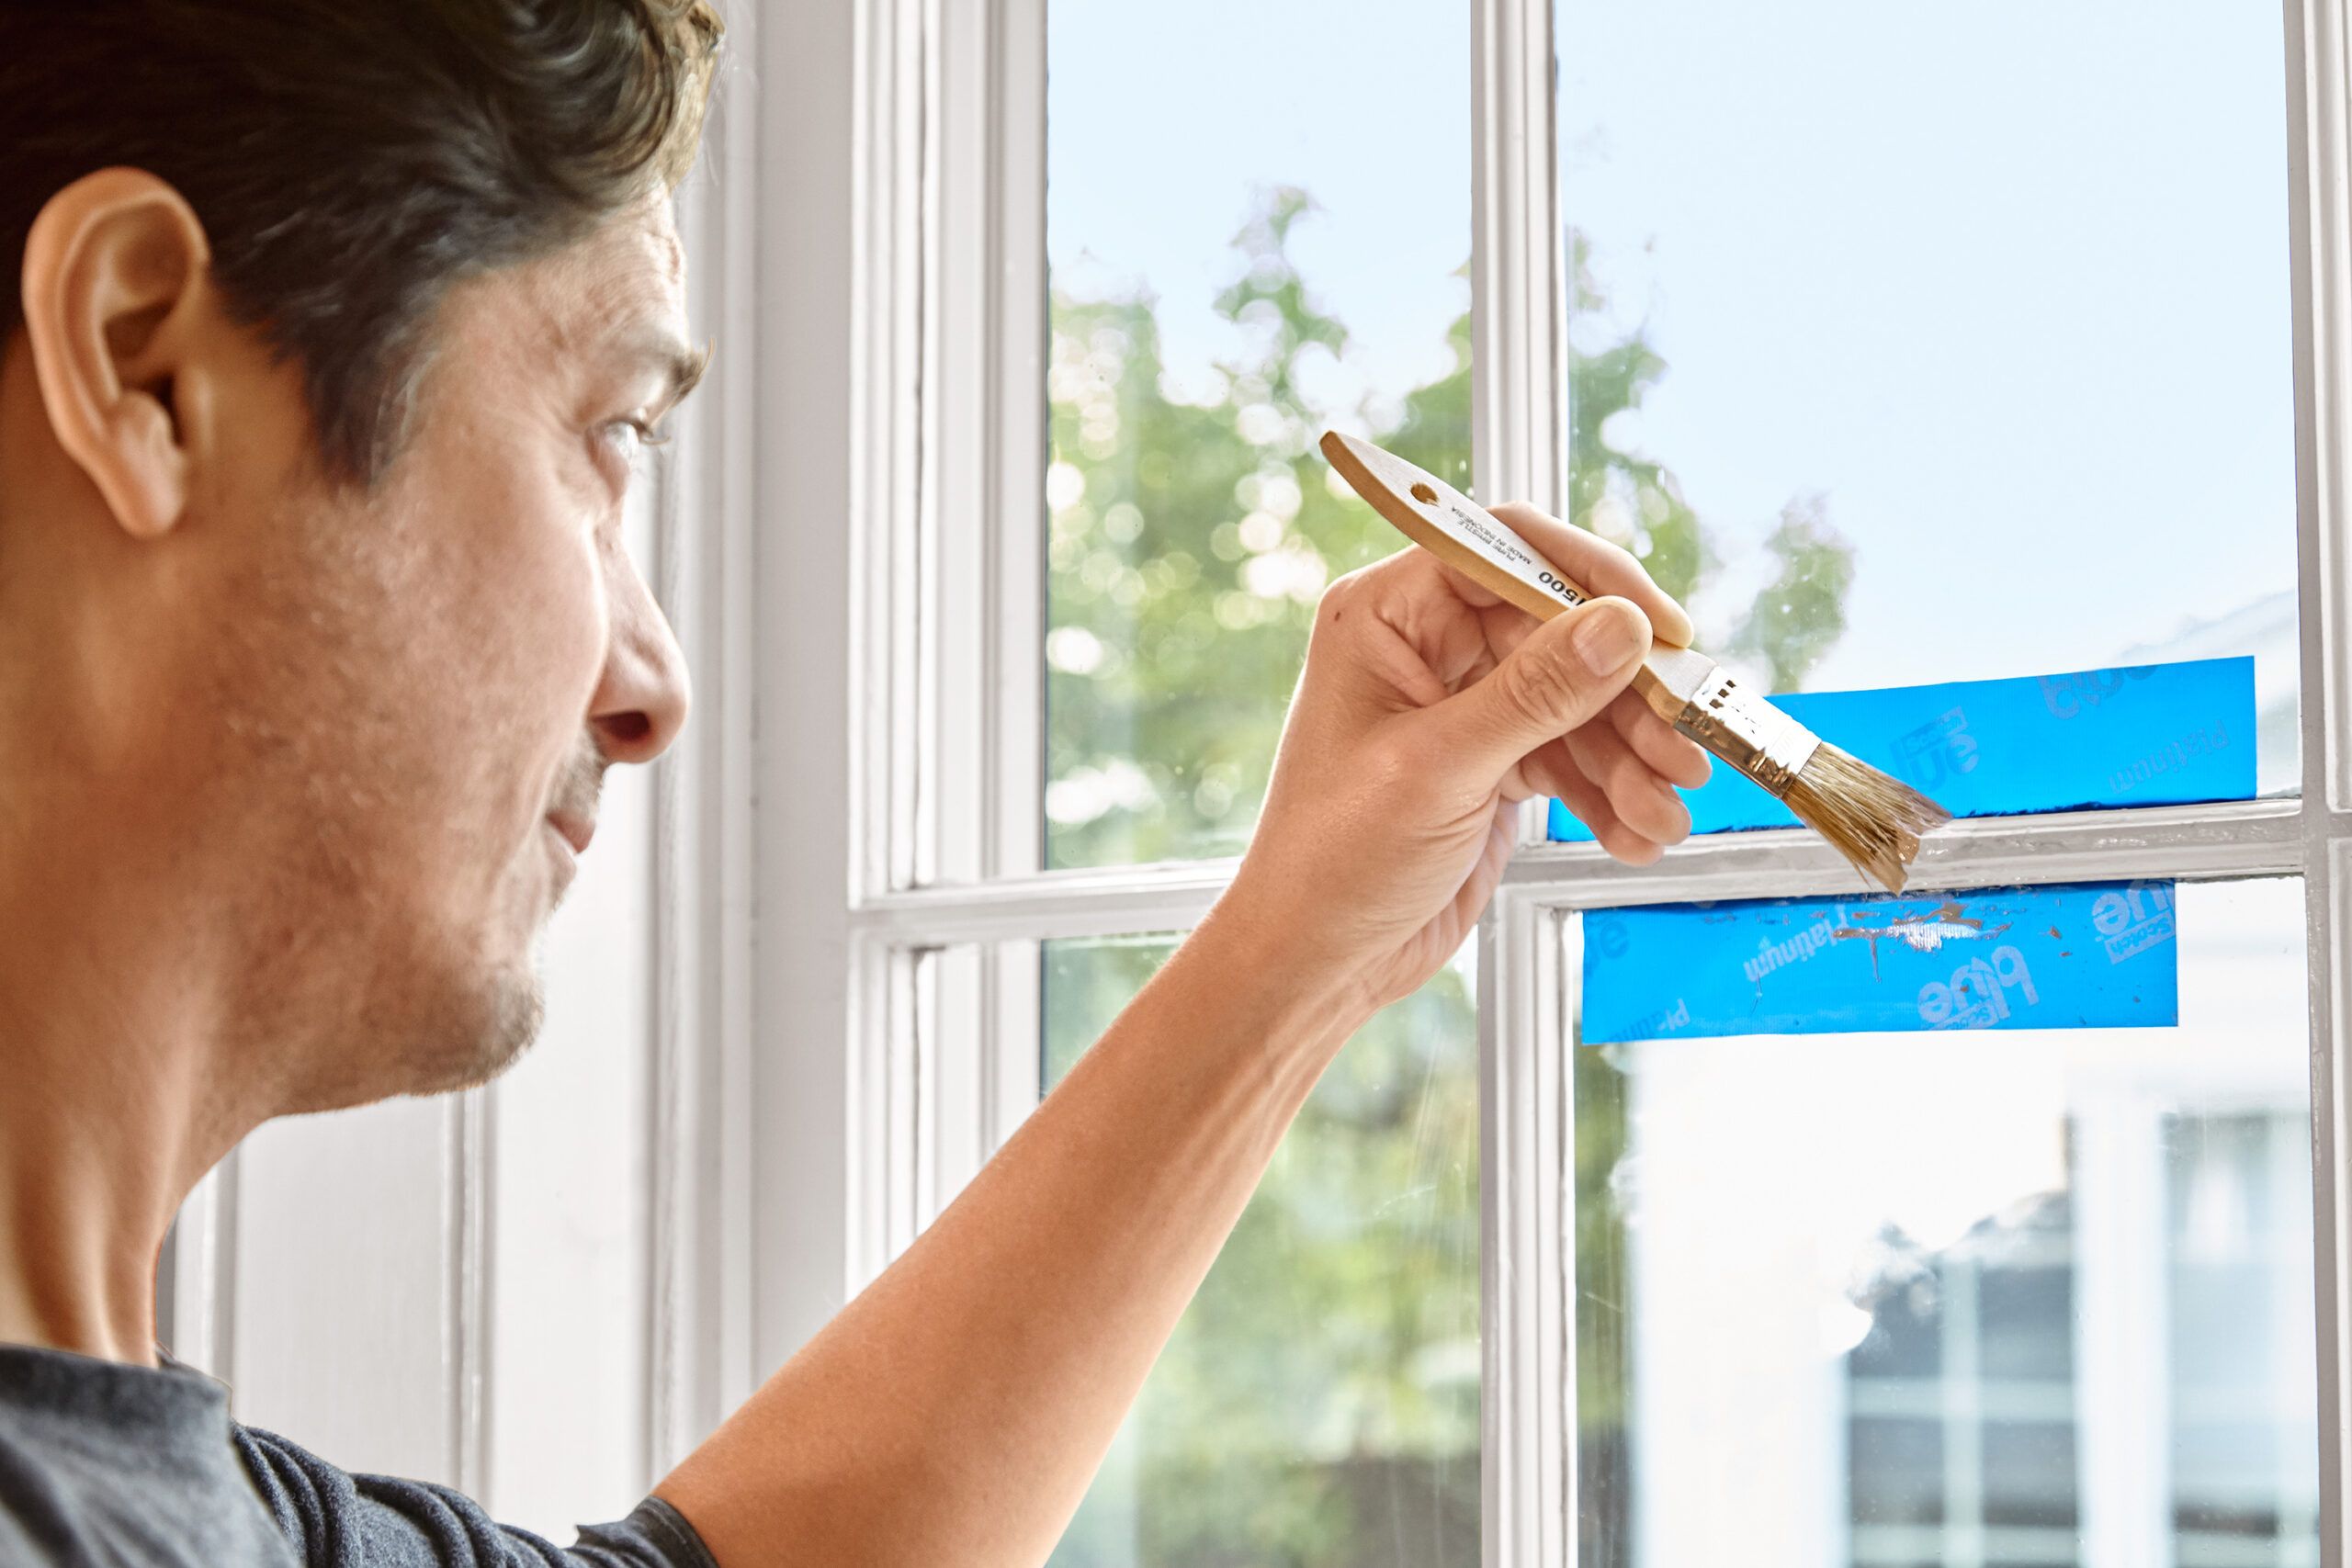
Step 1
Capture the Profile
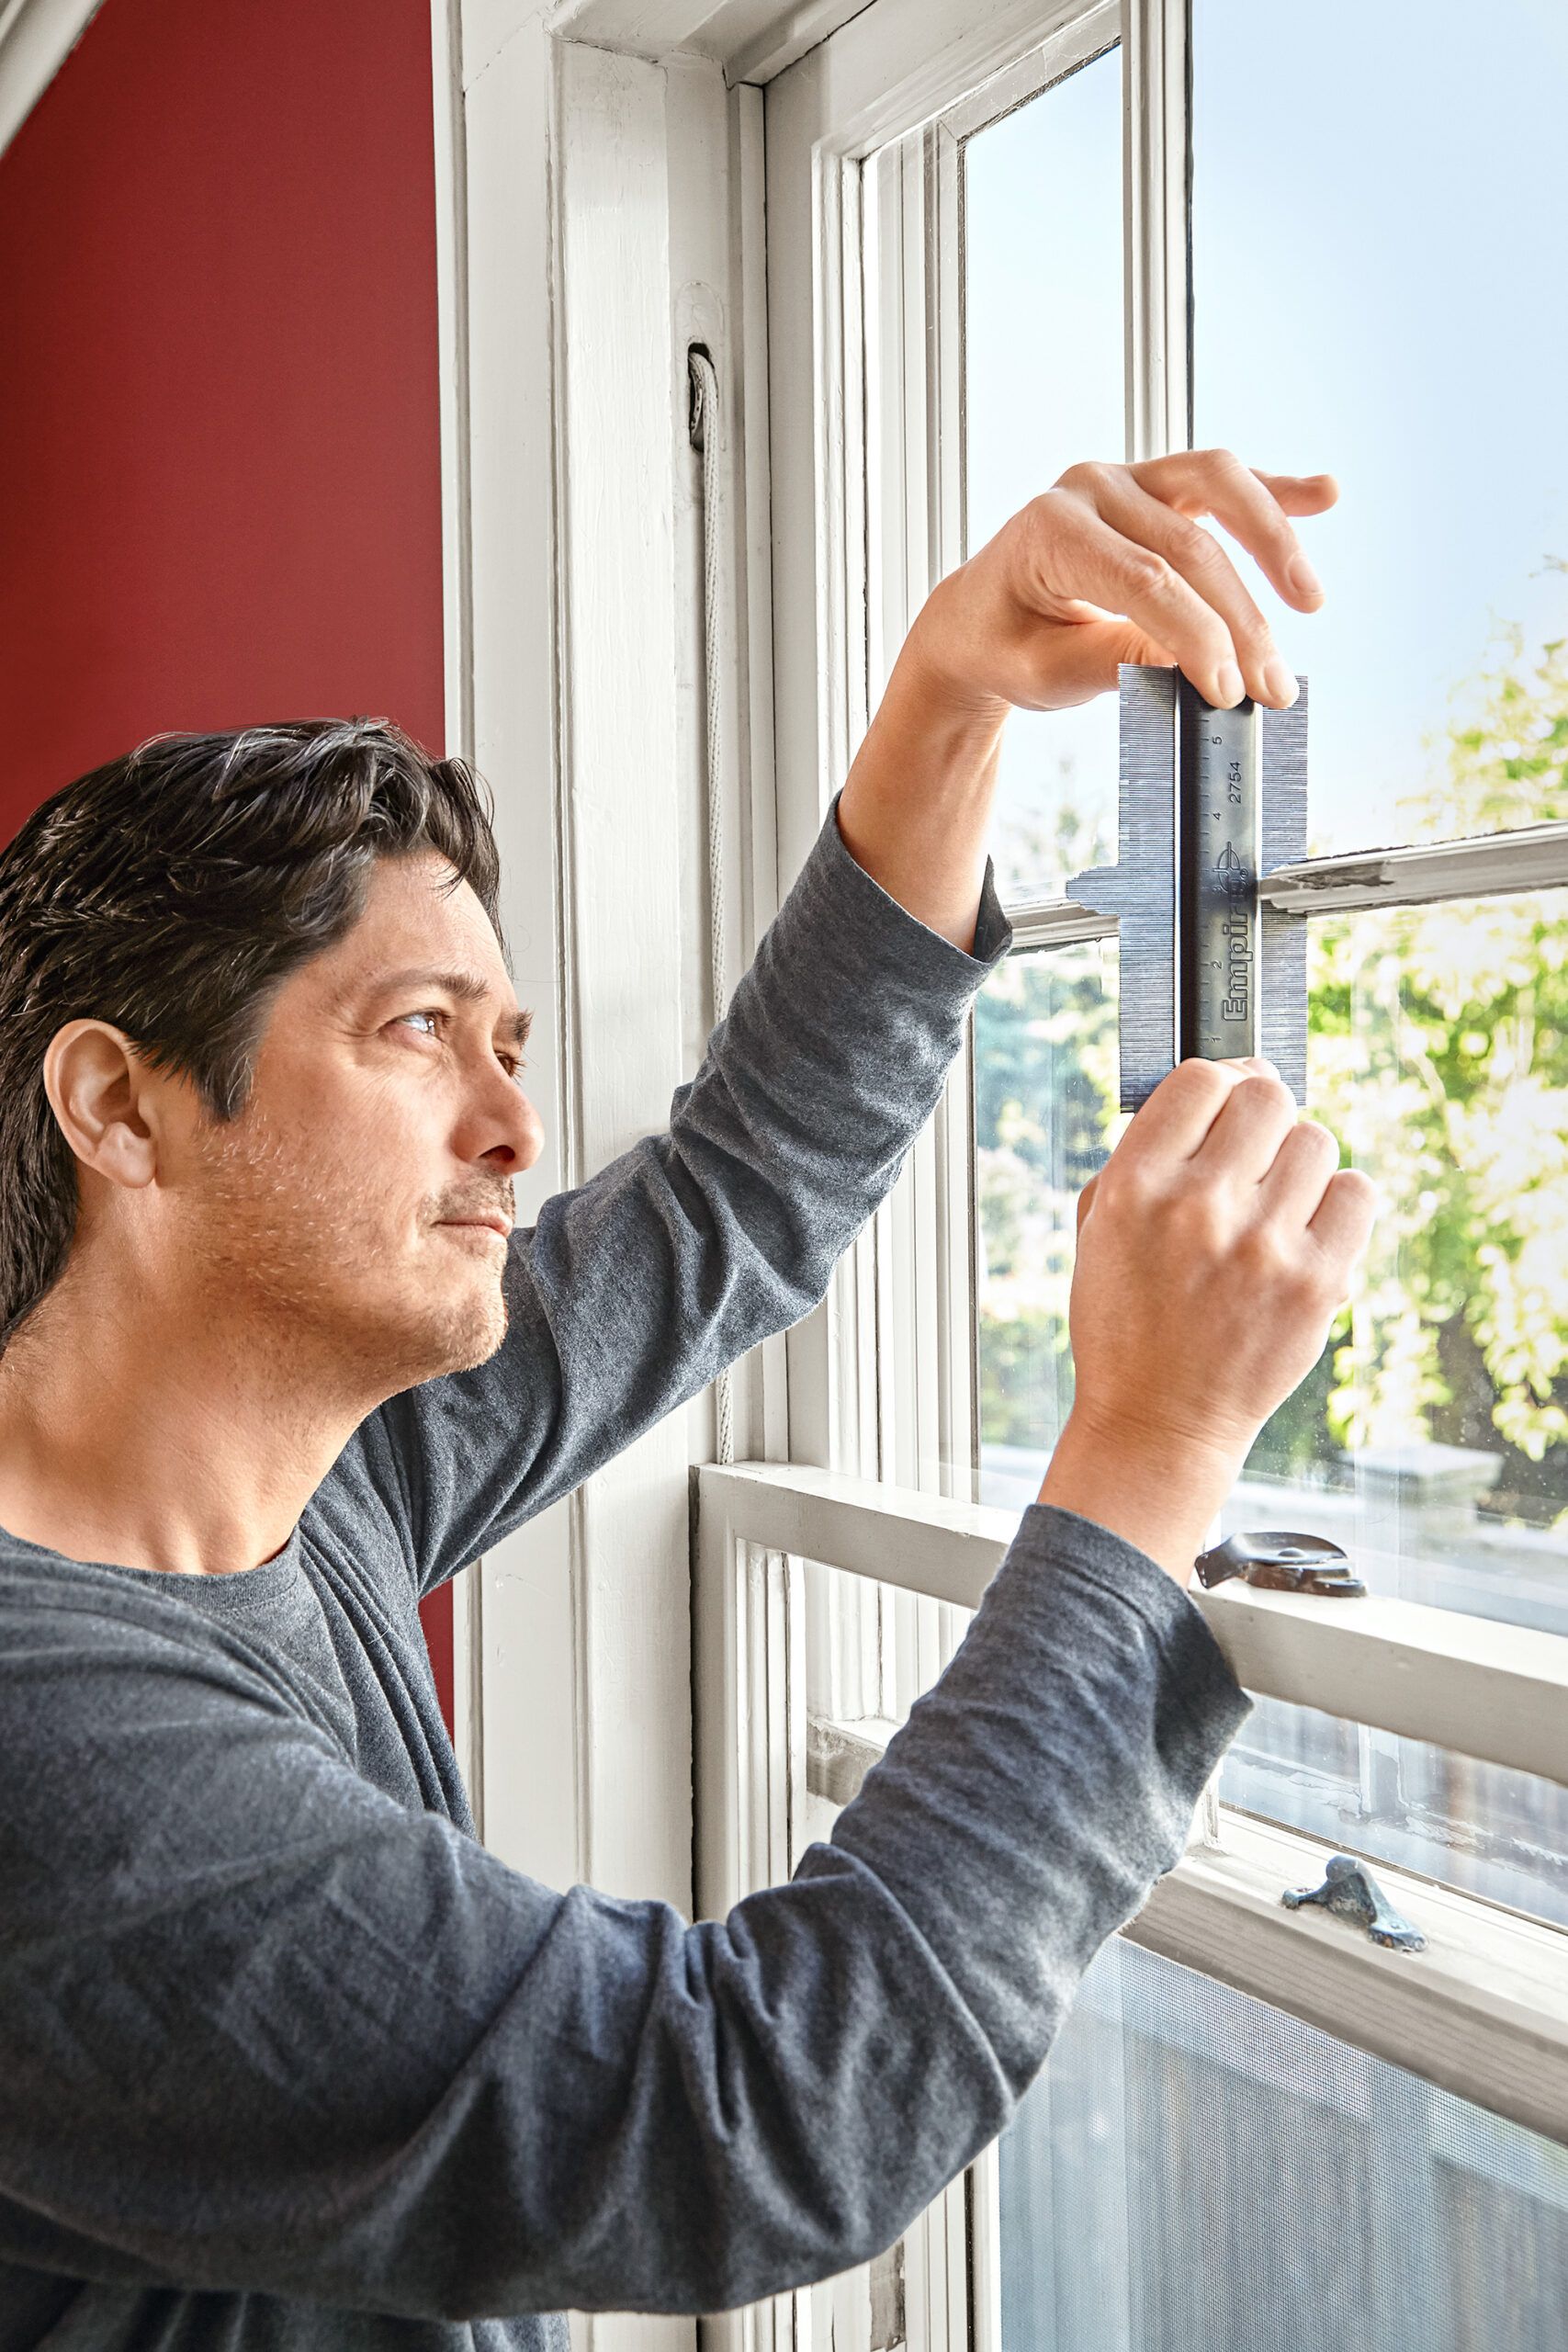
Shown: TOH senior technical editor Mark Powers uses a profile gauge to capture a muntin’s undamaged shape. It’s the first step in repairing the scarred portion to the right of the gauge.
Press a profile gauge against an intact muntin section and the glass, as shown in the image above. The gauge’s metal wires slide creates both a positive and a negative replica of the muntin’s profile, which you can then use to make a molding template.
Step 2
Trace the Profile
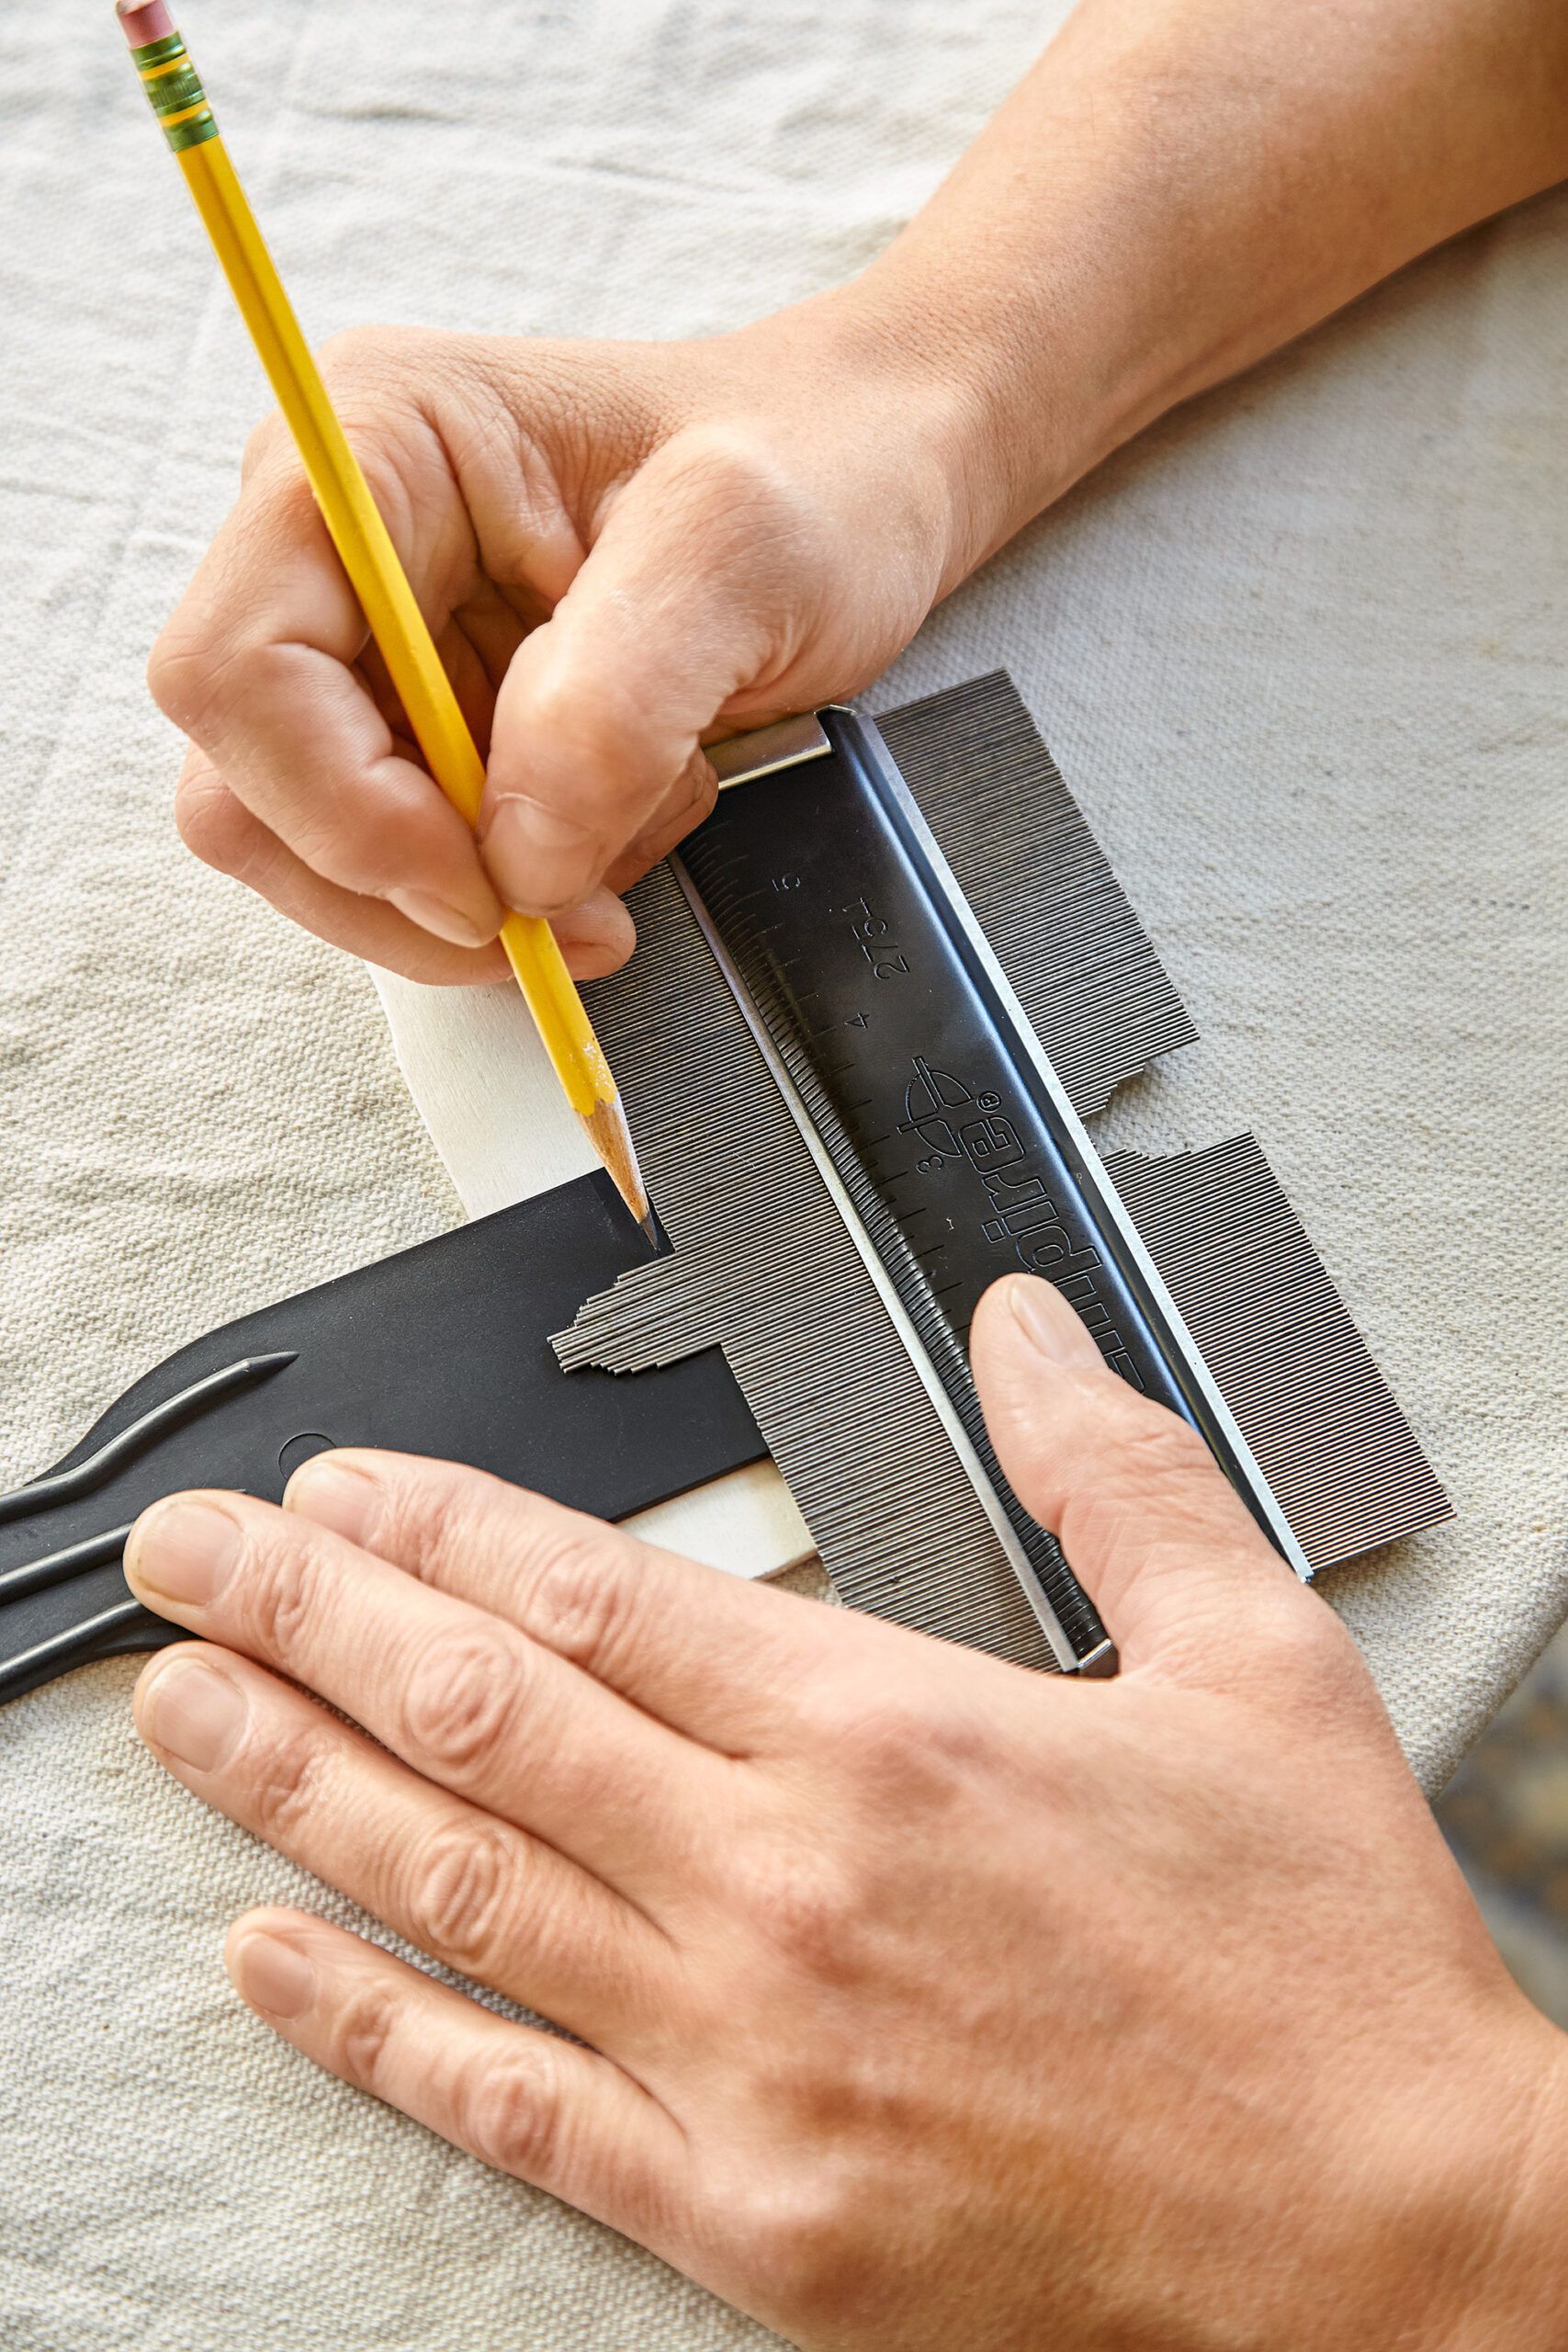
Place the side of the gauge with the positive profile on a plastic scraper. Line up the edge of the scraper’s blade with the wires that rested against the glass and trace the profile onto the blade face, as shown. Note: If the damage only affects one side of the muntin, trace a partial profile in a corner of the scraper blade.
Step 3
Cut Out the Scraper
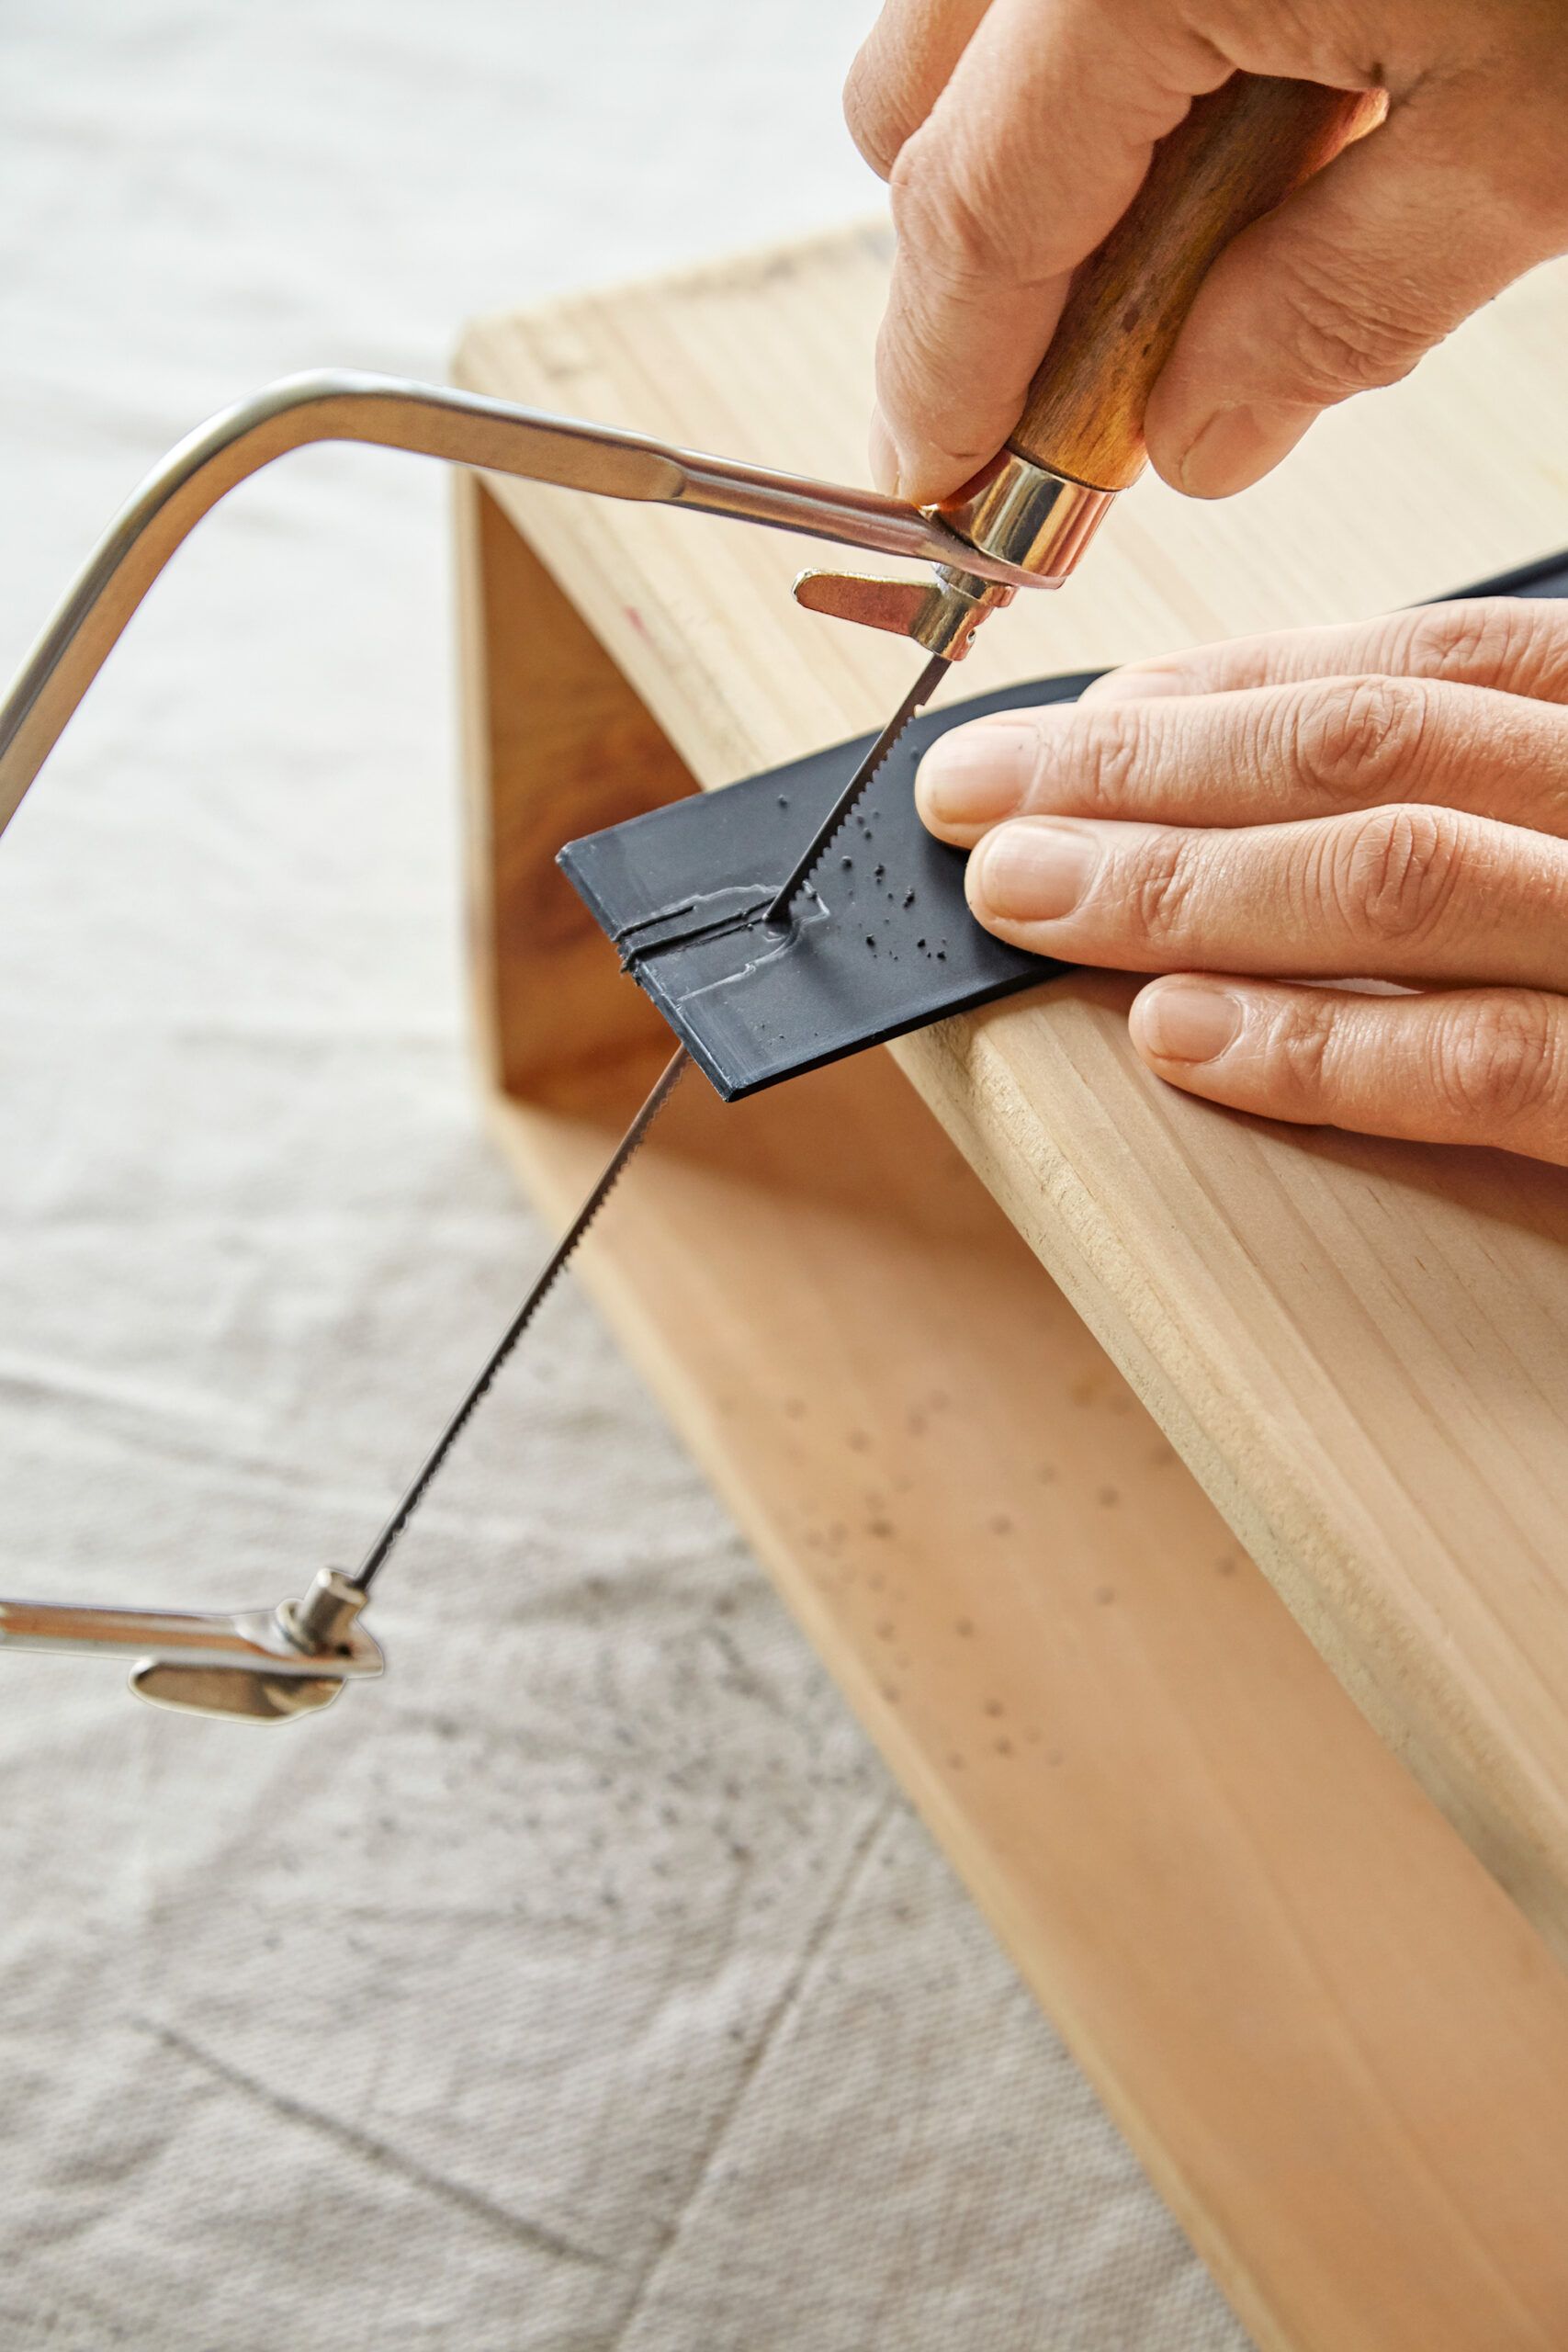
Use a coping saw to cut away the waste plastic inside the traced line. Then, fine-tune the freshly cut edges with a triangular slim-taper file. Check your work by placing the cutout over a muntin that hasn’t been damaged.
Step 4
Mix the Epoxy
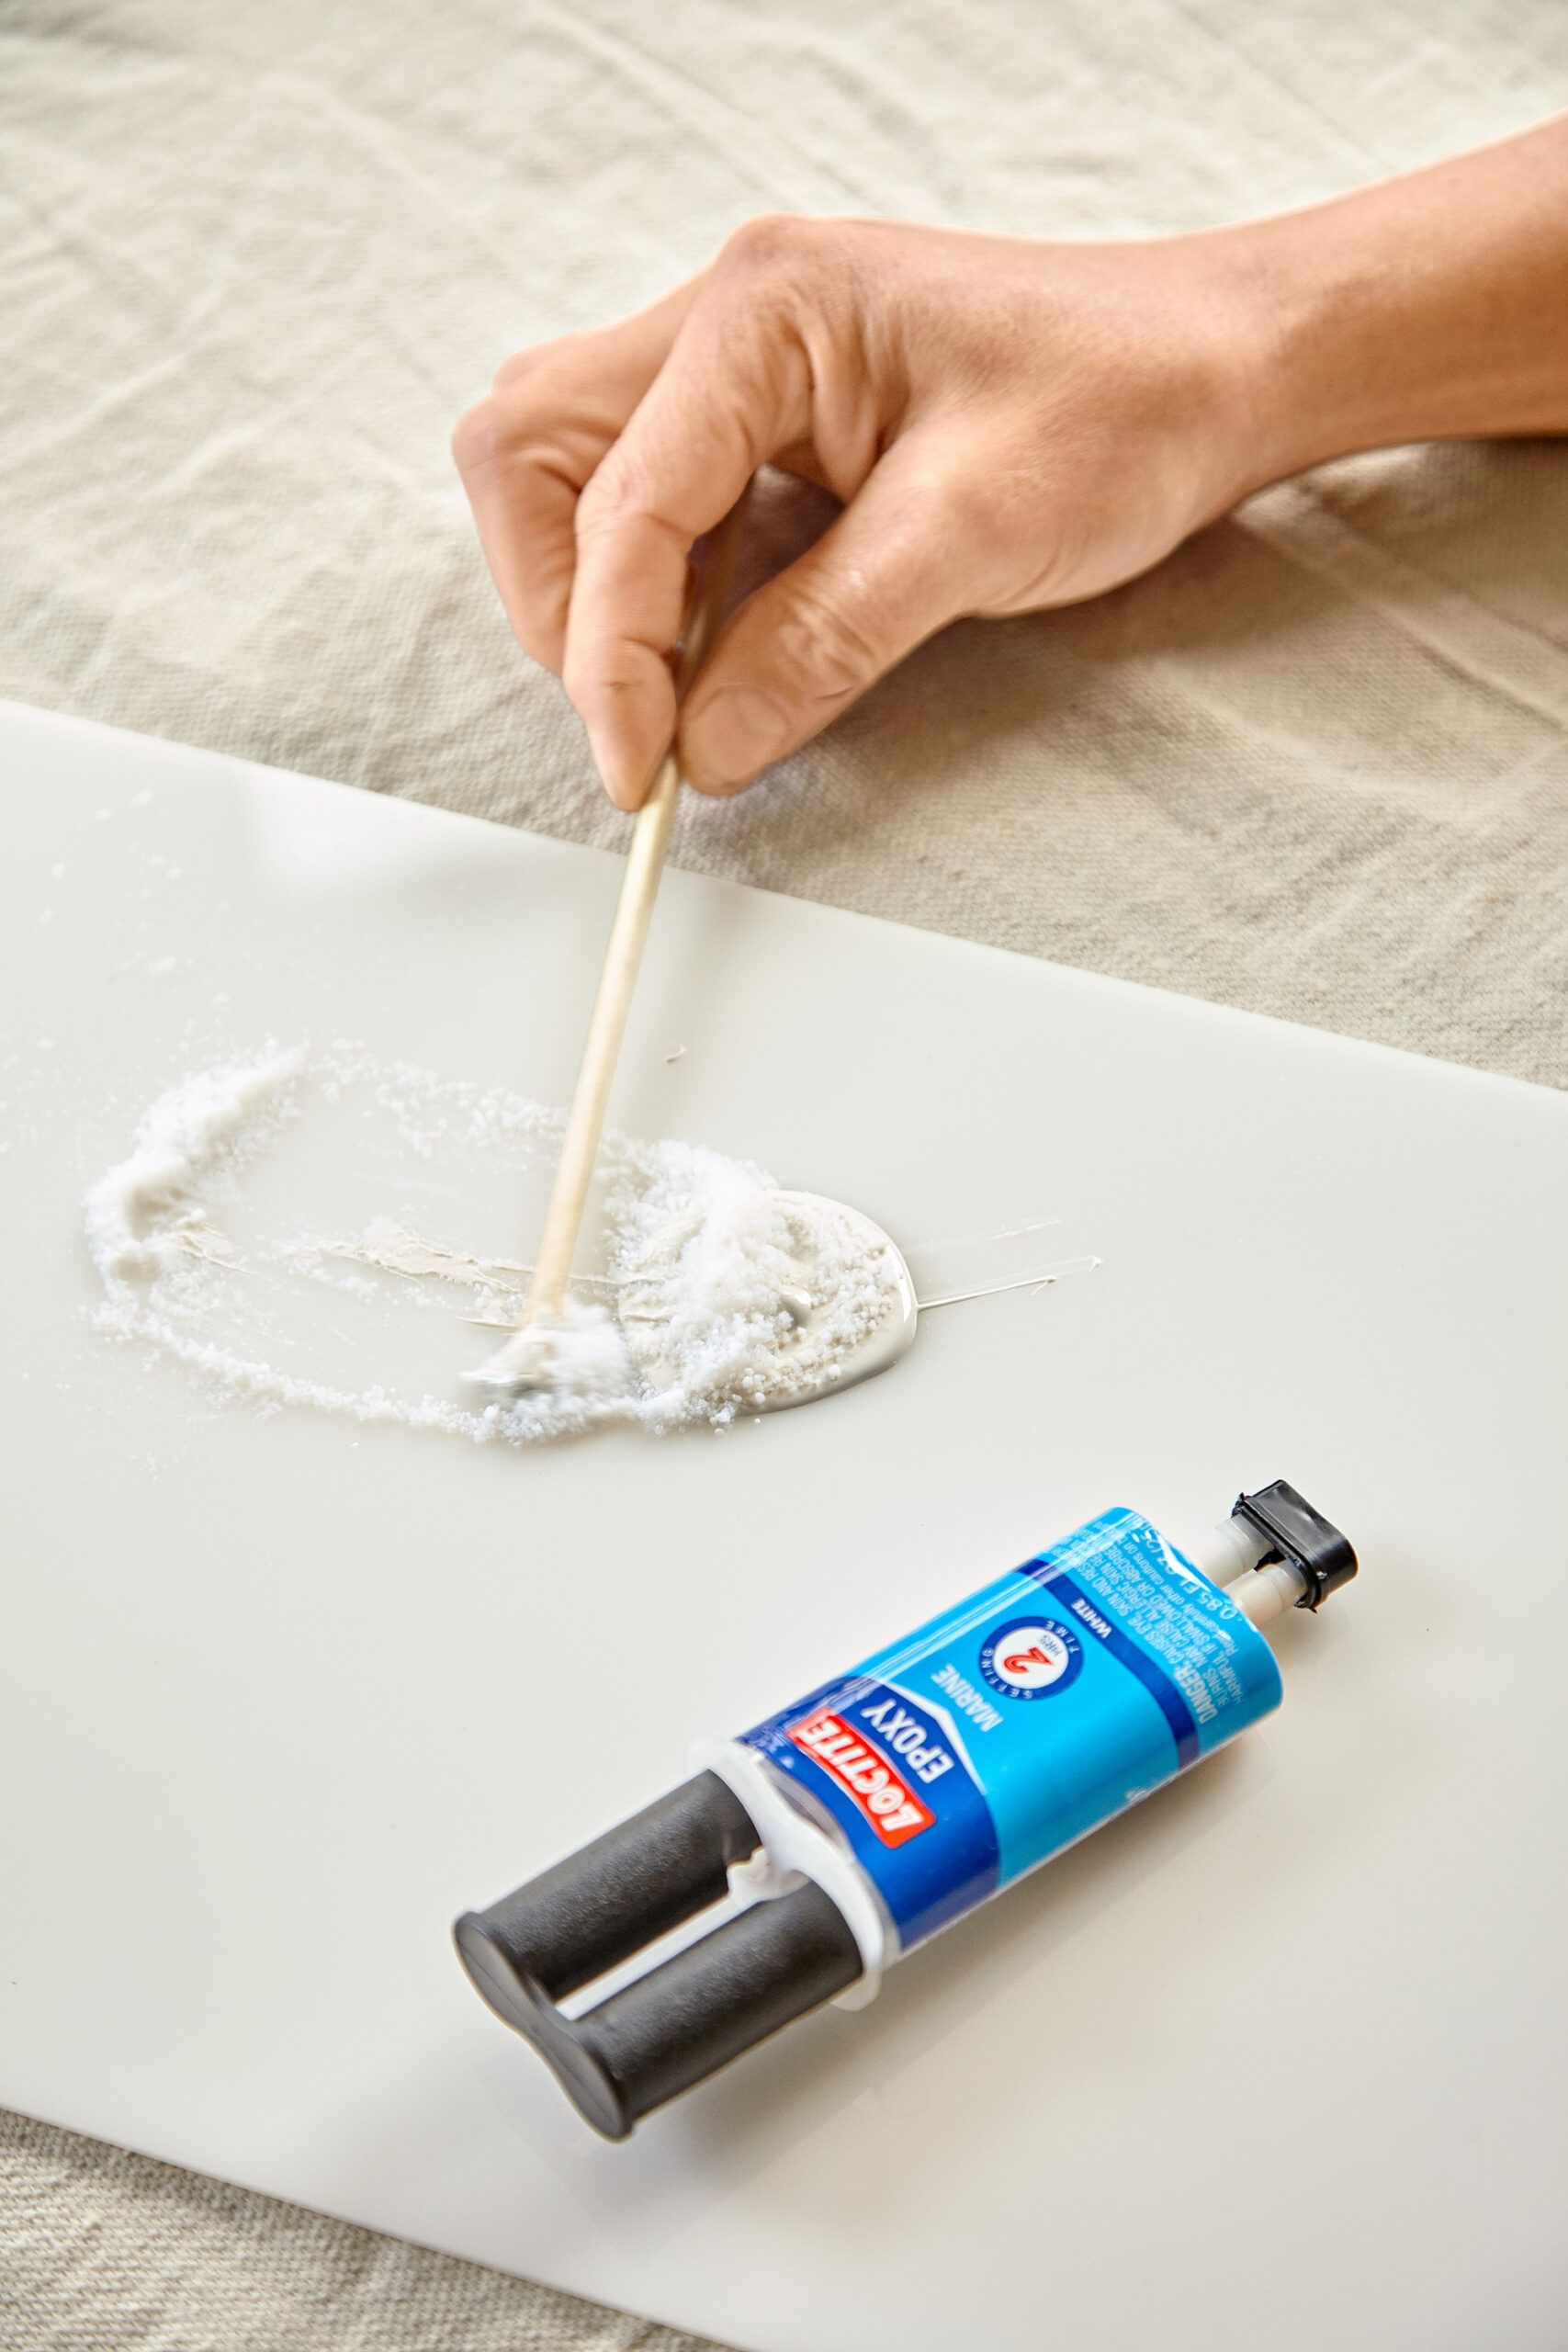
Squeeze the epoxy’s two components—resin and hardener—onto a plastic sheet and blend them with a stick for at least one minute.
Next, stir talcum powder into the epoxy until it becomes stiff enough to hold its shape.
We’ve included detailed instructions for creating the best epoxy mixture in the Tips for Thickening Your Epoxy section below.
Step 5
Shape the Epoxy
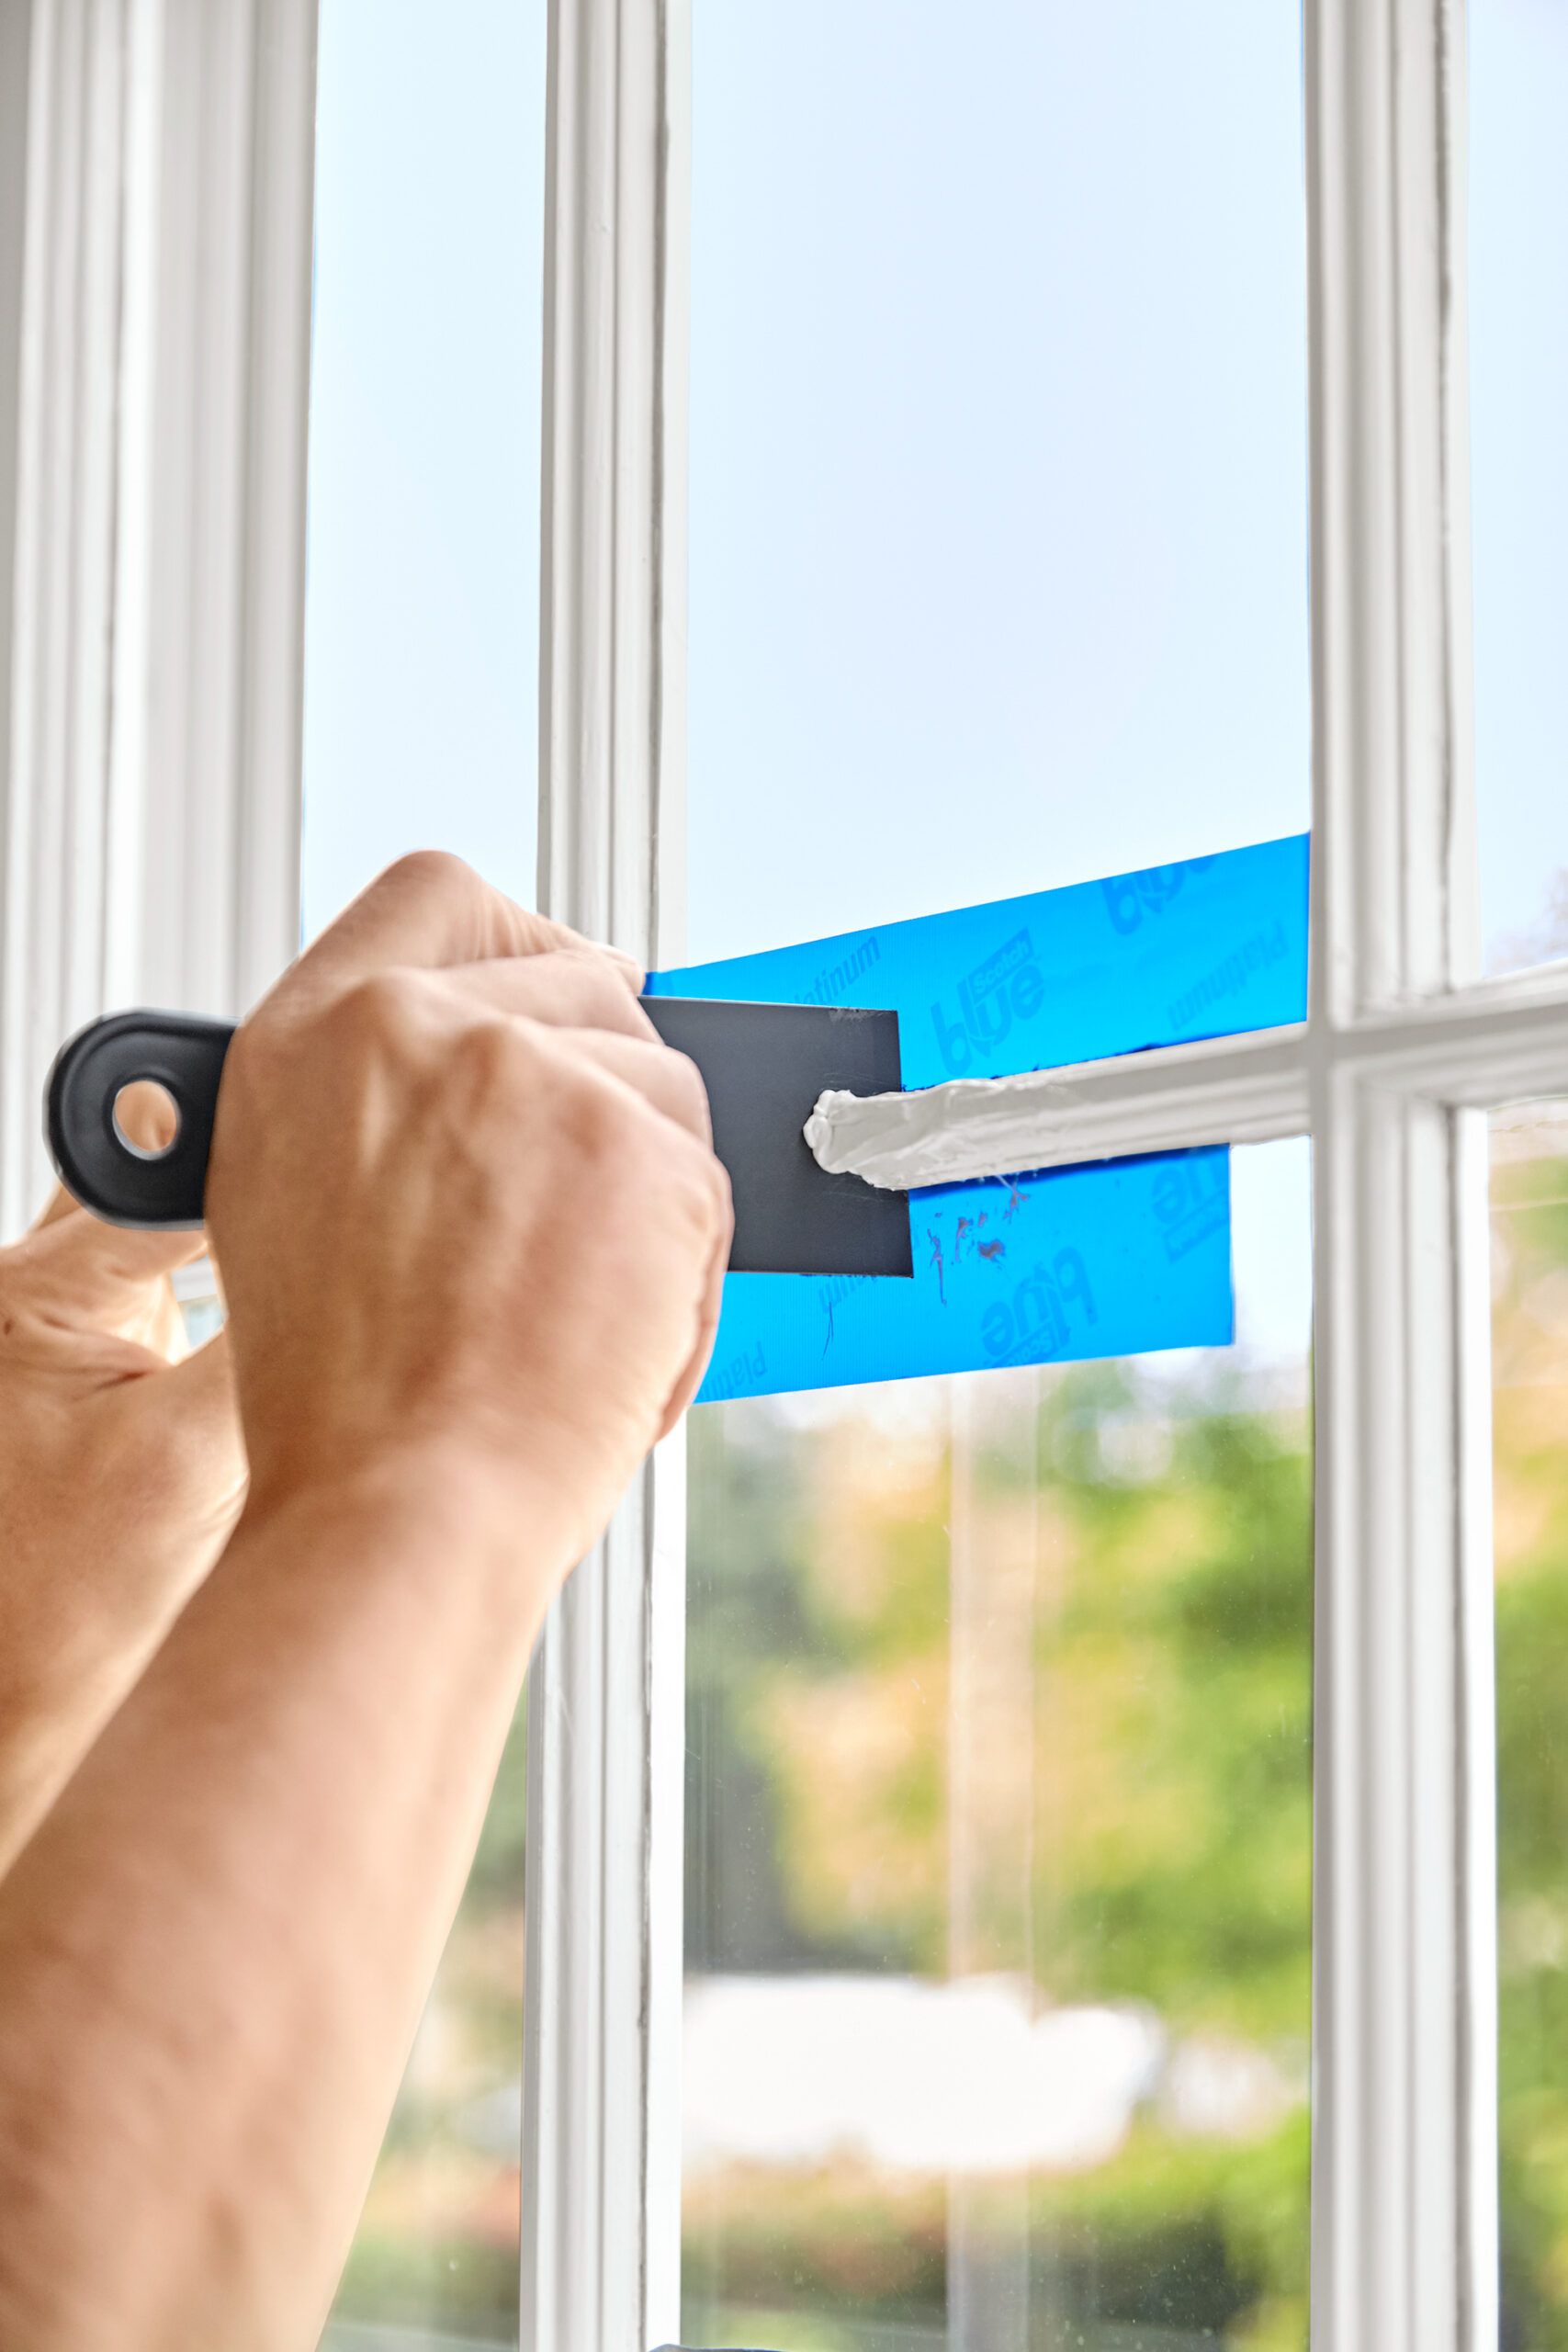
Protect the glass on both sides of the muntin with strips of painter’s tape.
Using an intact scraper, apply the epoxy to the damage.
Then, place the cutout scraper over the muntin and, holding the scraper square to the glass, slowly drag it through the epoxy. You may need to make a few such passes and add more epoxy to get a clean profile.
After each pass, remove any excess epoxy from the scraper and wipe it clean with a rag dampened with white vinegar.
Step 6
Sand
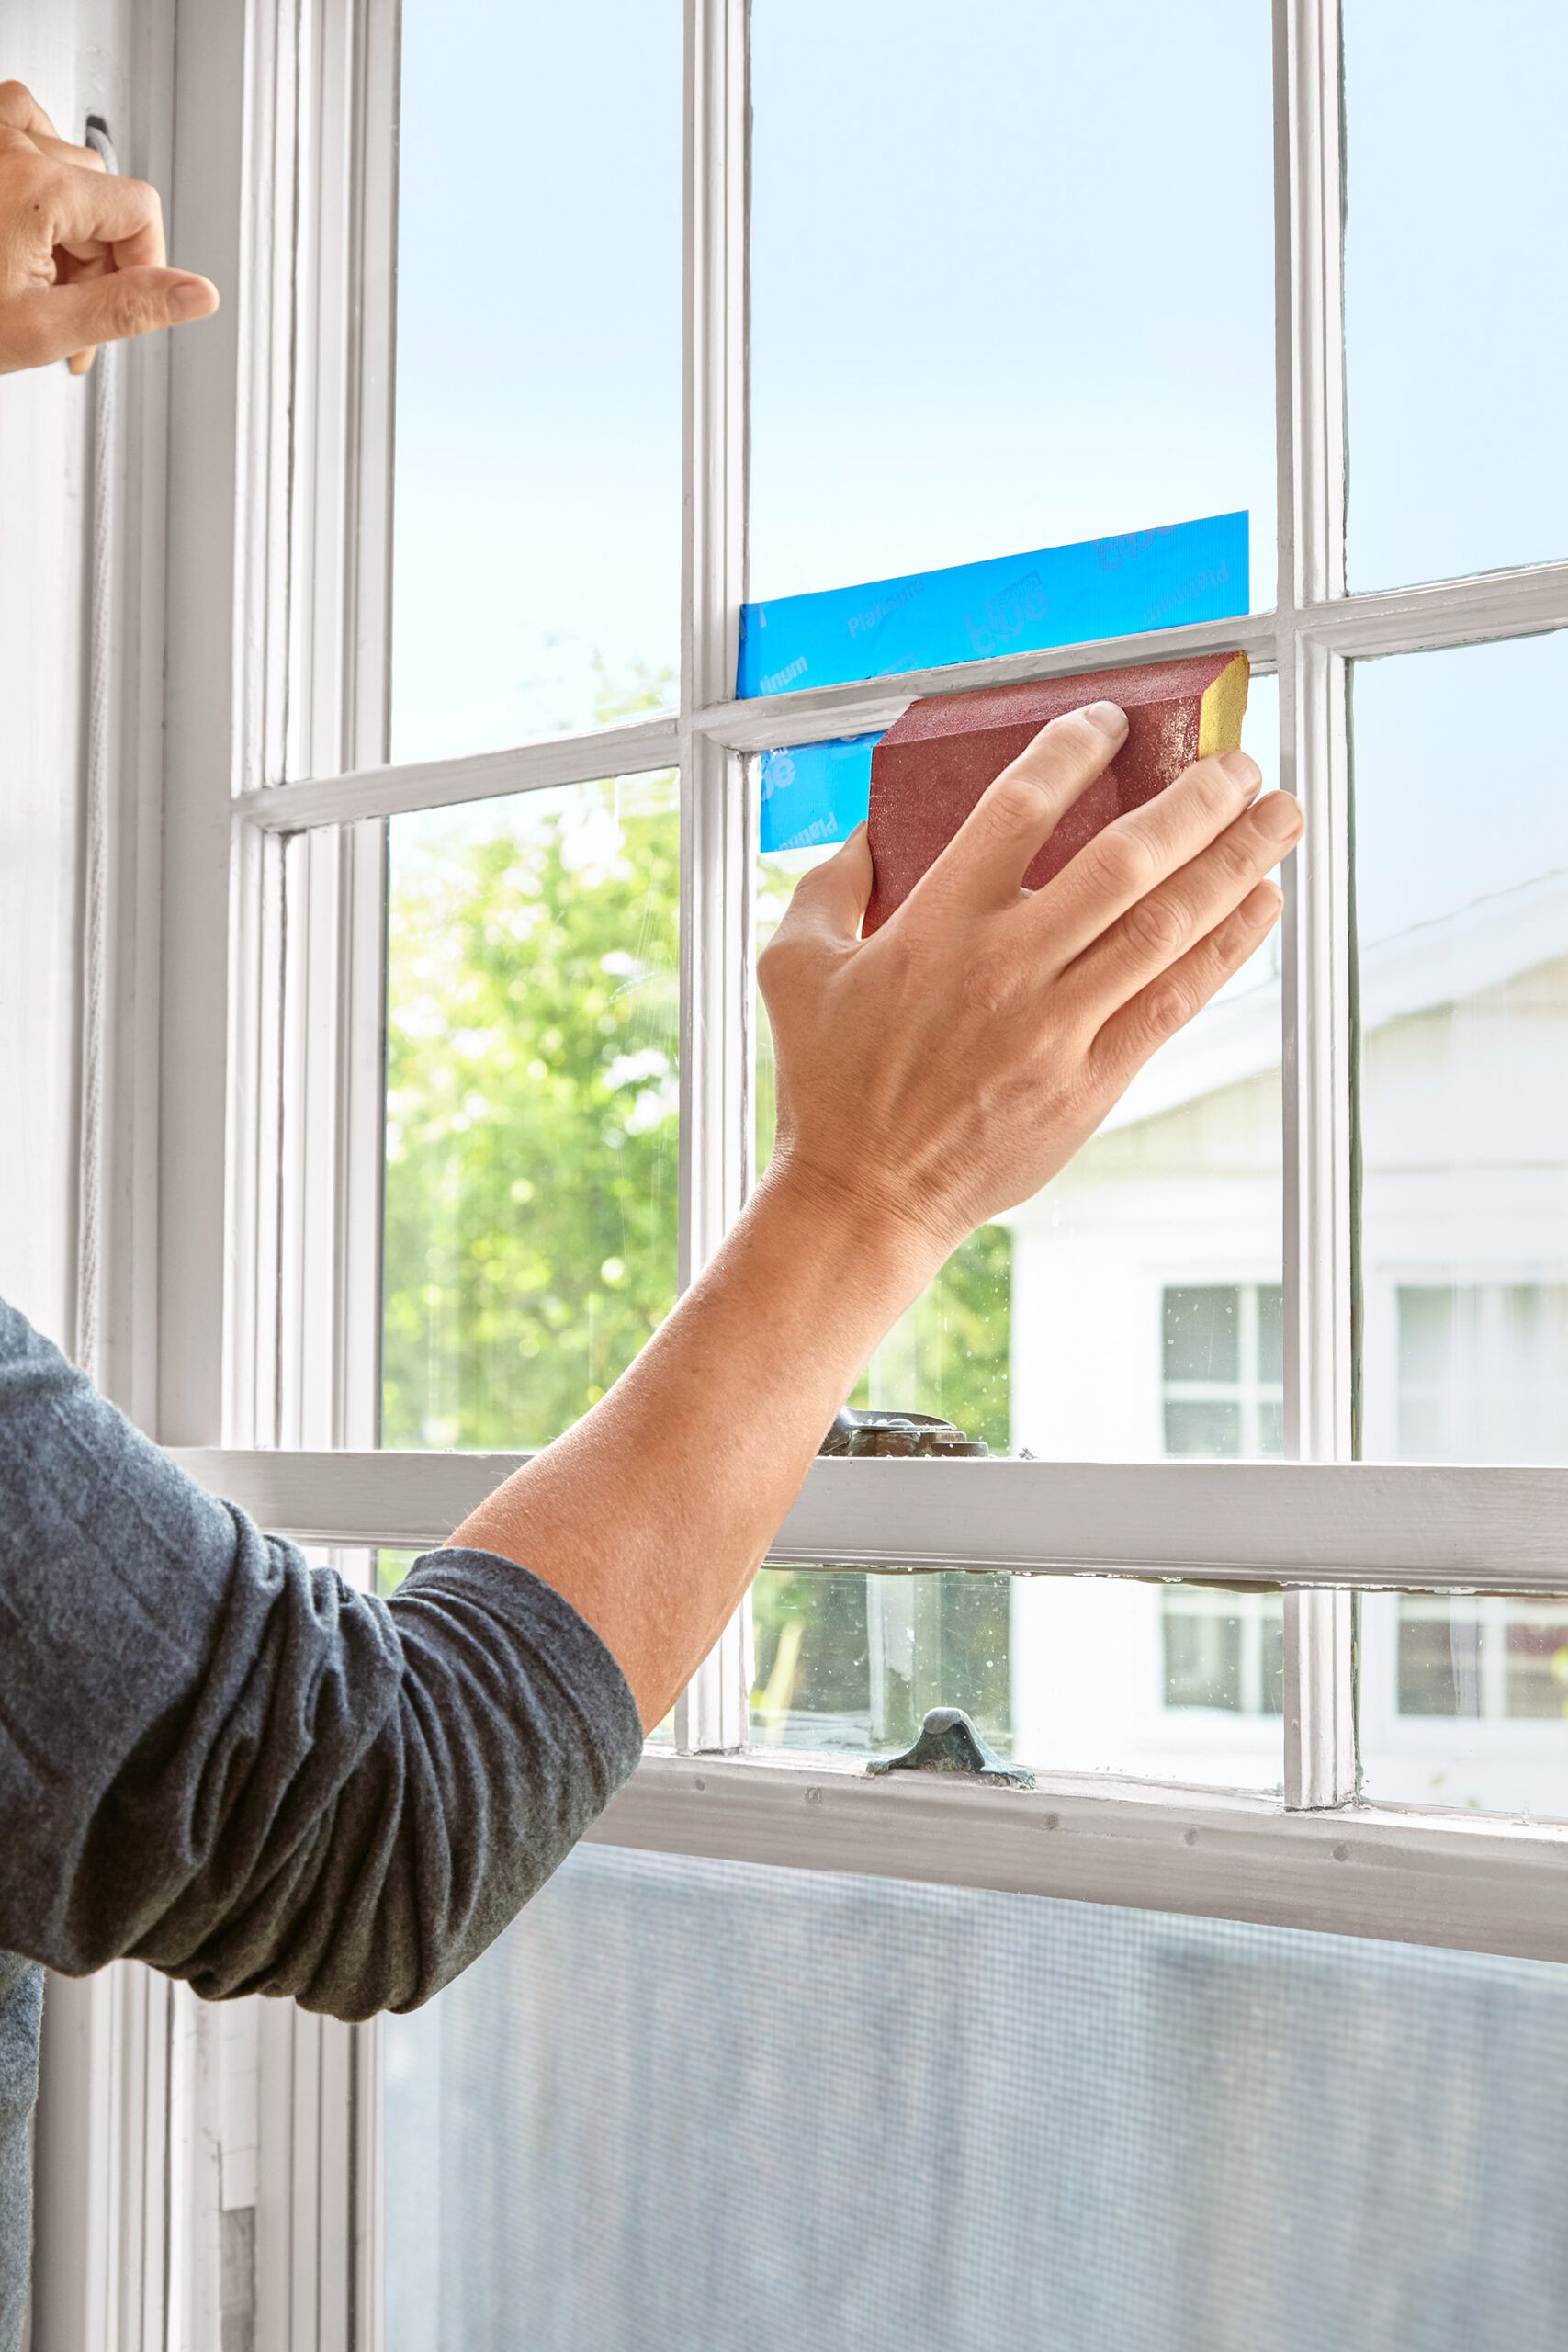
When the epoxy hardens, use a fine-grit sanding sponge to smooth it flush with the undamaged profile.
Step 7
Paint

The next day, wipe the muntin and cured epoxy with denatured alcohol and a clean rag.
Brush on an oil-based primer, followed by a top coat or two.
Remove the tape before the last coat dries completely.
Tips for Thickening Your Epoxy
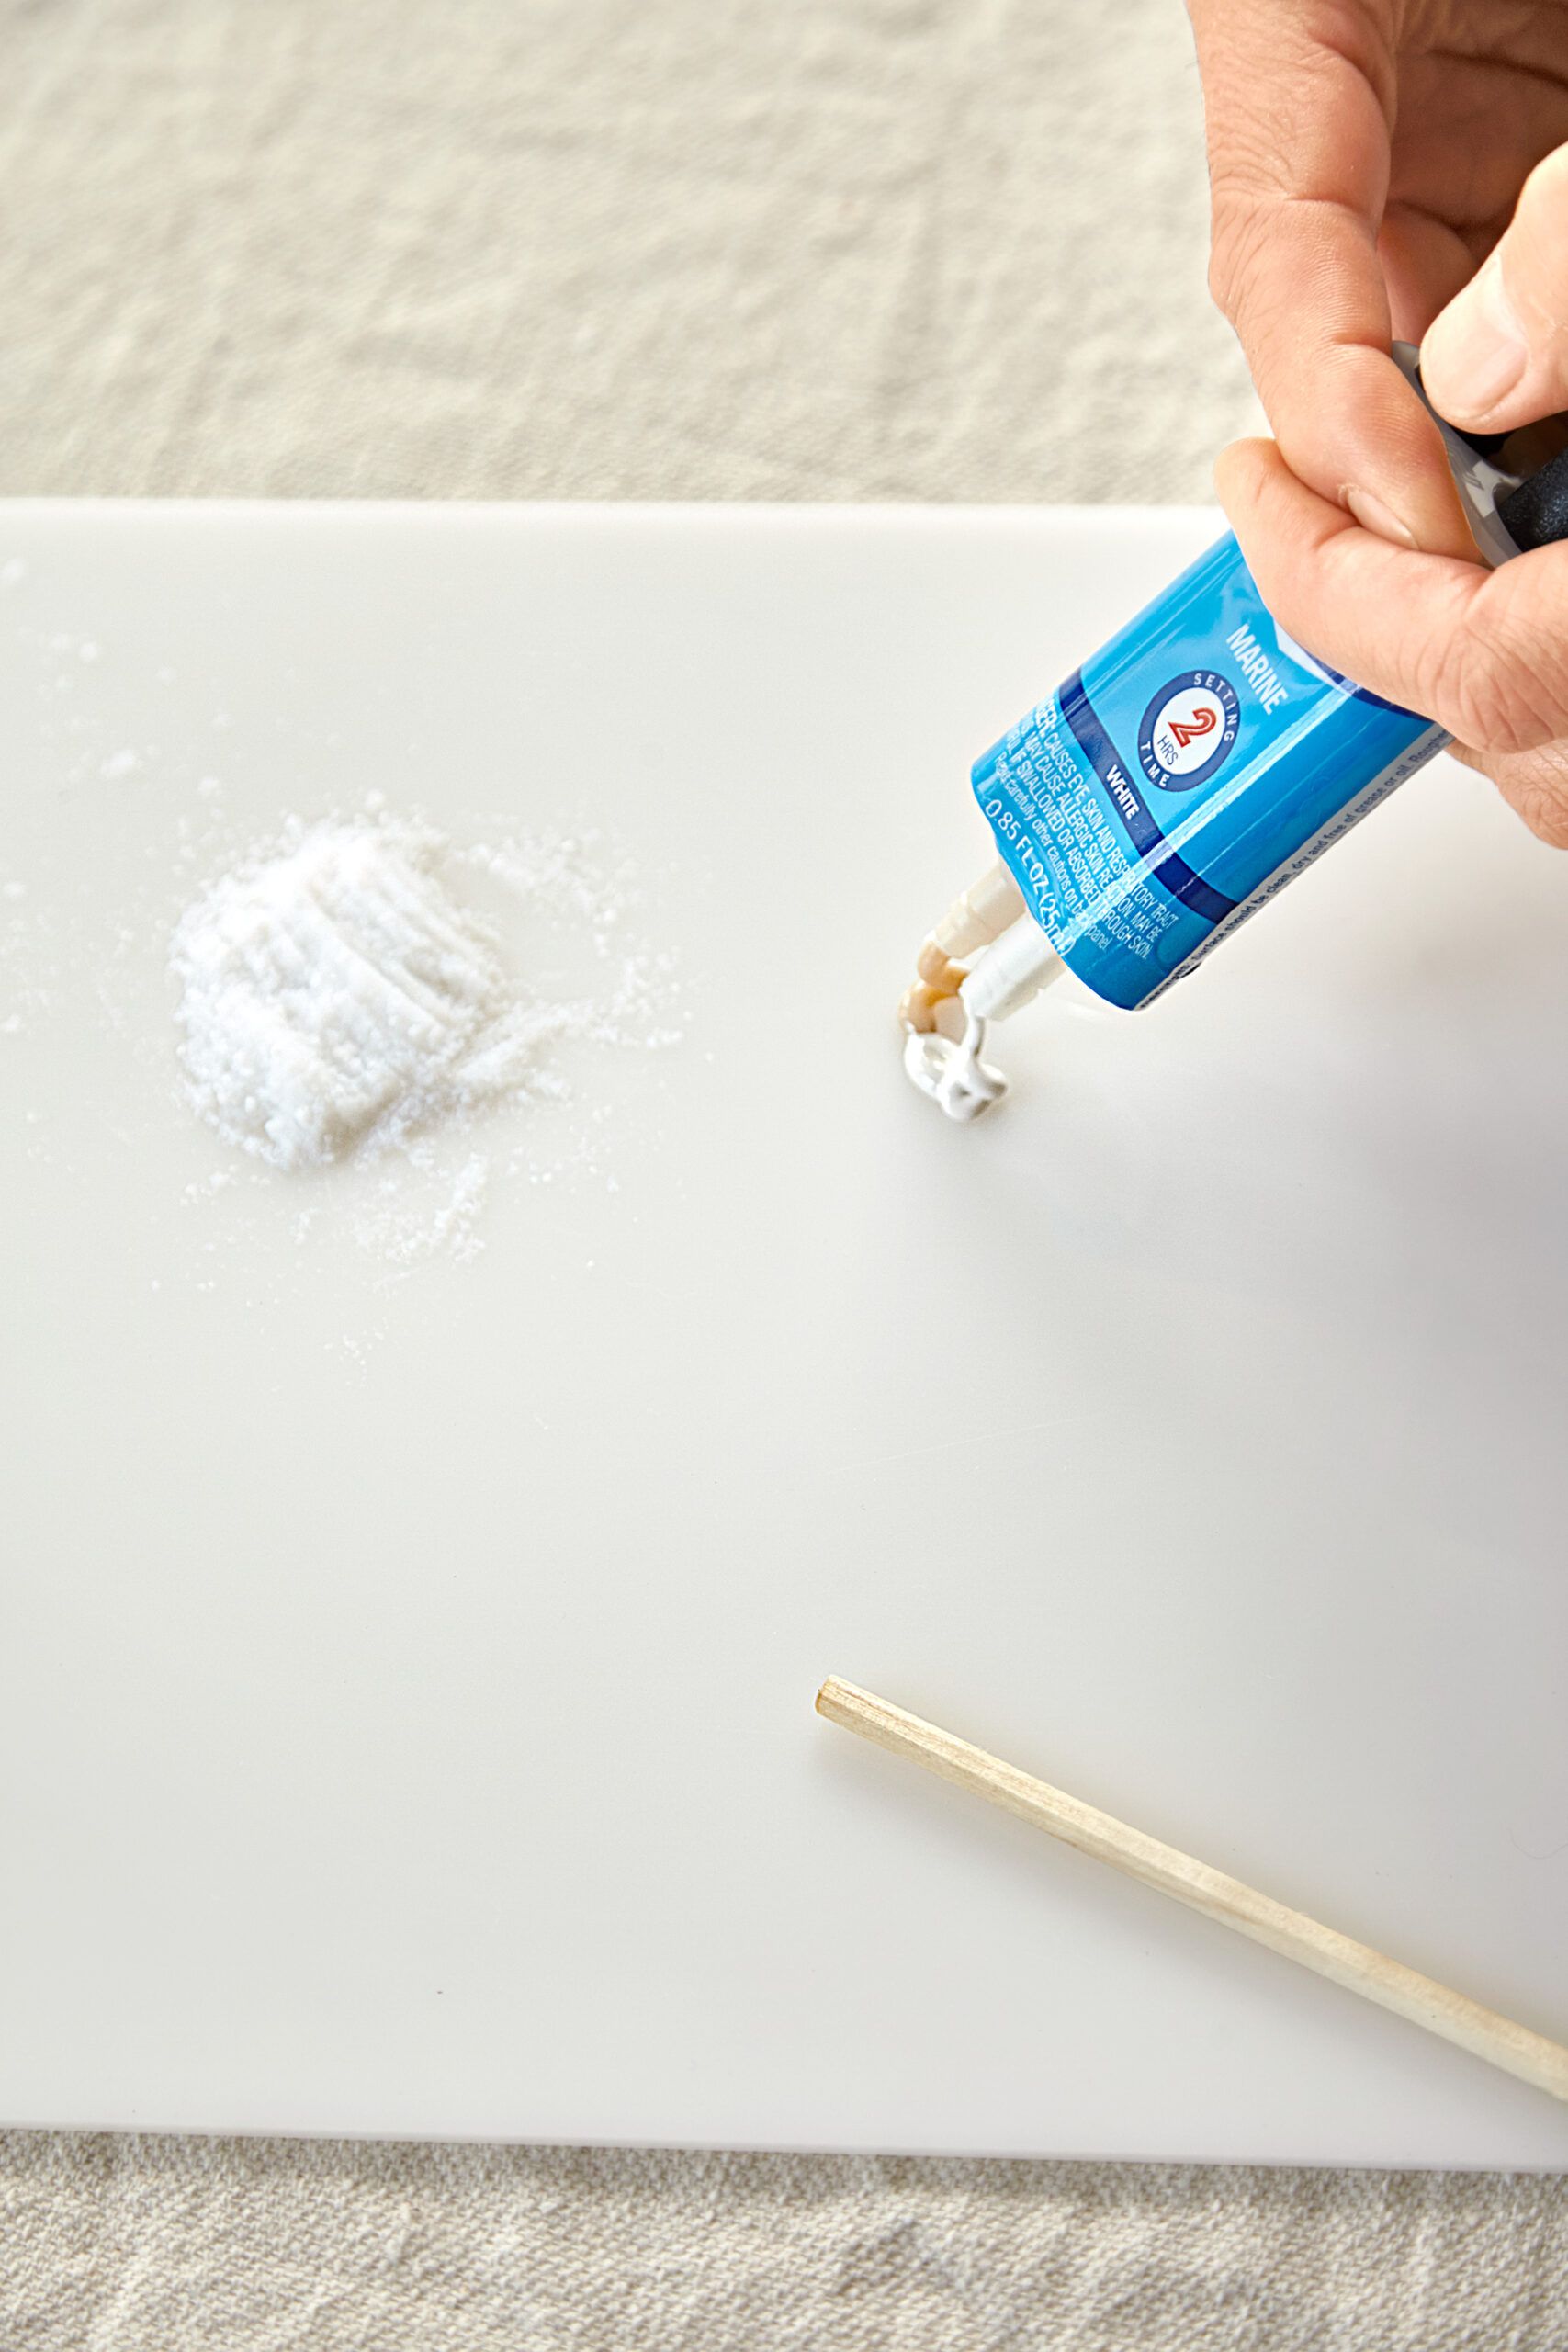
The secret to making this kind of repair is to use a slow-setting epoxy, one with a working time of 30 minutes or more. Using a slow-setting epoxy allows you to sculpt it to match the existing muntin profile before the epoxy turns rock-hard and becomes difficult to shape.
Most epoxies are too runny for this kind of repair—they usually require a thickening agent, such as talc (shown in the image above). Once you have mixed the two epoxy components together, blend in the powder, starting with less powder than you need. Gradually add and blend in more powder until the compound reaches a firm consistency similar to creamy peanut butter.
Now, you can proceed with the fix.
Preventive Measures for Future Window Muntin Damage
Taking steps to prevent future damage can save you time and effort in the long run. Here are some tips to keep your wood windows and muntins in top condition.
Proper Window Maintenance
Regular maintenance can help prevent many common issues. You should do the following:
- Clean windows and muntins regularly with a mild soap solution.
- Inspect windows annually for signs of wear or damage.
- Reapply caulk or weatherstripping as needed.
- Keep wooden muntins properly painted or sealed.
Avoiding Common Causes of Muntin Damage
Be mindful of these potential sources of damage. Ensure you do the following:
- Address any moisture issues promptly to prevent rot in wooden muntins.
- Avoid slamming windows shut.
- Be careful when cleaning or decorating around windows.
- Use caution when operating nearby blinds or curtains.
Comparing DIY Muntin Repair vs. Professional Services
While many homeowners can successfully repair window muntins themselves, there are situations where professional help may be necessary. Consider these factors when deciding whether to DIY or hire a professional.
Pros and Cons of DIY Muntin Repair
Pros:
- Ability to address issues promptly
- Cost-effective for minor repairs
- Satisfaction of completing the project yourself
Cons:
- May not achieve professional-quality results
- Risks causing further damage if done incorrectly
- Time-consuming, especially for inexperienced DIYers
When To Call a Professional
There are certain scenarios when calling a professional might be the best course of action, such as the following:
- The damage is extensive or affects multiple muntins.
- The window has structural issues beyond the muntins.
- You’re dealing with historical or specialty windows.
- You lack the time or tools to complete the repair properly.
Our Conclusion
Repairing a window muntin is a manageable DIY project, but it does require patience and attention to detail. By following the steps outlined in this guide, you can restore the muntins of your window, preserving its character and function.
However, if you’re unsure about tackling the repair yourself or encounter more extensive damage, don’t hesitate to consult a professional. Whether you choose the DIY route or opt for professional services, addressing muntin damage right away will help prevent further issues, like water damage and drafts.