Window trim is important to any home’s interior and exterior design. It enhances the appearance of windows and serves functional purposes. Whether you’re a homeowner looking to update your windows or simply curious about the intricacies of window trim, this article will provide valuable insights.
Types of Window Trim and Costs
Window trim comes in various styles and materials and is suitable for interior and exterior applications.
Interior Window Trim
Interior window trim often includes features that add character to the home. Styles range from simple and modern to ornate and traditional, allowing homeowners to customize their windows to match their interior design preferences. For example, in historic homes, the trim may feature intricate carvings that reflect the period’s craftsmanship. Modern homes may pair well with sleeker, more minimalist designs that emphasize clean lines. Read our guide for more detail on how to trim an interior window.
Common materials for interior trim are shown below, with average costs* per linear foot:
- Hardwood: $0.75–$5.50
- Reclaimed wood: $1.25–$12
- Medium-density fiberboard (MDF): $0.60–$7
- Polyurethane: $2–$6
*Cost data in this article sourced from contractor estimates used by Angi.
Exterior Window Trim
Exterior trim often incorporates additional elements, such as drip caps and sills, to direct water away from the window and protect the home’s structure. The design of the exterior trim can also complement other architectural features, like cornices and facades.
Popular materials for exterior trim are listed below, with average prices per foot:
- Vinyl: $0.80–$30
- Fiber cement: $0.70–$5.50
- Cellular PVC: $0.50–$5
- Wood: $1–$10
Window Trim Components
What’s referred to collectively as “window trim” can be broken down into its various components. Using our illustrations, we take a detailed look at each aspect of window trim.
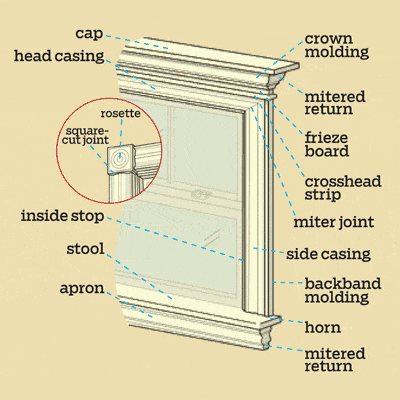
The Crown
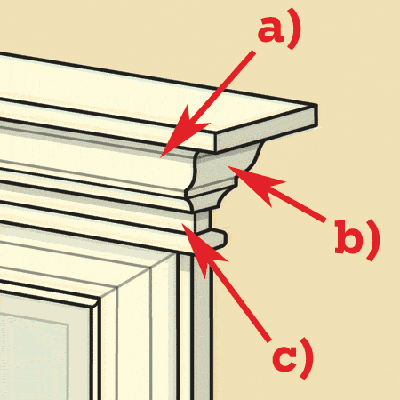
The crown can be broken down into three components:
a) Crown molding: Angles out from the wall at the top of the window, adding dimension lacking in flat stock. Together with frieze board and cap, this makes up entablature, a feature found in classical house styles, such as Georgian, Federal, and Greek Revival.
b) Mitered return: Covers the end grain as it carries profile to the wall.
c) Frieze board: Serves as a base for attaching the crown molding and cap. Its ends line up with the outside edges of the casing.
The Top Corner
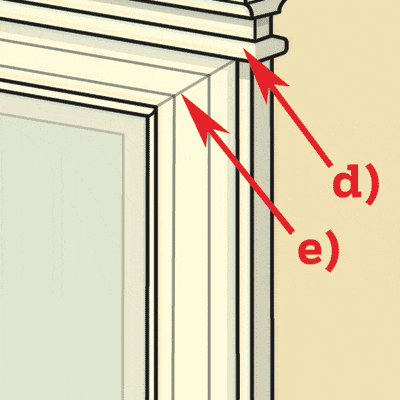
The top corner has two aspects, each with its own purpose:
d) Crosshead strip: Provides transition between the head casing and frieze board.
e) Mitered return: Covers end grain as it carries profile to the wall.
The Side Casing
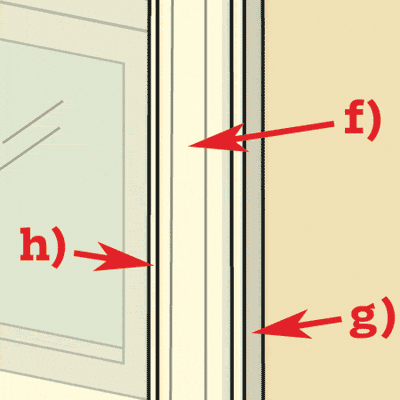
The side case helps ensure the molding looks great from every angle:
f) Side casing: Covers the gap between the side of the window frame and wall.
g) Backband molding: Adds depth and width to the outside edges of the casing. L-shaped to fit neatly over corners.
h) Inside stop: Holds sash in the window opening. Removing stops allows the sash to be taken out for repair.
The Bottom Corner
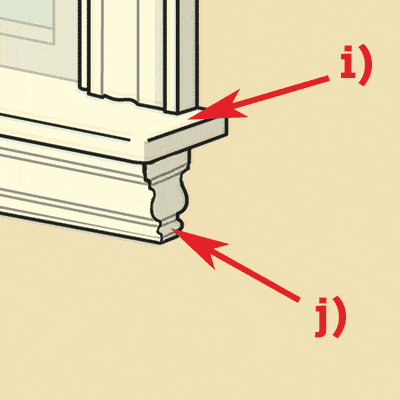
Before we get to the windowsill, let’s look at the bottom corner:
i) Horn: Extends stool past casing and apron by 1 to 2 inches.
j) Mitered return
The Windowsill
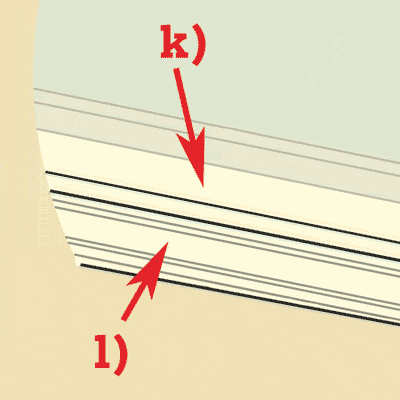
More than just a place to set a plant, the windowsill is functional on several levels:
k) Stool: Hides gap between the bottom edge of the lower sash and the top of the windowsill outside.
l) Apron: Provides visual support for stool. The ends line up with the outside edges of the casing. Aprons with a profile require mitered returns.
The Top
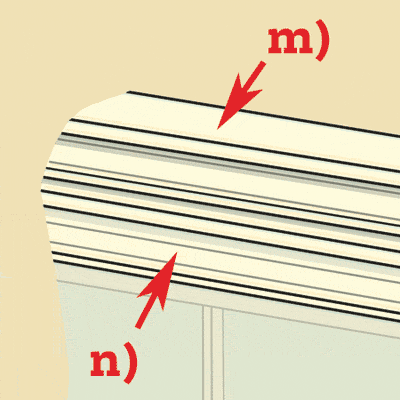
Even the crown may receive a topper:
m) Cap: Covers the top of the crown.
n) Head casing: Covers the gap between the top of the window frame and the wall.
The Square Cut Miter
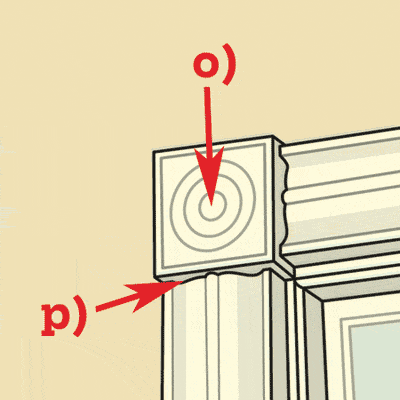
In many Victorian-era, Craftsman, and Colonial Revival homes, casing ends are cut square, then butted against either adjacent casing edges or corner rosettes, which are separate blocks slightly thicker and wider than casing stock. For this joint to work, casings must be symmetrical, not tapered.
o) Rosette
p) Square-cut joint
Choosing the Right Window Trim Style
Consider your home’s architectural style and personal preferences when choosing your window trim.
Classical Styles
Classical window trim styles, often found in Georgian, Federal, and Greek Revival homes, typically feature:
- Elaborate crown molding
- Wide casings
- Decorative friezes
- Ornate capitals and bases
These styles emphasize symmetry and proportion, often incorporating elements inspired by ancient Greek and Roman architecture.
Victorian and Craftsman Styles
Victorian-era and Craftsman homes often feature distinct trim styles:
- Victorian: Ornate, with intricate details and sometimes painted in contrasting colors
- Craftsman: Simple and sturdy, often with broad, flat casings and visible joinery
In many Victorian-era, Craftsman, and Colonial Revival homes, casing ends are cut square and butted against either adjacent casing edges or corner rosettes. These rosettes are separate blocks slightly thicker and wider than the casing stock.
Victorian styles are often vibrant and extravagant, while Craftsman styles focus on handmade quality and natural materials. Each style offers unique charms and appeals to different tastes.
Modern and Contemporary Styles
Modern and contemporary window trim styles tend to be minimalist, featuring:
- Clean lines
- Simple profiles
- Minimal ornamentation
These styles often prioritize function over decoration, with trim that blends seamlessly into the wall or window frame.
How To Install Window Trim
Installing window trim can be a rewarding do-it-yourself project for those with some carpentry experience. However, it’s important to approach the task with the right tools and knowledge.
Tools and Materials Needed
To install window trim, you’ll need:
- Miter saw
- Tape measure
- Level
- Nail gun or hammer
- Caulk gun
- Wood filler
- Sandpaper
- Paint or stain
General Installation Process
- Measure the window opening and cut the trim pieces to size using a miter saw for angled cuts.
- Install the sill and apron first, ensuring they’re level.
- Attach the side casings, checking for plumb–a feature or line that is perfectly vertical–as you go.
- Install the head casing, making sure it’s level and properly aligned with the side casings.
- Add any additional decorative elements, such as crown molding or backband.
- Fill nail holes with wood filler and sand smooth once dry.
- Caulk gaps and paint or stain as desired.
For a more detailed guide on trimming out a window, you can refer to our step-by-step window trim installation guide.
Maintaining and Repairing Window Trim
Regular inspections and prompt repairs preserve your trim’s functionality and appearance.
Common Issues
Some common window trim problems include:
- Rot or decay (especially in wood trim)
- Peeling paint
- Gaps or separation from the wall
- Warping or cracking
Repair Techniques
For minor issues:
- Sand and repaint peeling areas
- Fill small cracks or gaps with wood filler or caulk
- Tighten loose trim with finishing nails
For more severe damage, you may need to replace sections of trim.
Window Trim vs. Other Home Trims
While window trim shares some similarities with other types of home trim, there are distinctions.
Comparing Window Trim to Baseboard
Baseboard trim runs along the bottom of interior walls, while window trim surrounds windows. Both serve decorative purposes—and baseboard trim also protects walls from scuffs and damage. Window trim, however, plays a more significant role in weatherproofing and energy efficiency.
Baseboards often have different profiles and may be more expansive to shield walls effectively. Coordinating baseboards and window trim aesthetically can create a unified look throughout your home.
Differences Between Window Casing and Trim
The terms “window casing” and “window trim” are often used interchangeably, but there is a subtle difference. Window casing refers to the flat, wide boards that frame the window opening. Window trim is a broader term that includes the casing as well as additional decorative elements like crown molding, aprons, and stools.
Window Trim: Our Conclusion
Whether considering a do-it-yourself installation or hiring a professional, remember that quality materials and proper installation provide a long-lasting, beautiful window trim. By paying attention to details and choosing the right style, your window trim can provide lasting value and elevate the look of your entire home.