Project details
Skill
Cost
Estimated Time
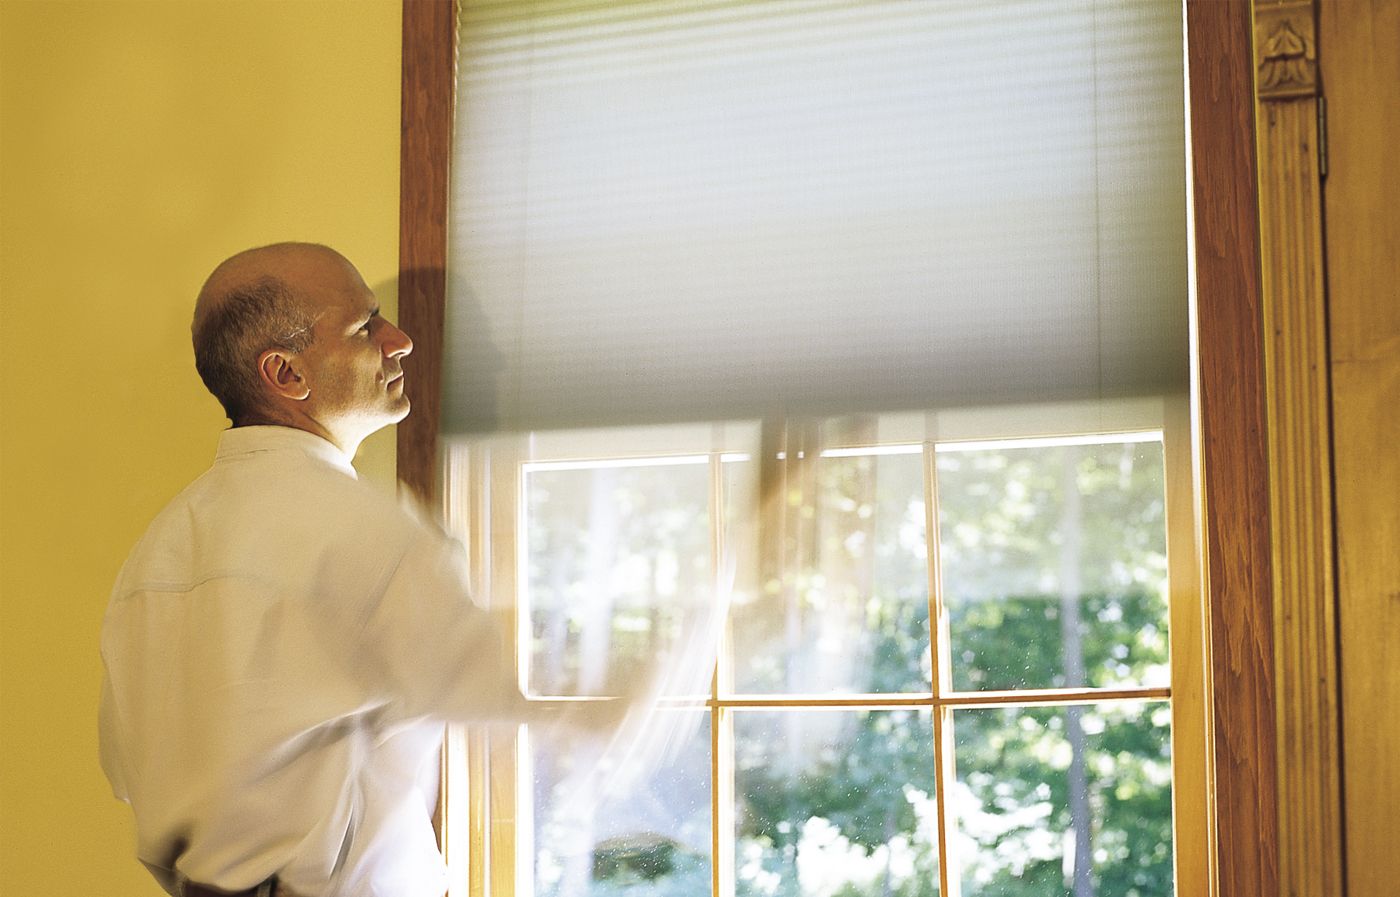
Installing window shades is an excellent way to control natural light, enhance privacy, and improve your home’s energy efficiency. This do-it-yourself (DIY) project is relatively simple and can typically be completed in about an hour per window. Whether you’re looking to upgrade your current window treatments or install new ones to complement a new window installation, this guide will walk you through the process step-by-step.
Choosing the Right Type of Window Shade
Before beginning installation, take time to understand the different types of window shades available so you can find the best blinds or shades for your needs. Each type has unique features and benefits, which can affect both the installation process and the overall look of your room. You should consider what sort of windows you have as well. If you are installing egress windows, for example, you’ll want to pick shades that don’t interfere with their use as a home exit.
Cellular Shades
Cellular shades, also known as honeycomb shades, are popular for their energy efficiency and sleek appearance. These shades feature two layers of pleated polyester fabric fused together, creating air pockets that provide insulation. They come in various cell sizes and can be single, double, or triple-layered for enhanced temperature control. Cellular shades are also a good option for reducing energy costs and drafting during the colder months.
Roller Shades
Roller shades are simple and versatile, consisting of a single piece of fabric that rolls up around a tube. They’re easy to operate and come in a wide range of fabrics, from sheer to blackout. Roller shades are an excellent choice for minimalist decor and can be customized to fit almost any window size. Their smooth operation and clean lines make them a popular choice in modern homes.
Roman Shades
Roman shades offer a more traditional and elegant look. When raised, they fold into neat, horizontal pleats. These shades come in various styles, from flat to cascading folds, and can be made from almost any fabric. Roman shades are ideal for adding a touch of sophistication to any room. From casual to formal settings, Roman shades provide a versatile window treatment solution that accommodates a variety of interior design styles.
Step 1: Gather Necessary Tools and Materials
Before you begin installation, gather all the tools and materials you’ll need. This typically includes the following:
- Drill with appropriate bits
- Screwdriver
- Level
- Pencil
- Tape measure
- Mounting brackets (usually included with your shades)
- Screws (usually included with your shades)
- Step ladder
Step 2: Prepare the Window for Installation
Before installing your new shades, prepare the window area. Start by removing any existing window treatments and hardware that might interfere with the installation. Clean the window frame and surrounding area thoroughly to ensure a clean working surface. This is also a good time to clean your windows if needed, as it will be more challenging once the new shades are in place.
Step 3: Choose the Right Mounting Method
The mounting method you choose can significantly impact the look and functionality of your window shades. When deciding between inside and outside mounting, consider the window’s depth, trim, and surrounding wall space. You should also consider the overall aesthetic you’re aiming to achieve and the functional benefits of each method.
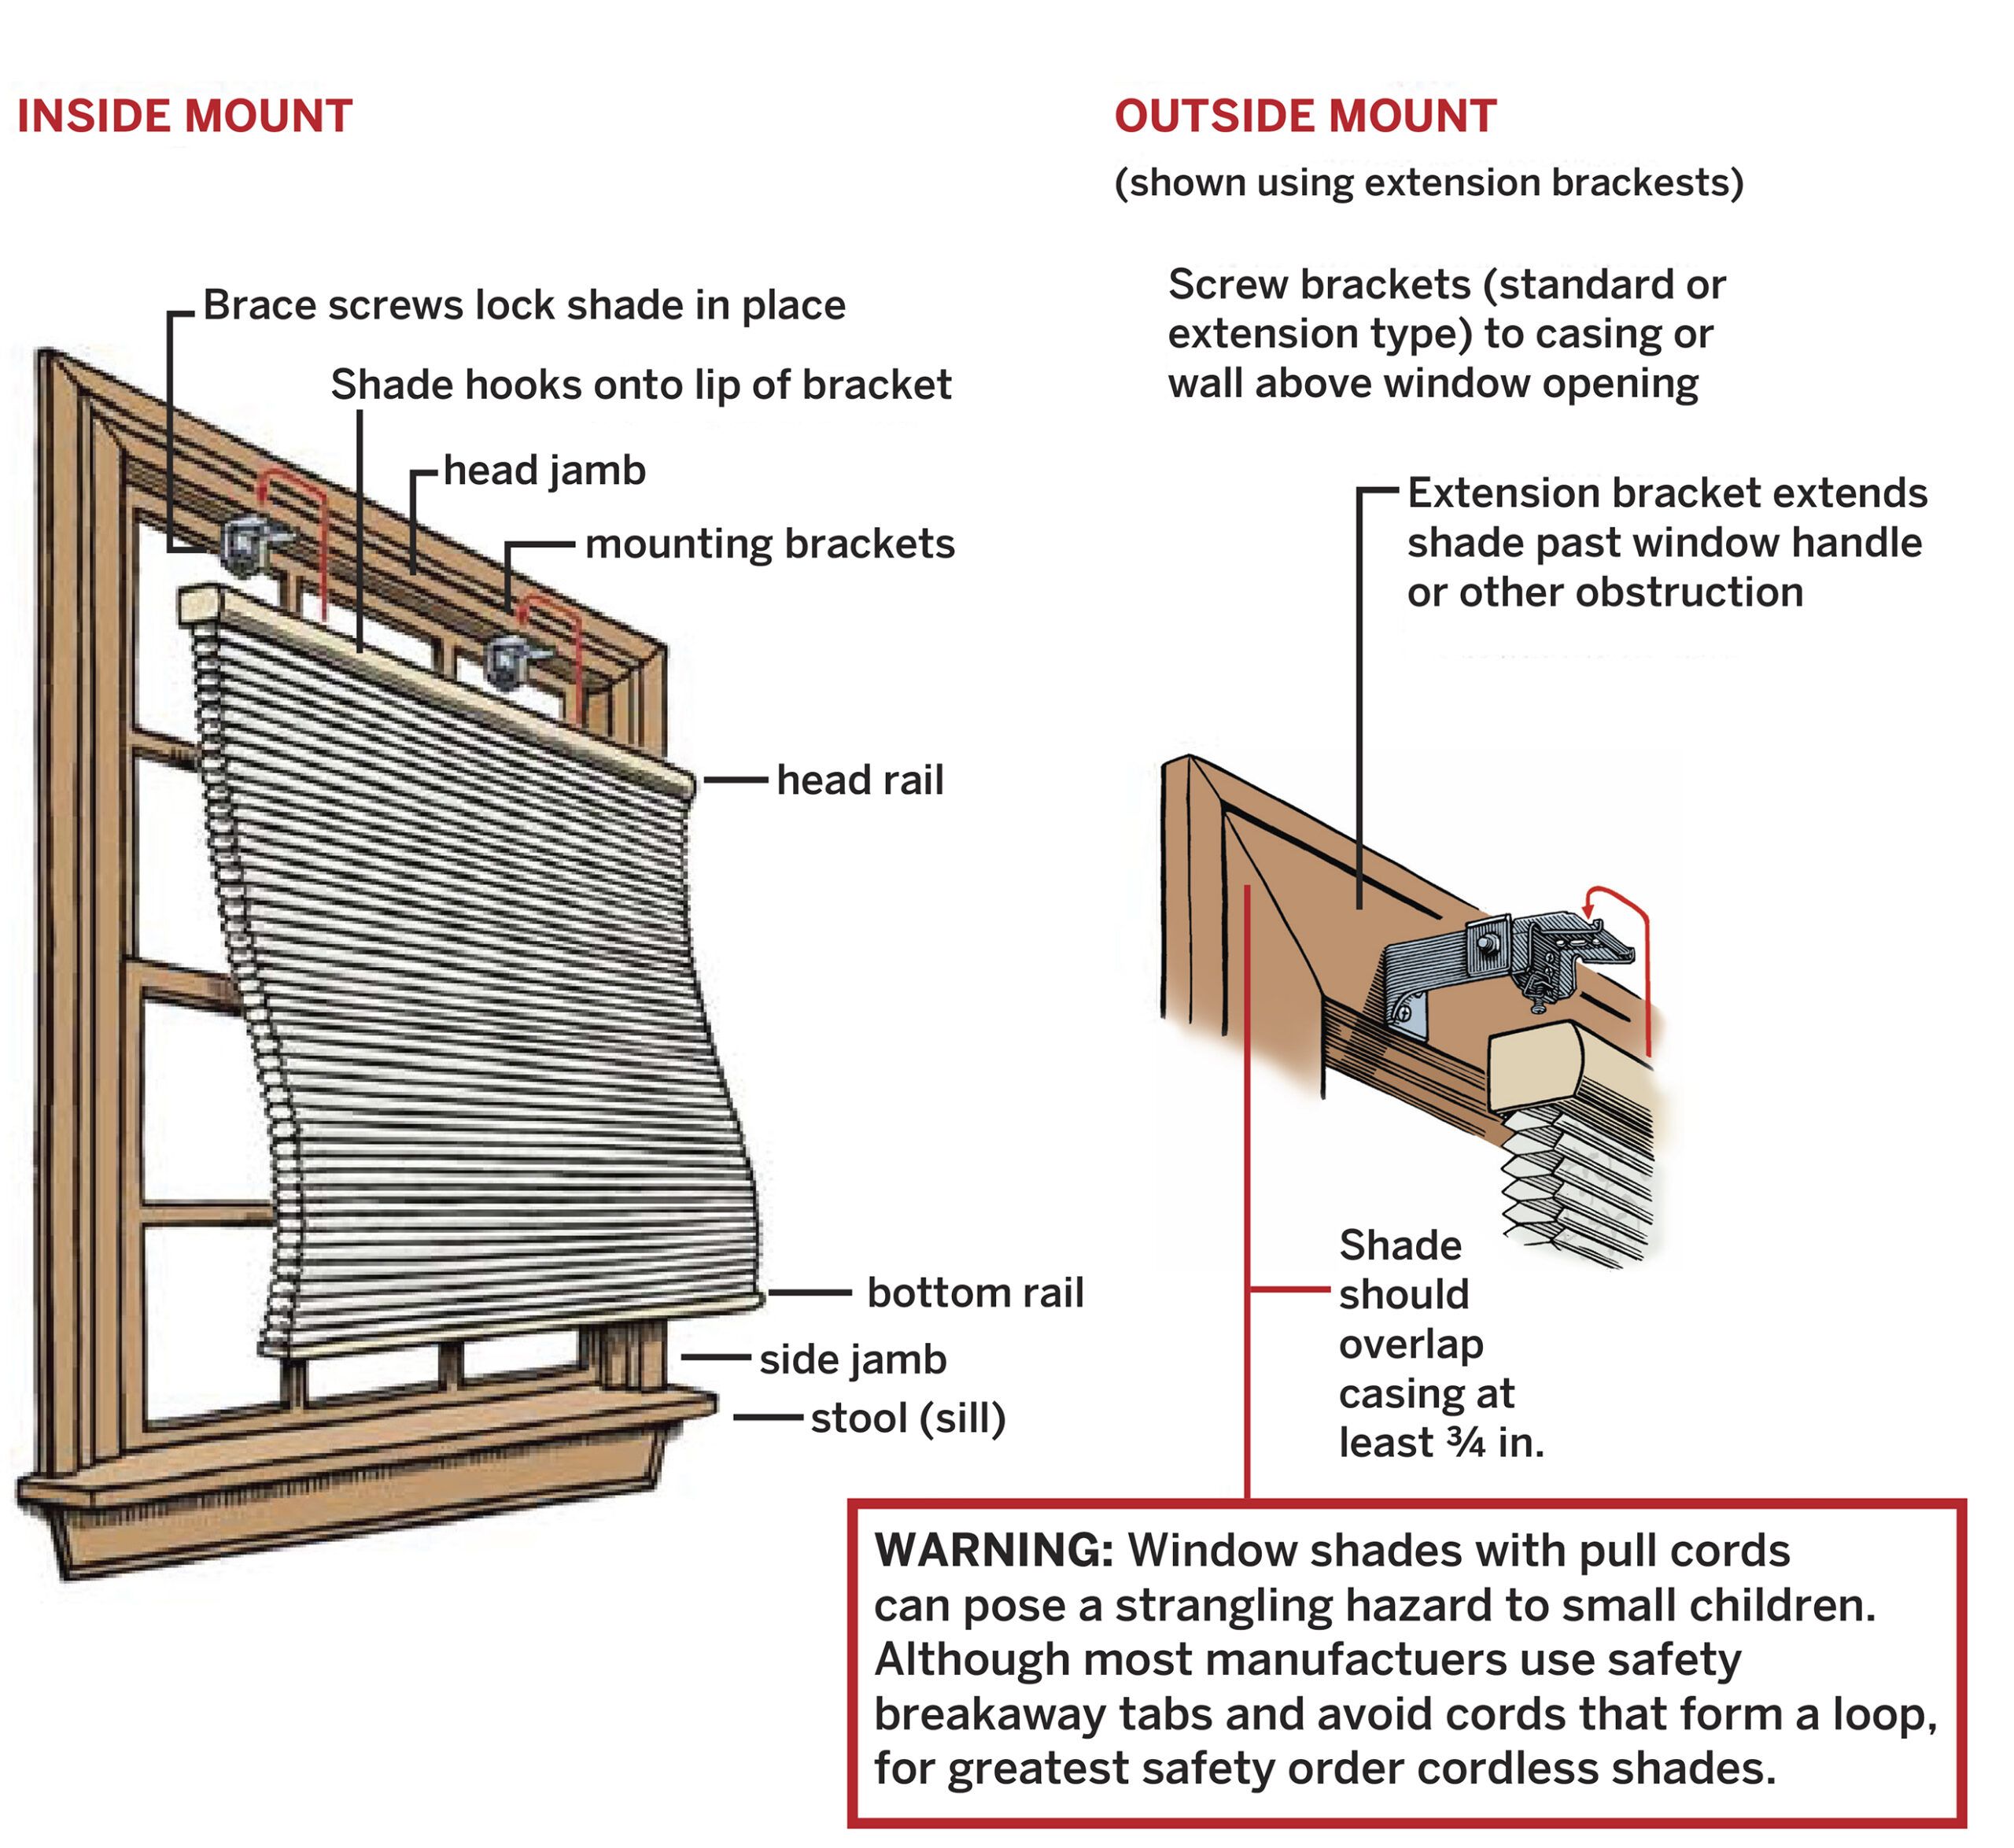
Inside Mount Installation
Inside mounting provides a clean, built-in look and is ideal for windows with deep sills. This method allows the shade to sit flush within the window frame. However, it may not be suitable for windows with shallow depths or protruding handles. This mount style can help you achieve a minimalist look and works well in spaces with trim that adds to the window’s aesthetic appeal.
Outside Mount Installation
Outside mounting is versatile and can work with almost any window type. This method is ideal for windows with minimal depth or for creating the illusion of larger windows. Outside mounts also provide better light blockage, as the shade extends beyond the window frame. This option can also make the window appear larger and more substantial, adding to the room’s overall design.
Step 4: Measure Your Windows for Shades
The measurement process for shades differs depending on whether you’re opting for an inside or outside mount. This step ensures your shades fit perfectly, avoiding any gaps that could compromise privacy and light control.
Inside Mount Measurements
For an inside mount, measure the width at the top, middle, and bottom of the window opening. Use the smallest measurement to ensure the shade fits within the frame. For the length, measure from the top of the opening to the sill at the left, center, and right sides. Again, use the smallest measurement. This method makes certain that the shades sit neatly within the window frame, offering a streamlined appearance without protruding into the room.
Outside Mount Measurements
For outside mounts, measure the width of the area you want to cover, adding 2–3 inches on each side for optimal light blockage. For the length, measure from where you want the top of the shade to sit to where you want it to end, typically three to four inches below the sill or to the floor for full-length treatments. This approach can be particularly effective for covering imperfections around the window frame or for when the window frame depth is insufficient for an inside mount.
Step 5: Mark Bracket Positions
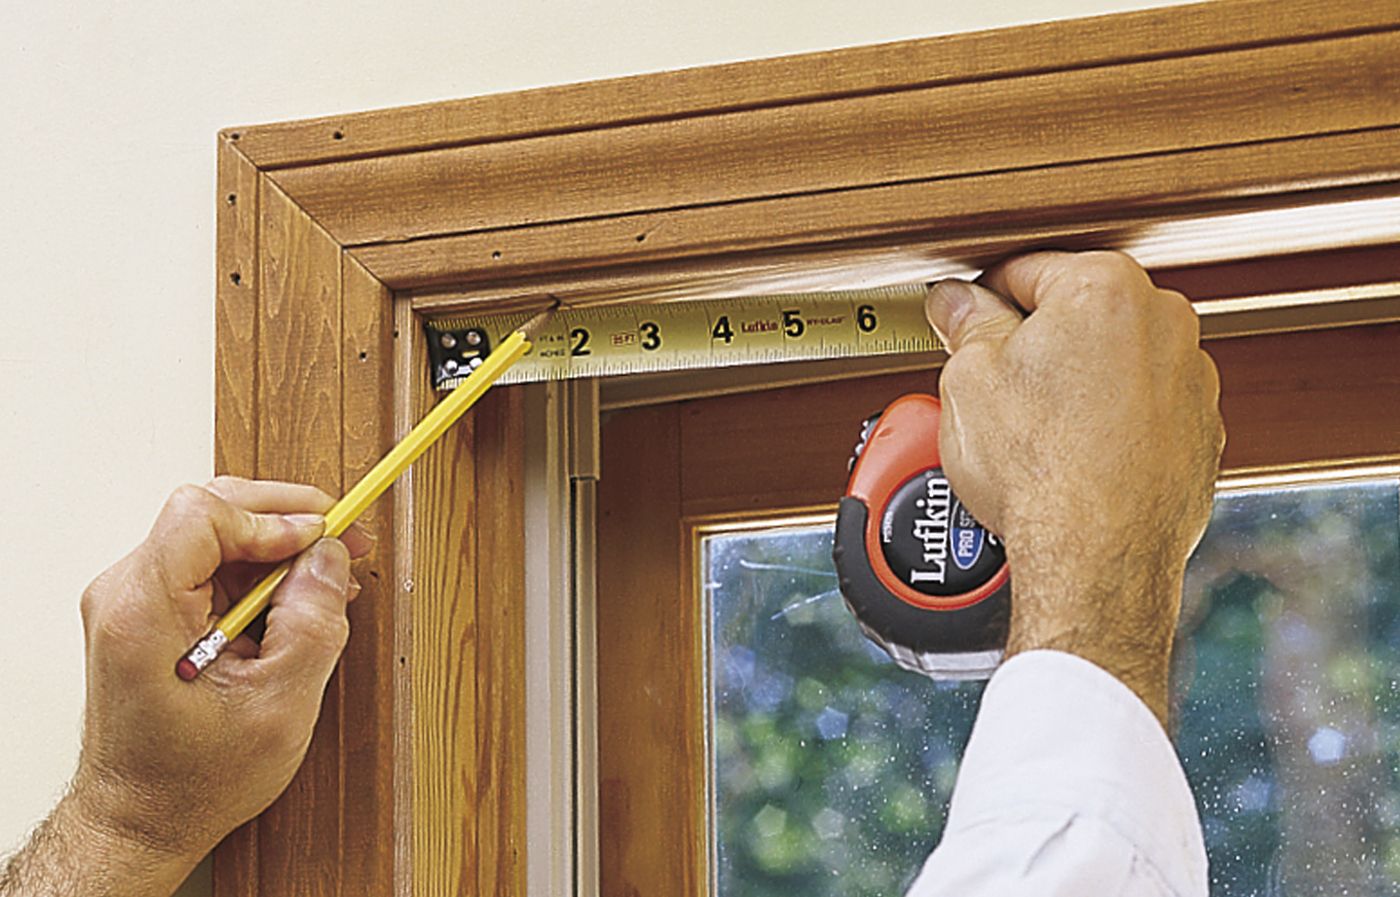
Check the hardware that comes with the shade to make sure all brackets and mounting screws are included.
Next, measure 2 inches in from each side jamb and make a mark on the head jamb above the window.
Step 6: Mark the Screw-Hole Locations
- To mark the screw-hole locations, hold one of the metal mounting brackets up against the head jamb, keeping it aligned with the 2-inch pencil line.
- To ensure that the bracket is square, line up its front lip with the front edge of the head jamb.
- With the bracket held firmly in place, mark two screw-mounting holes with an awl.
- Repeat this procedure for the other bracket(s).
Step 7: Bore Pilot Holes
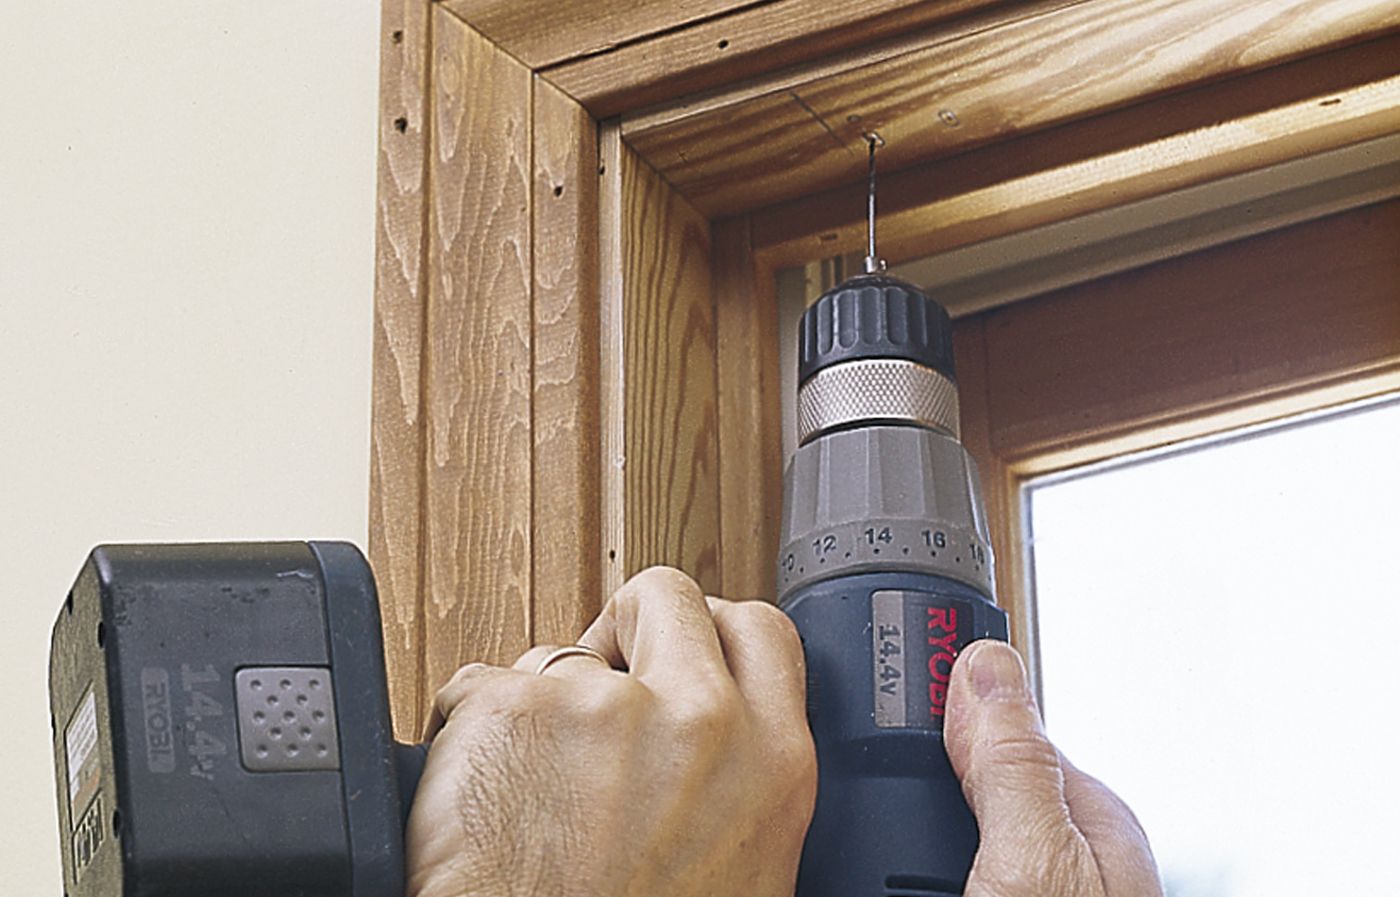
- Use a drill fitted with a 1/16-inch-diameter bit to bore pilot holes at each screw location. Hold the bit perfectly straight as you bore up into the head jamb.
- If drilling into a stone or concrete lintel, use a 1/4-inch-diameter masonry bit and insert a lead anchor in each hole.
- Vacuum up all the sawdust you’ve created.
Tip: For windows greater than 44 inches wide, install a third center bracket.
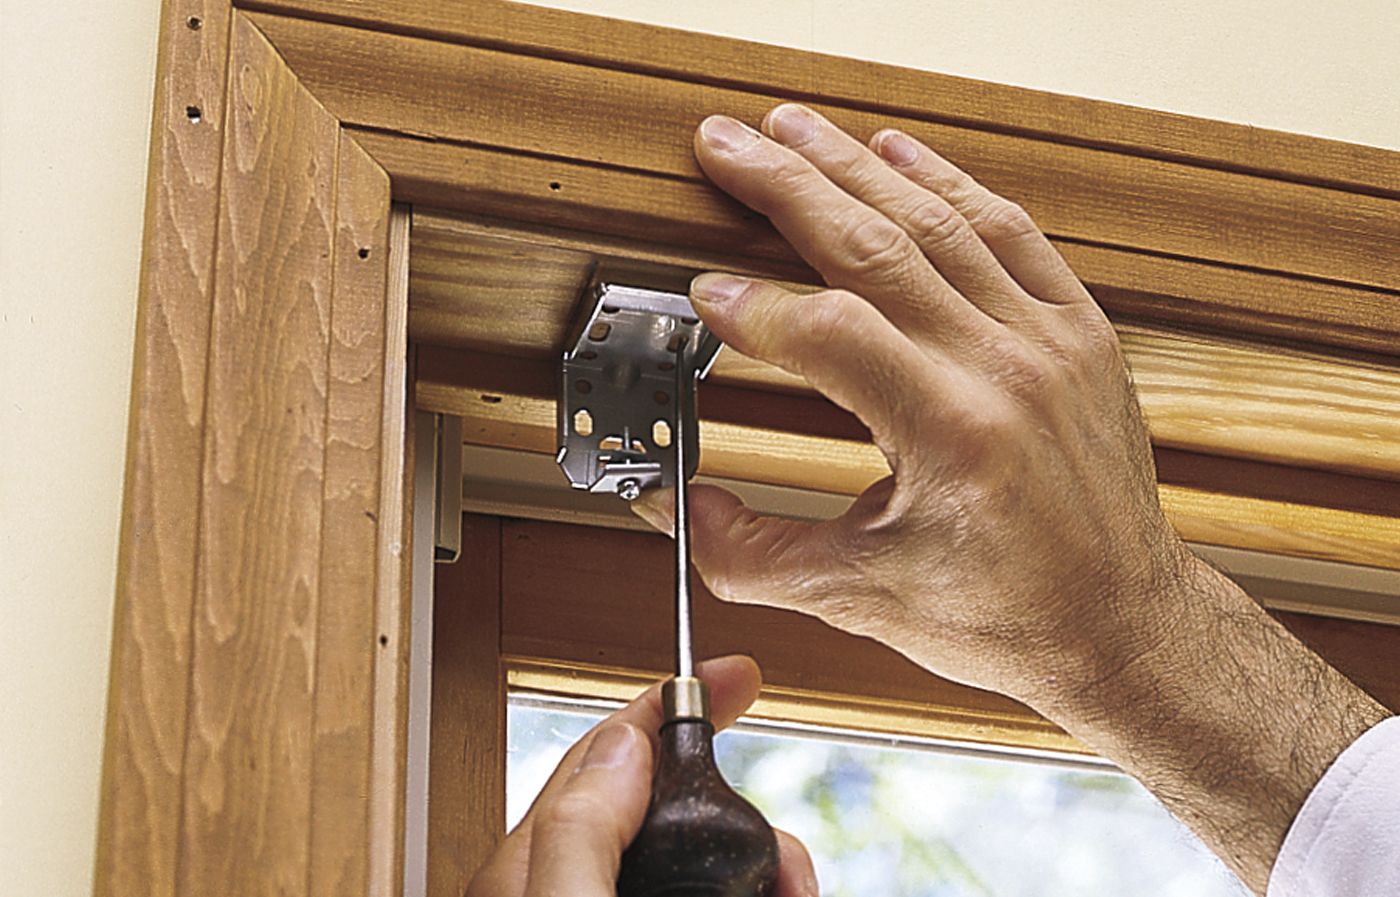
Step 8: Attach the Mounting Brackets

- Hold the bracket in place, making sure that you align it with the screw pilot holes bored into the head jamb.
- Fasten the bracket with two pan-head screws.
- Install the remaining mounting brackets.
Tip: If necessary, install extension brackets to project the shade past any obstructions, such as a window handle.
Step 9: Check the Brackets for Level
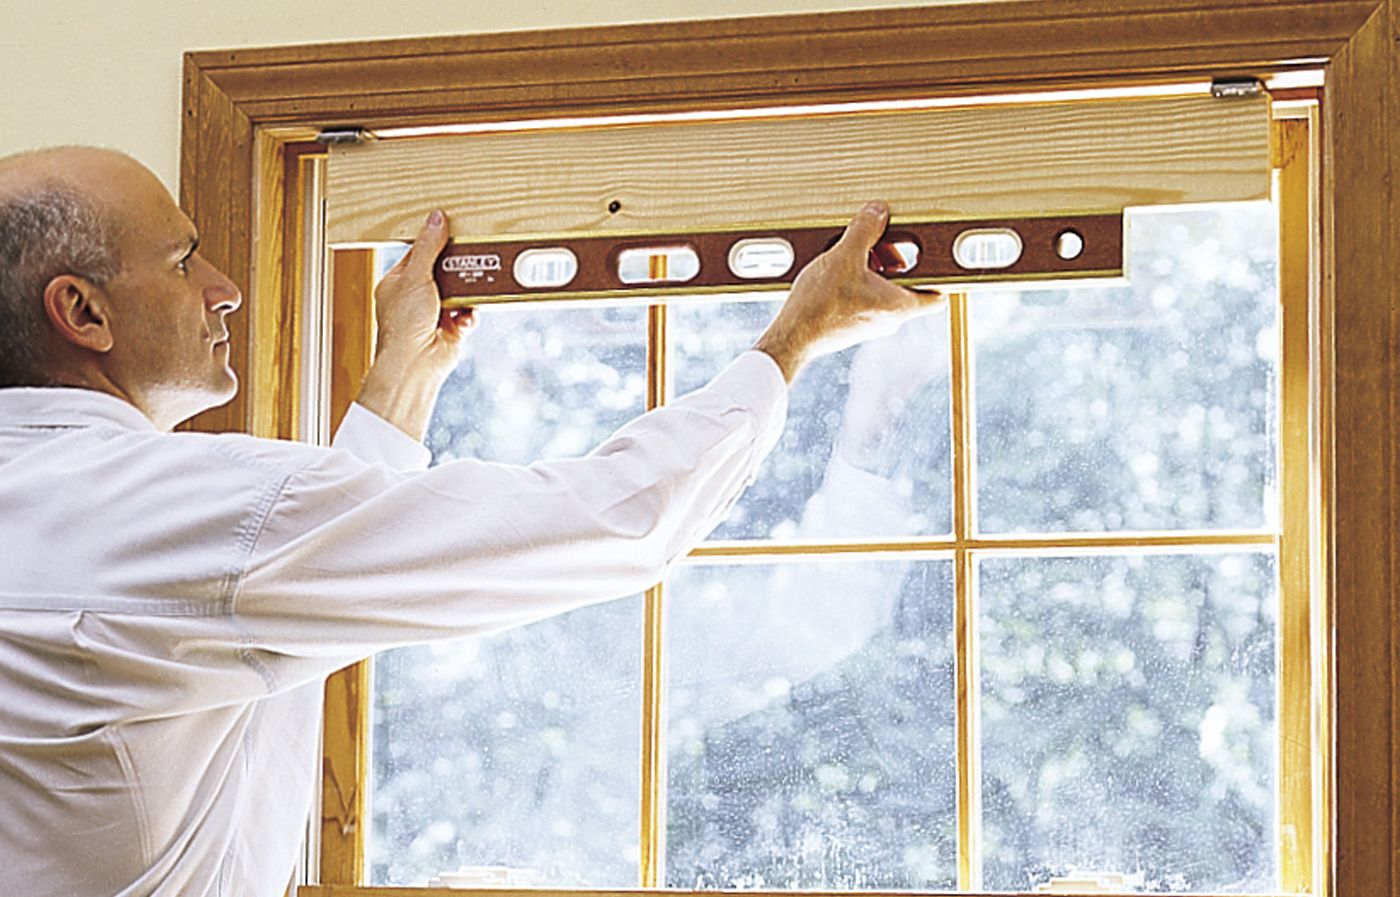
- Hold a level across the two mounting brackets to see if they’re level.
- If your level isn’t long enough to span from one bracket to the next, cut a straight-edged board to fit the opening.
- Hold the board firmly across the two brackets, then place the level against the bottom edge of the board and check the bubble.
Step 10: Insert a Thin Wood Shim
If the brackets are out of level by 1/8 inch or less, follow the instructions below. If the distance is greater, loosen the screws on the “higher” bracket. Otherwise, skip to step 11.
- Slip a wood shim or pieces of thin cardboard between the bracket and head jamb.
- Tighten the screws and check the brackets for level again.
- Repeat if necessary, then trim off the excess shim with a utility knife.
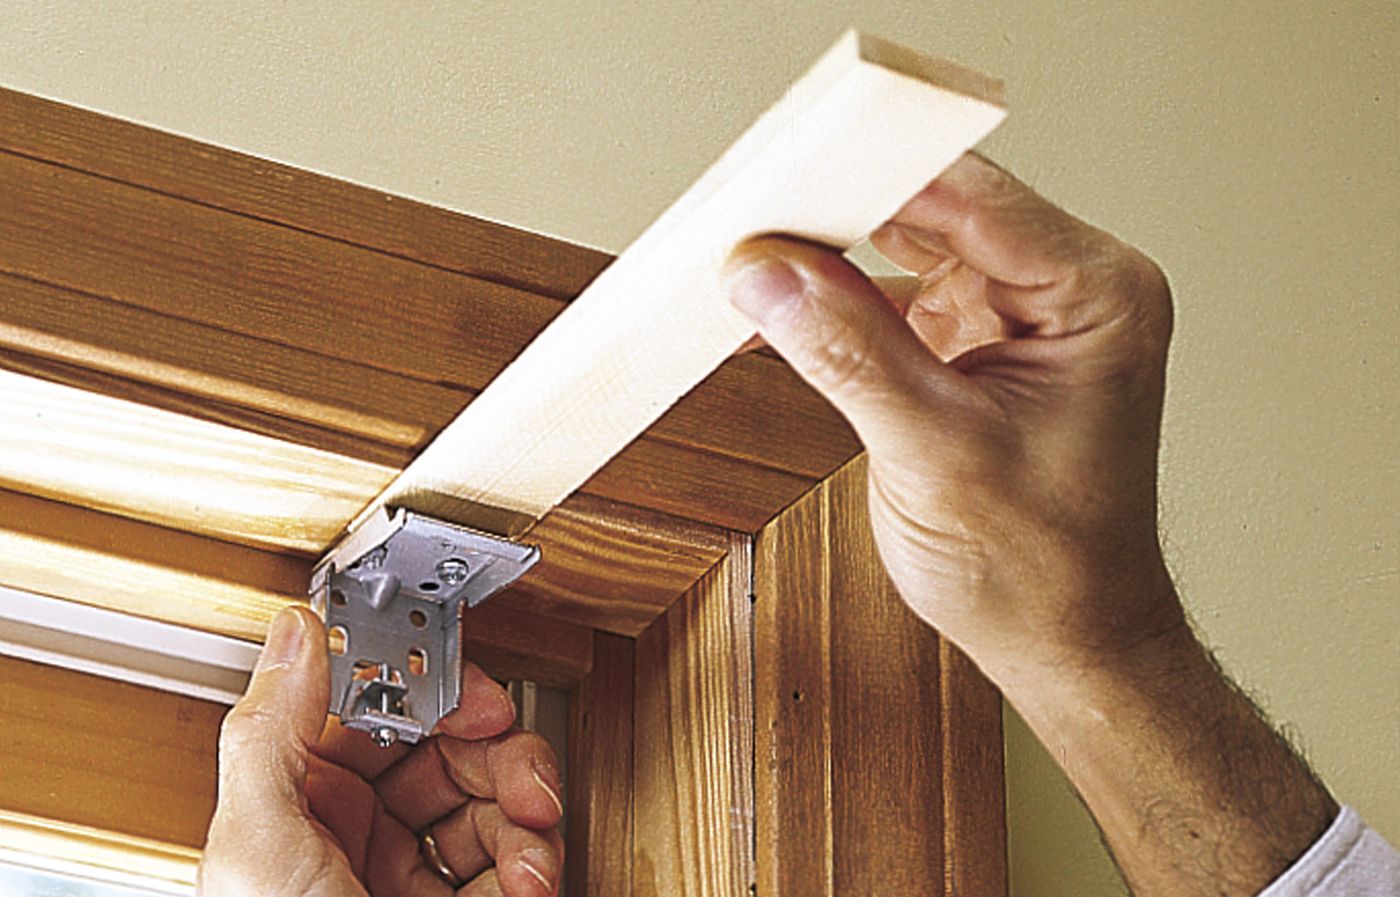
Step 11: Clip the Shade into the Brackets

- Loosen the small screws, called brace screws, on the bottom side of the mounting brackets.
- Next, lift the shade up to the head jamb and hook the front edge of the shade’s head rail onto the protruding lip of the two brackets.
- Swing the rear of the headrail back toward the window and tighten the brace screws to lock the shade into the brackets.
Tip: When tightening the brace screws, be careful not to catch the fabric in the bracket.
Step 12: Test the Operation of the Shade
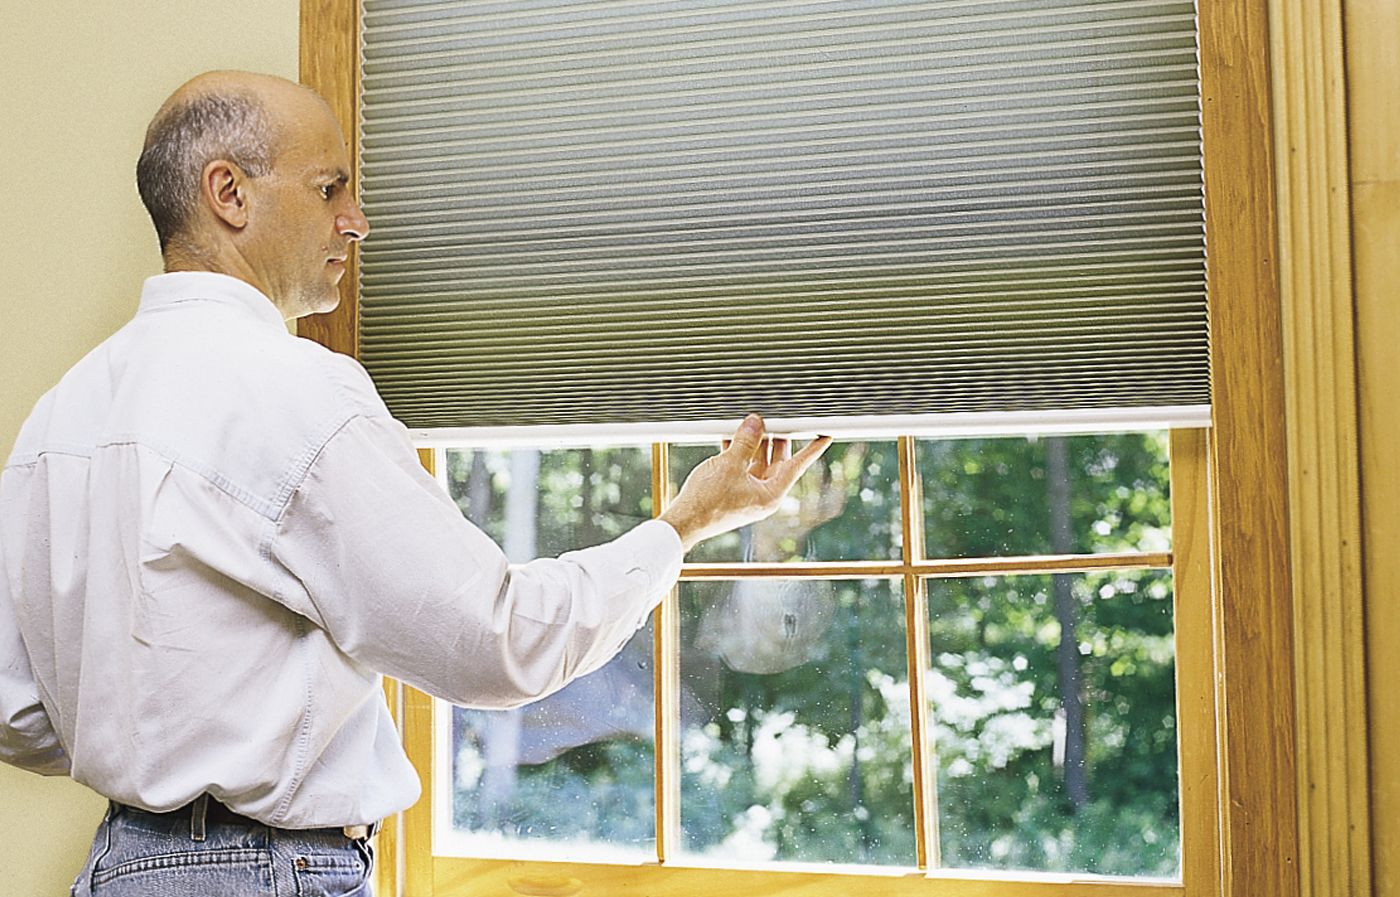
With the brace screws firmly tightened, check that the shade works properly.
- Grasp the center of the bottom rail and slowly pull straight down to extend the shade all the way to the stool, or sill.
- Again, with your hand in the middle of the rail, push up to raise the shade. Stop at several points along the way to check that the shade remains at the desired height.
Tip: If the shade looks a bit short, leave it fully extended for a day or two until the fabric relaxes.
Troubleshooting Common Window Shade Installation Issues
Even with careful installation, you may encounter some issues. Here are some common problems and solutions.
Uneven Shades
If your shade appears uneven when fully extended, it may be due to uneven bracket installation. Double-check the level of your brackets and adjust as necessary. Correcting this can prevent the shade from becoming damaged due to uneven stress distribution.
Difficulty Raising or Lowering
If you’re having trouble raising or lowering your shade, check to be sure that there are no obstructions in the window frame. For cordless shades, the lifting mechanism may need time to adjust.
Maintaining Your Window Shades
Proper maintenance will extend the life of your window shades and keep them looking their best. Regularly dust your shades with a feather duster or vacuum with a soft brush attachment. For deeper cleaning, follow the manufacturer’s instructions, as different materials may require specific cleaning methods.
Safety Considerations for Corded Shades
If you’ve opted for corded shades, there are some important safety considerations, especially if you have young children or pets. Window shades with pull cords can pose a strangling hazard to small children. Consider cordless options or ensure that cords are kept out of reach and use safety devices provided by the manufacturer.
Enhancing Energy Efficiency with Window Shades
Window shades can significantly improve your home’s energy efficiency. Cellular shades, in particular, provide excellent insulation due to their honeycomb structure. According to the U.S. Department of Energy, tightly insulated cellular shades can reduce heat loss through windows by 40% or more, which equates to about 10% heating energy savings.
During hot months, keep shades closed during the day to block out heat. In colder months, open shades during sunny days to let in warmth and close them at night to retain heat. This can help reduce your energy bills and make your home more comfortable year-round. For additional energy efficiency, consider properly flashing your windows to prevent air and water leaks. You could also install waterproof windows if you don’t want to worry about water damage to your shades.