Project details
Skill
Cost
Estimated Time
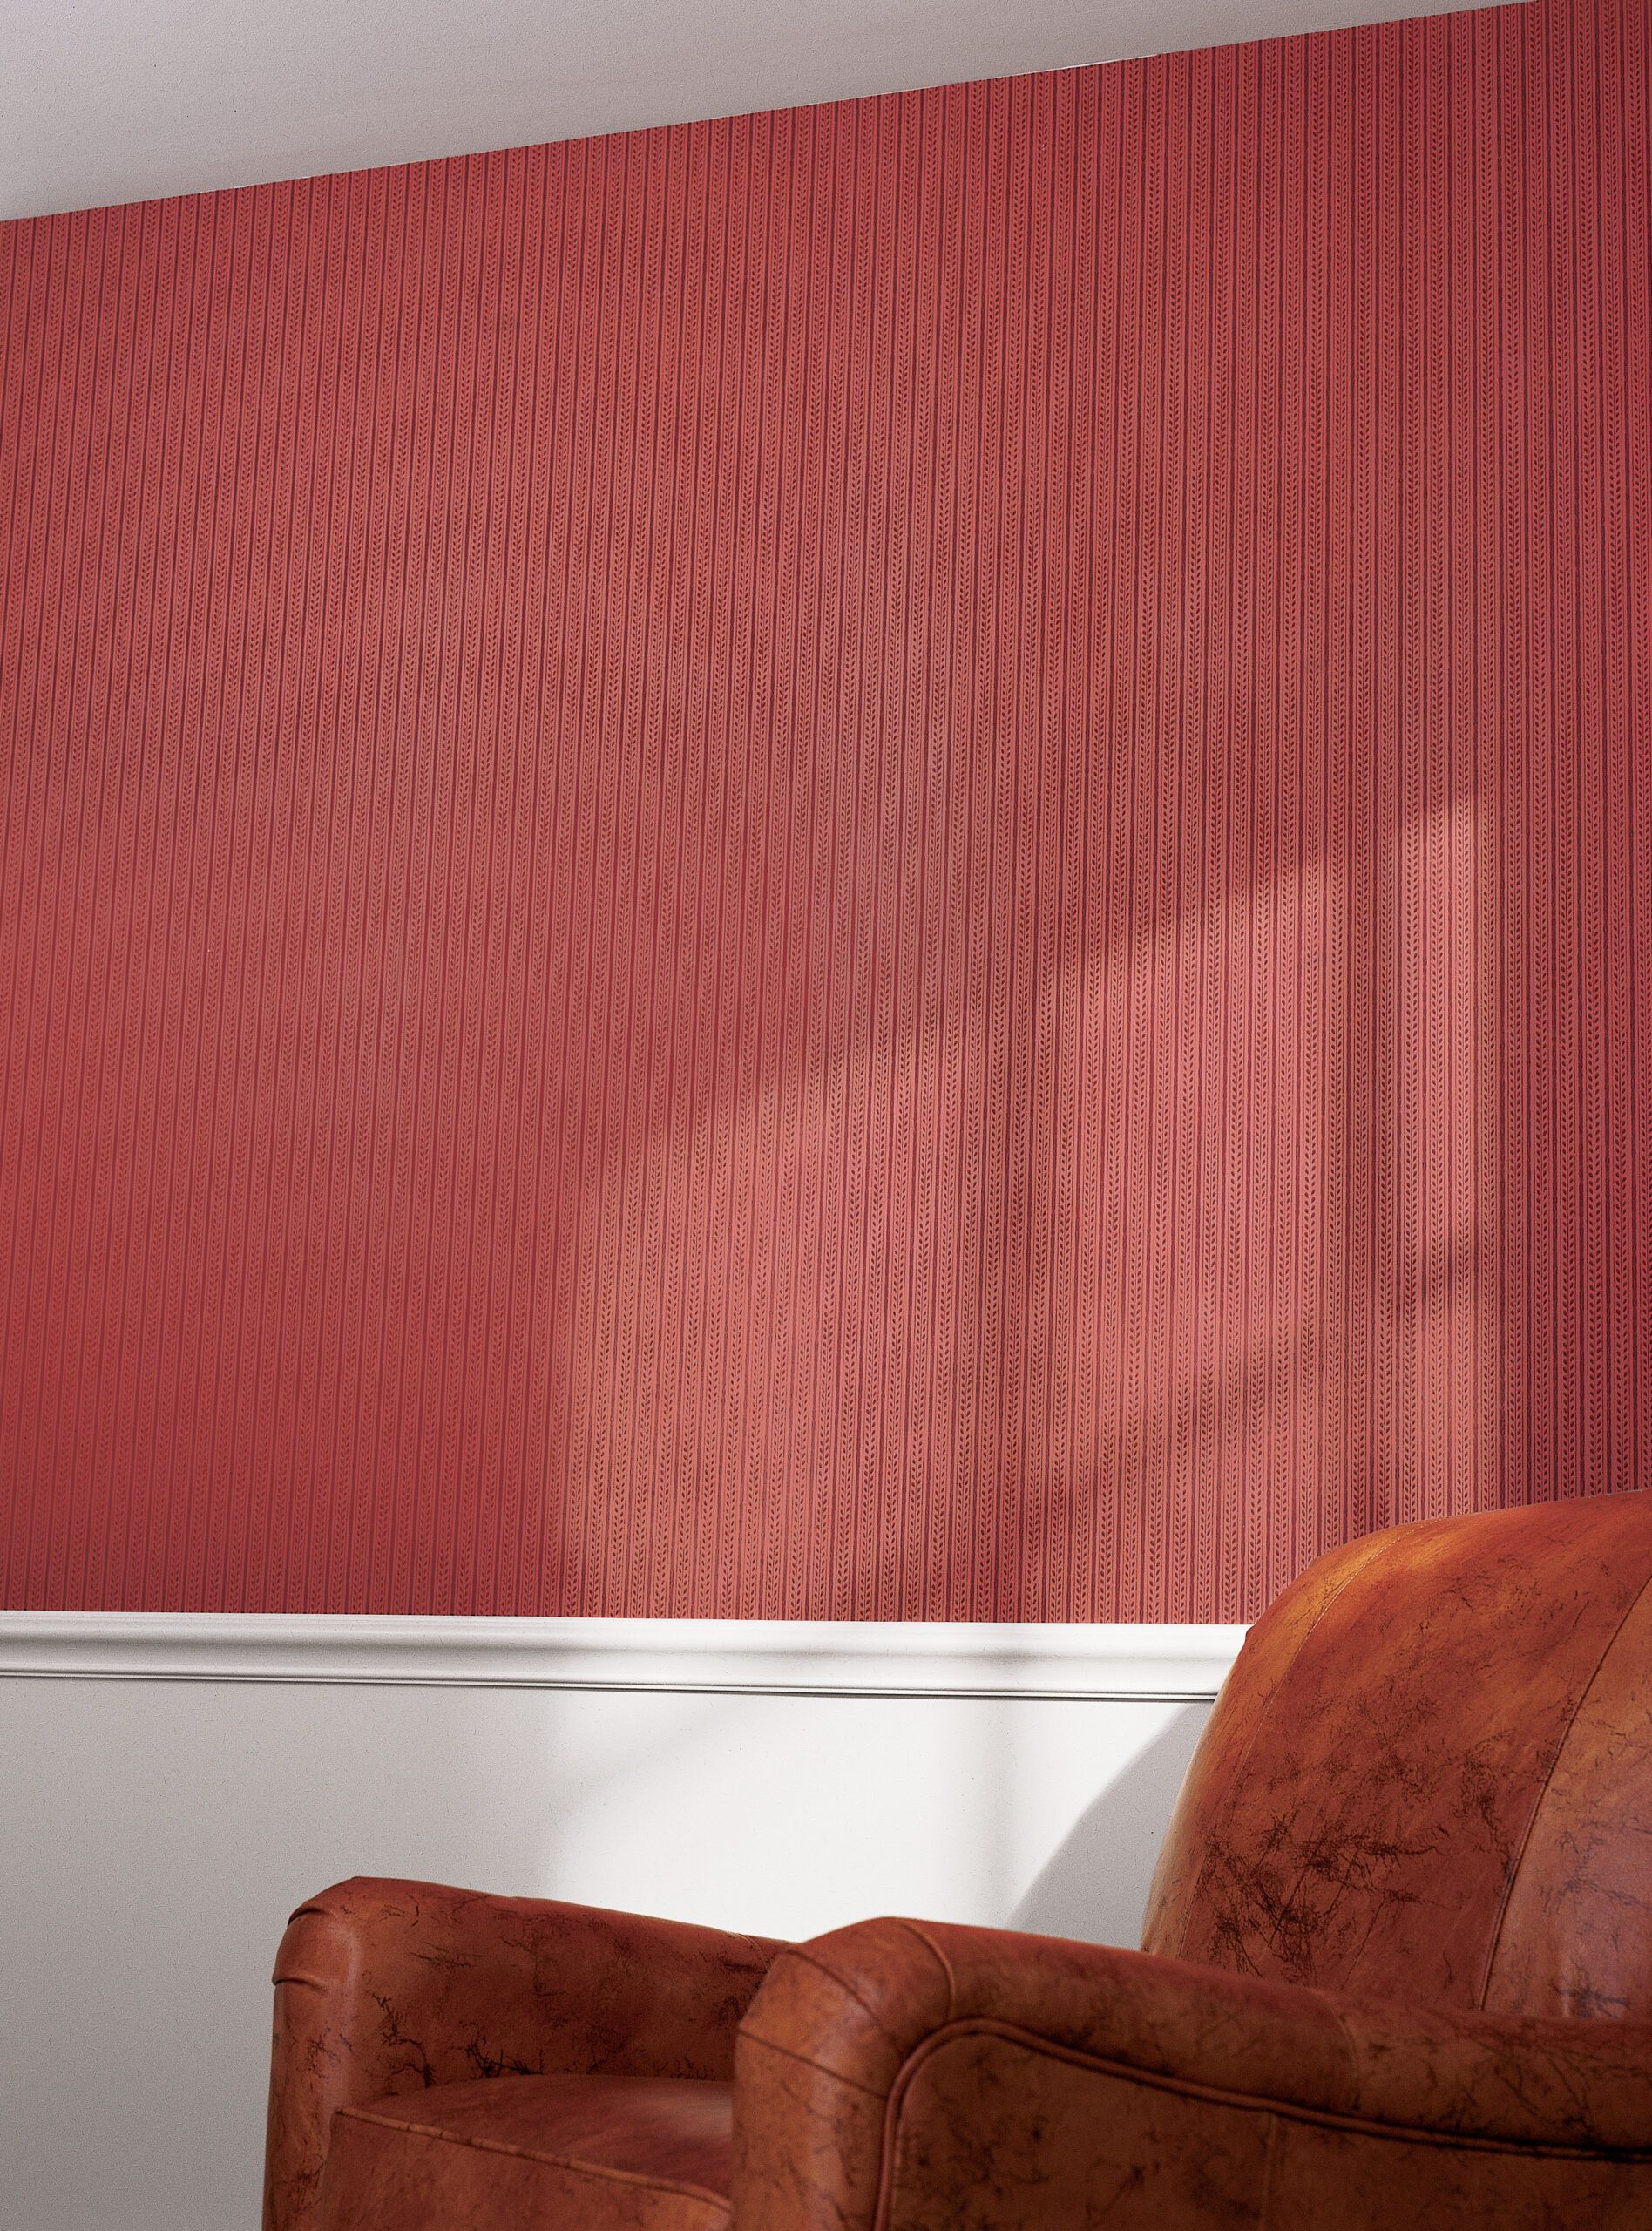
Wallpaper can transform a room from dull to dynamic in a matter of hours, adding texture, pattern, and personality to your walls while concealing minor imperfections in plaster and drywall.
However, homeowners trying to DIY the job often find themselves frustrated by peeling seams and mismatched patterns. To help you achieve professional-looking results, we consulted John Gregoras, a seasoned paper hanger from Somers, New York, with nearly two decades of experience. He’s shared his expert tips and tricks for pasting, hanging, aligning, and trimming wallpaper. With this insider knowledge, you’ll be more than prepared to tackle your next wallpapering project.
Best Wallpaper Techniques Overview
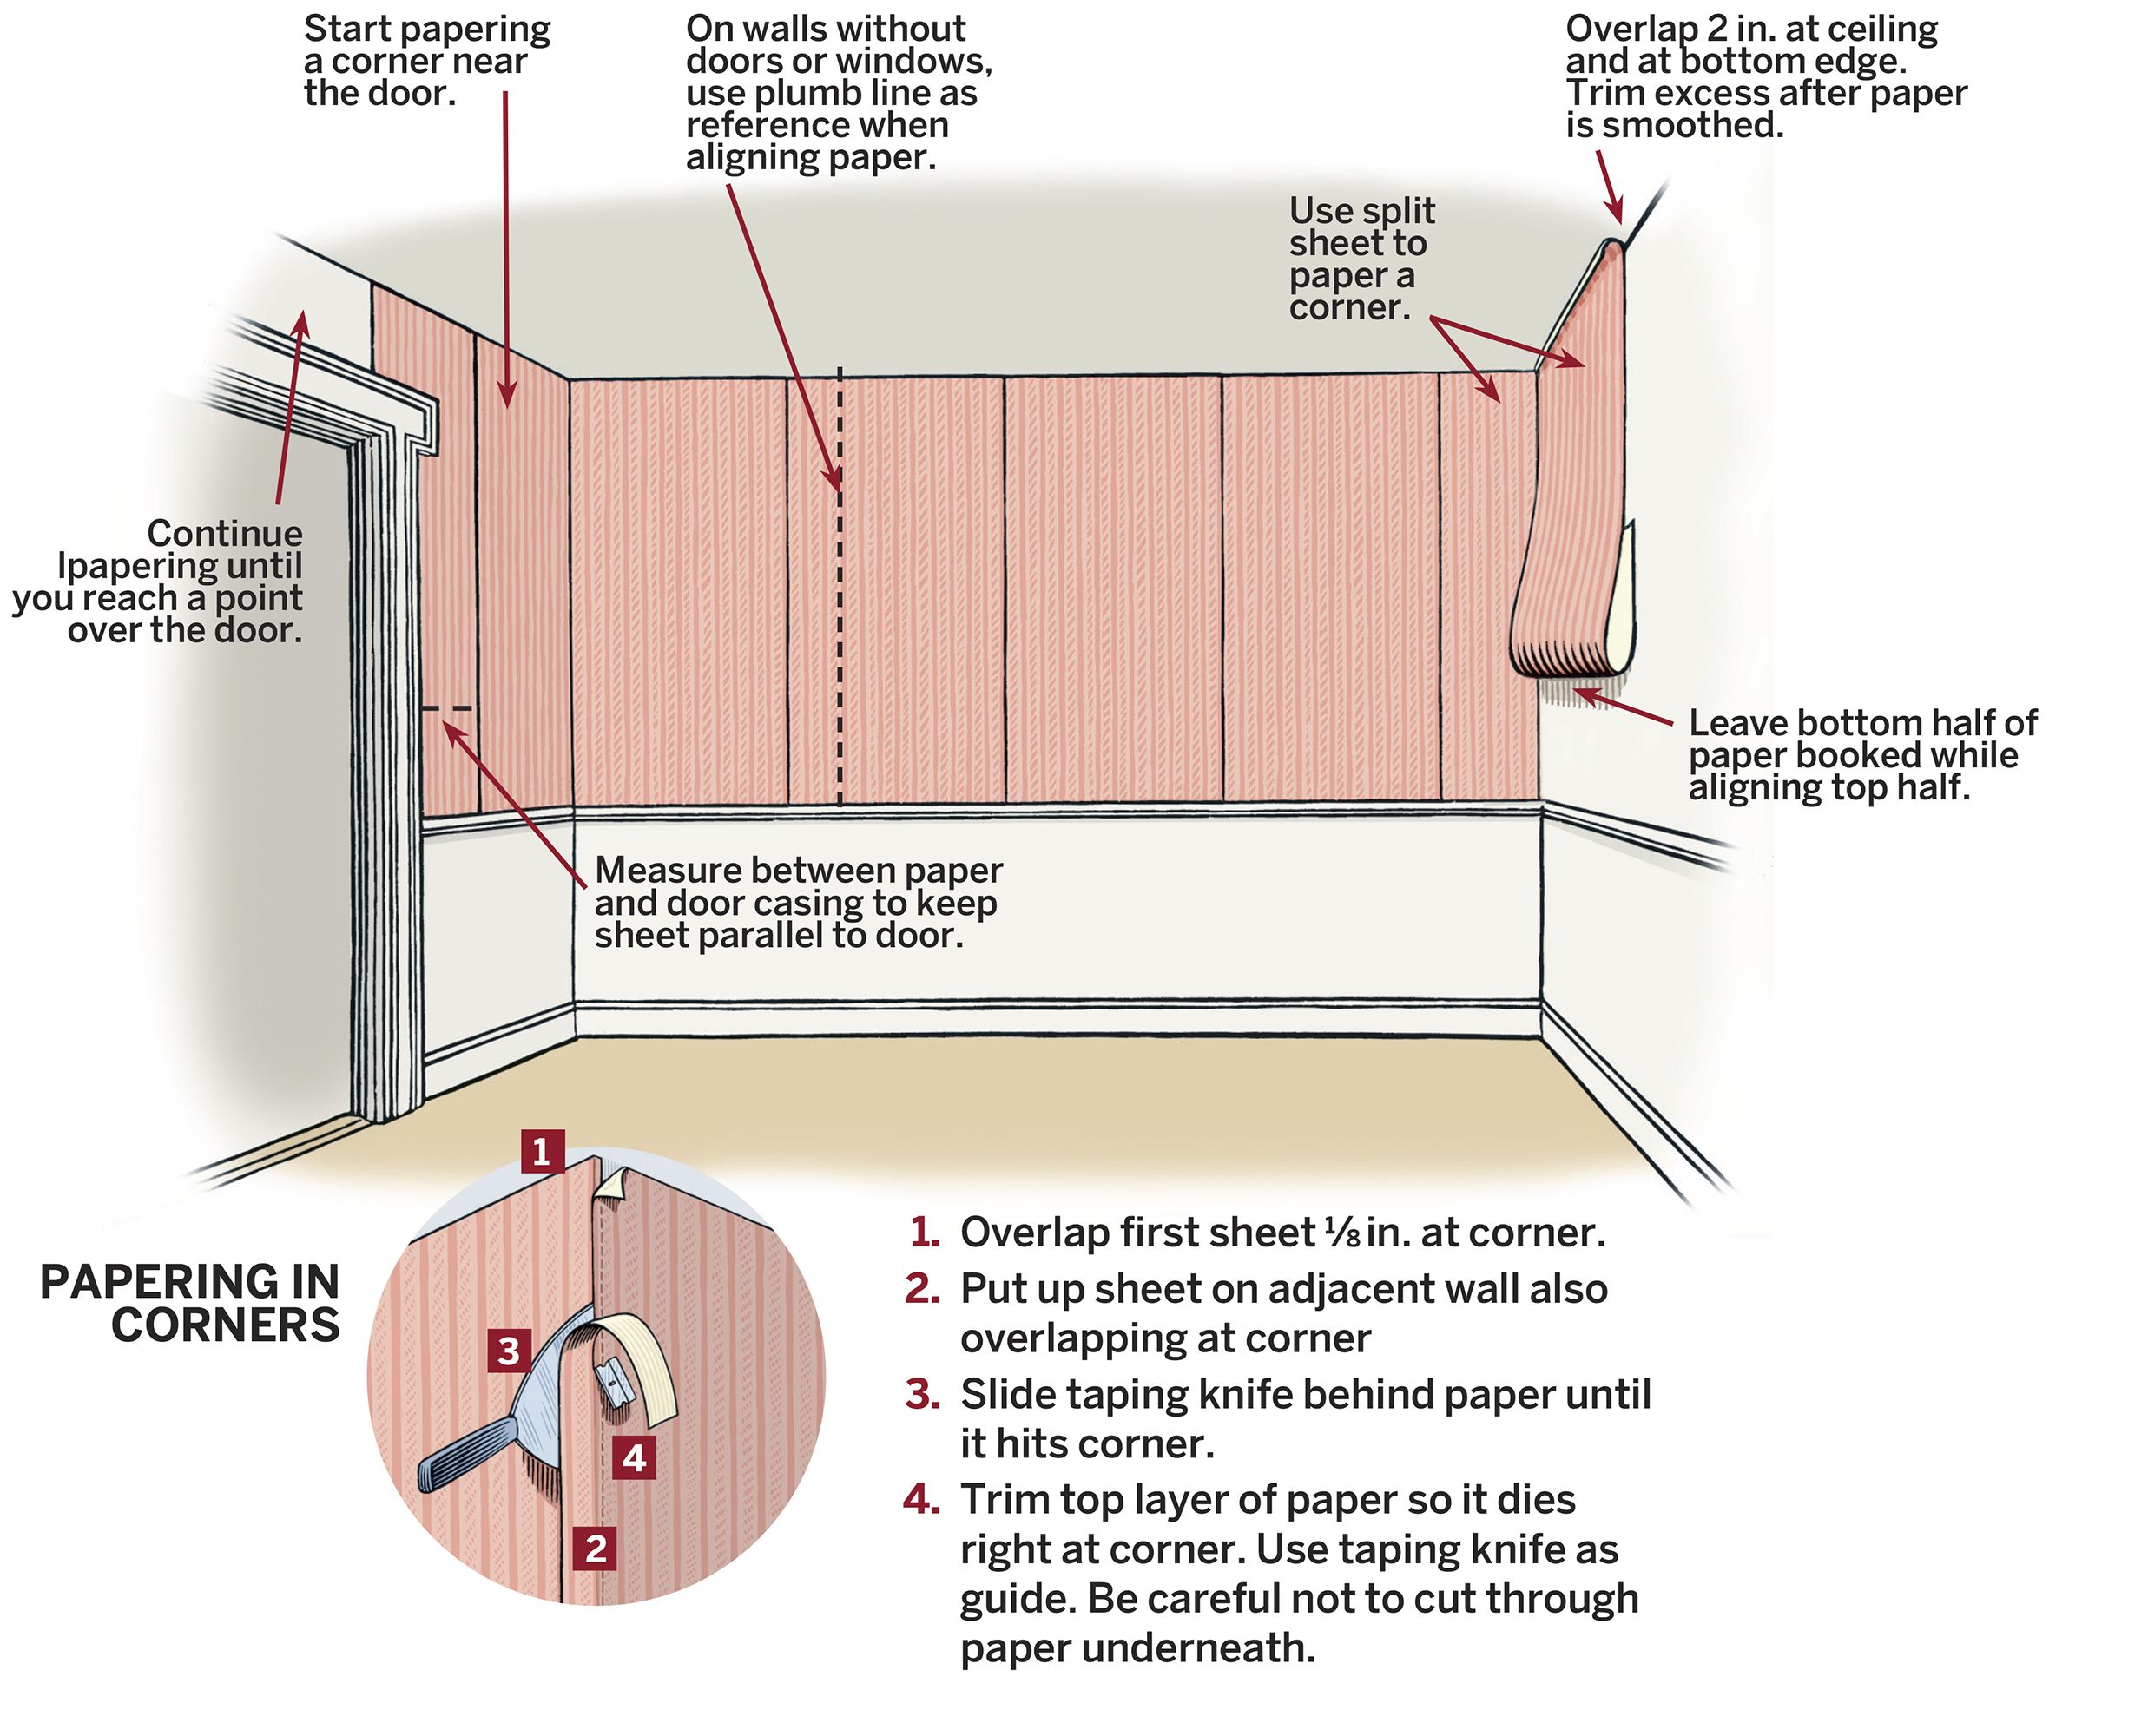
The key to perfect wallpapering is careful planning and execution. Gregoras stresses the importance of layout to make the patterns match well and be straight throughout the room. He recommends working in one direction around the room to maintain pattern consistency.
However, even with the best techniques, the pattern between the first and last strip rarely matches perfectly. For this reason, Gregoras always begins behind a door, papering outward from the corner until reaching the space above the door — the area you’re least likely to notice in the room.
Another pro tip is to use split sheets when papering corners, as the last strip of paper on a wall is often not a full sheet. This technique helps maintain a seamless look throughout the room. Paying attention to these finer details means the difference between a beginner’s attempt and a professional finish.
A Step-By-Step Guide to Wallpapering a Room
To put those techniques into practice, first you’ll need to gather the proper tools. Then you’re ready to jump into the first step.
 Level
Level- Tape measure
- Paper smoother
- Seam roller
- Razor blades
- Bucket
- Grout sponge
- Paint roller


Step 1: Apply Wallpaper Paste
Before you begin papering, you must properly prepare your walls. Start by painting the entire room with a wall primer/sizer. This step allows you to get better adhesion and makes future wallpaper removal easier. Investing in a good primer can also make the wallpaper last longer by providing a solid base.
Next, unroll your wallpaper and inspect it for any defects. As you unroll, drag the paper against the edge of your worktable to remove any curl. Cut the paper into sheets that are four inches longer than the height of your walls. Then, make sure you cut at the same place on the repeat so patterns on adjacent sheets will align correctly.
To apply the paste:
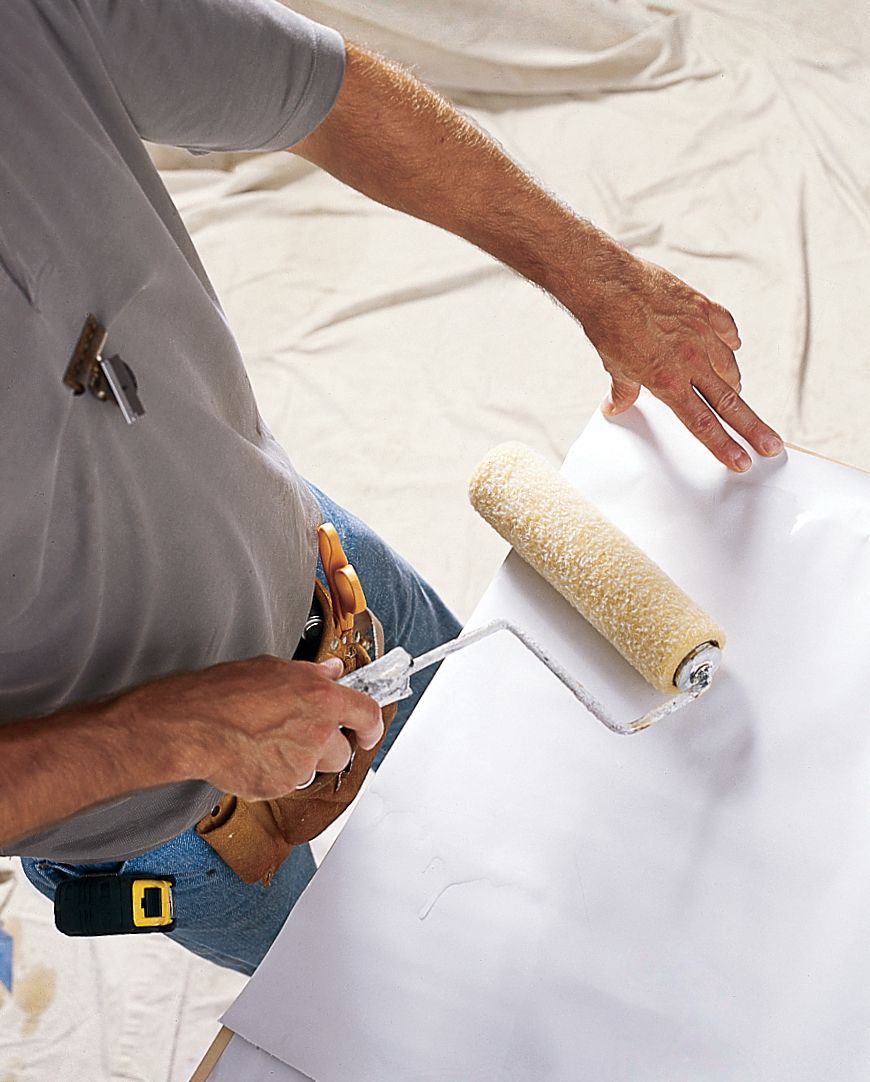
- Lay a cut sheet on the table, face down.
- Using a paint roller, apply a thin, even layer of clear premixed wallpaper paste to the back of the paper.
- Be careful not to allow paste to get on the table, as it can mar the next sheet.
- Slide the paper to the edge of the table to apply paste to the ends and edges.
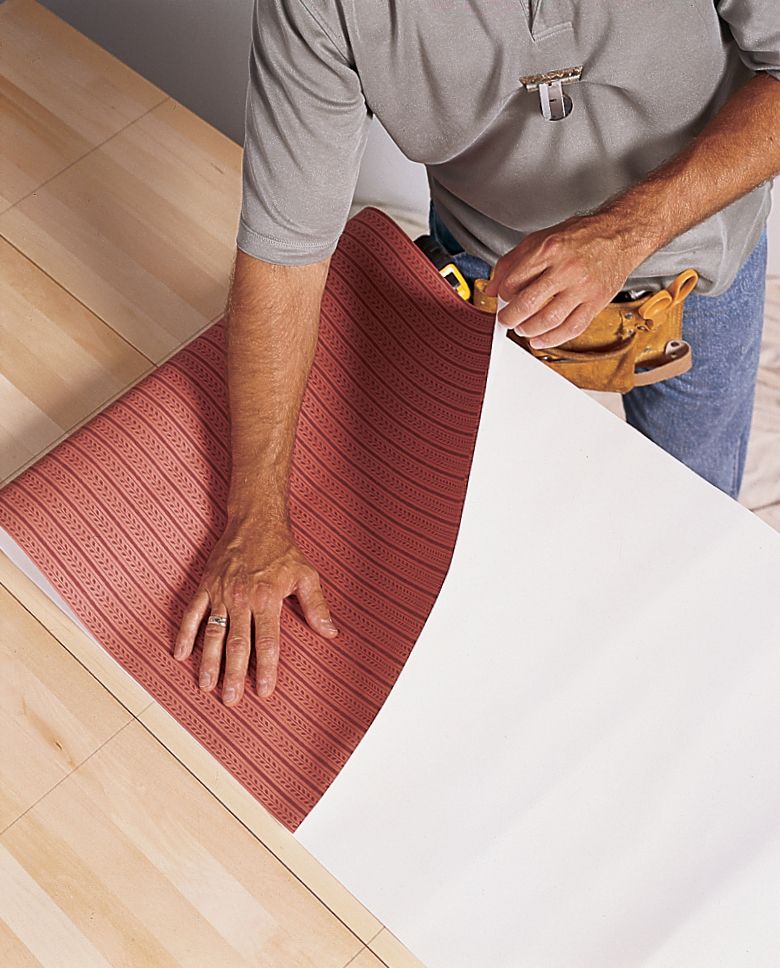
Step 2: Book the Paper
After you apply the paste, it’s time to “book” the paper. This step allows the paste to soak in and the paper to relax, making it easier to hang. Here’s how to do it:
- Fold the pasted back of the paper onto itself, with the top and bottom ends meeting in the middle.
- Ensure the side edges line up perfectly.
- Smooth the paper onto itself as much as possible without creasing the folds.
- Set the paper aside and allow it to rest for the exact booking time recommended on the wallpaper’s label. This time can vary depending on the paper’s content, with vinyl-coated wallcoverings typically requiring more time than uncoated papers.
Booking the paper gives it a chance to become more pliable, which makes handling and applying it far easier. Neglecting this step can lead to wrinkles and misalignment later.
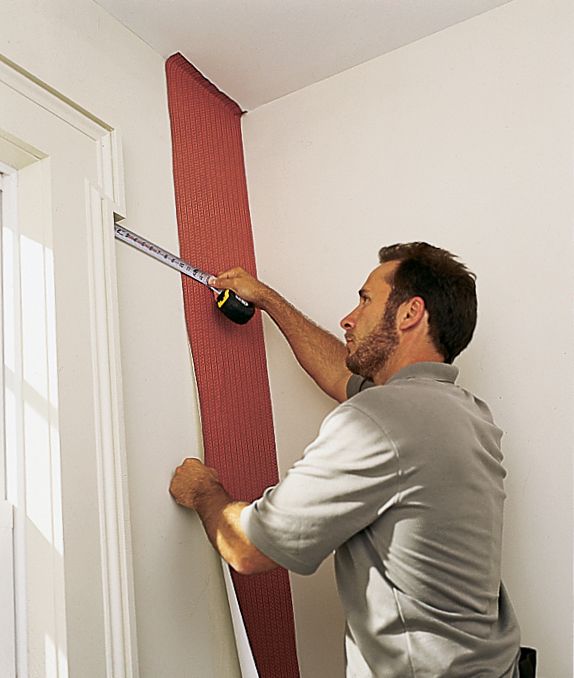
Step 3: Align the First Strip
Proper alignment is a must for your wallpapered room. Here’s how to get it right:
- Start in a corner near a door. If the door is far from the corner, draw a reference line parallel to the door near the corner.
- Unfold the top of the booked paper and hang it on the wall, overlapping about two inches at the ceiling and 1/8 inch in the corner.
- Lightly press it in place.
- Unfold the bottom of the book and let it hang.
- Check the measurement between the paper and the door casing or reference line.
- Adjust the paper to keep it parallel to the door while still overlapping at least 1/8 inch in the corner.
Remember, taking your time with this first strip will set you up for success with the rest of the room.
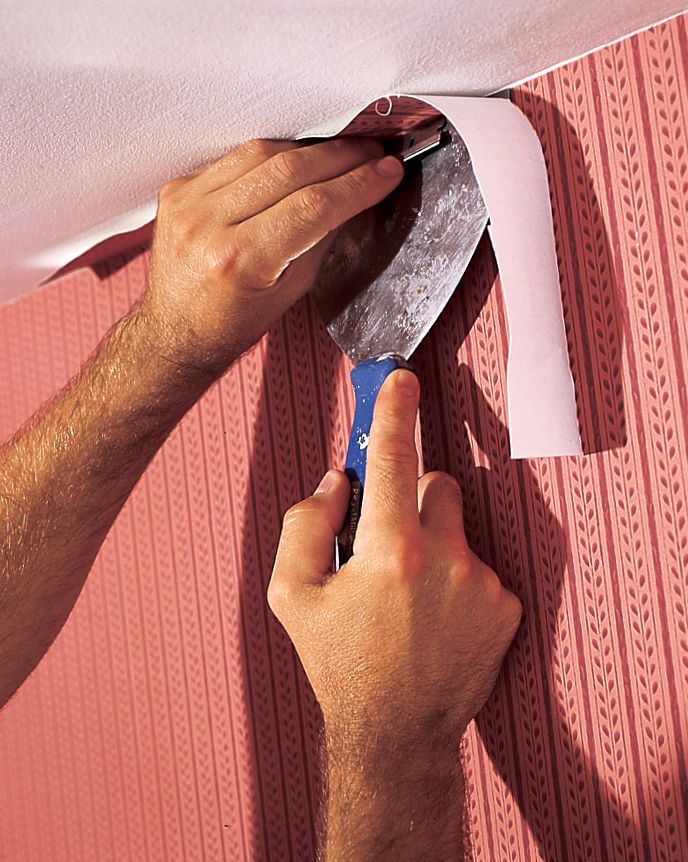
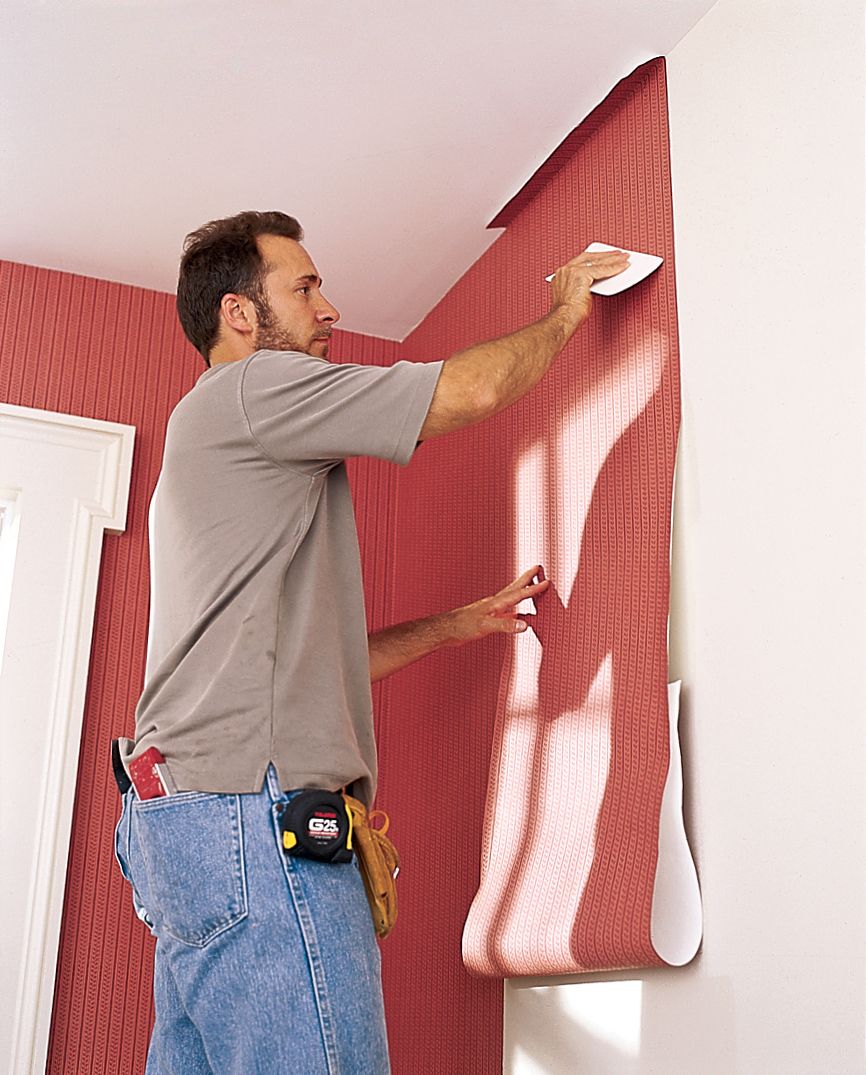
Step 4: Tuck and Trim the Paper
Once your first strip is aligned, it’s time to secure it properly and trim the excess:
- Use the edge of a paper smoother to tuck the paper into the corner at the ceiling.
- Working from the top down, sweep the smoother over the entire sheet. Be careful not to press so hard that you push out the glue.
- To trim the excess paper at the ceiling, push a 6-inch taping knife into the joint between the wall and ceiling.
- Using a razor, cut above the knife to trim off the excess. Work slowly, alternating between cutting and moving the knife. Do not slide the razor and knife together.
- Continue papering to a point above the door.
This method ensures a clean, professional-looking edge at the ceiling. The sharper and more precise your cuts, the more polished your final result.
Step 5: Continue Papering
As you continue to paper the room, keep these tips in mind:
- On the adjacent wall, draw a plumb line if there’s no door or window to use as a reference.
- Hang a strip in the corner, overlapping the existing piece on the adjacent wall by 1/8 inch.
- Measure to the plumb line and adjust the paper to keep the distance equal.
- Smooth the paper and trim at the ceiling and corner.
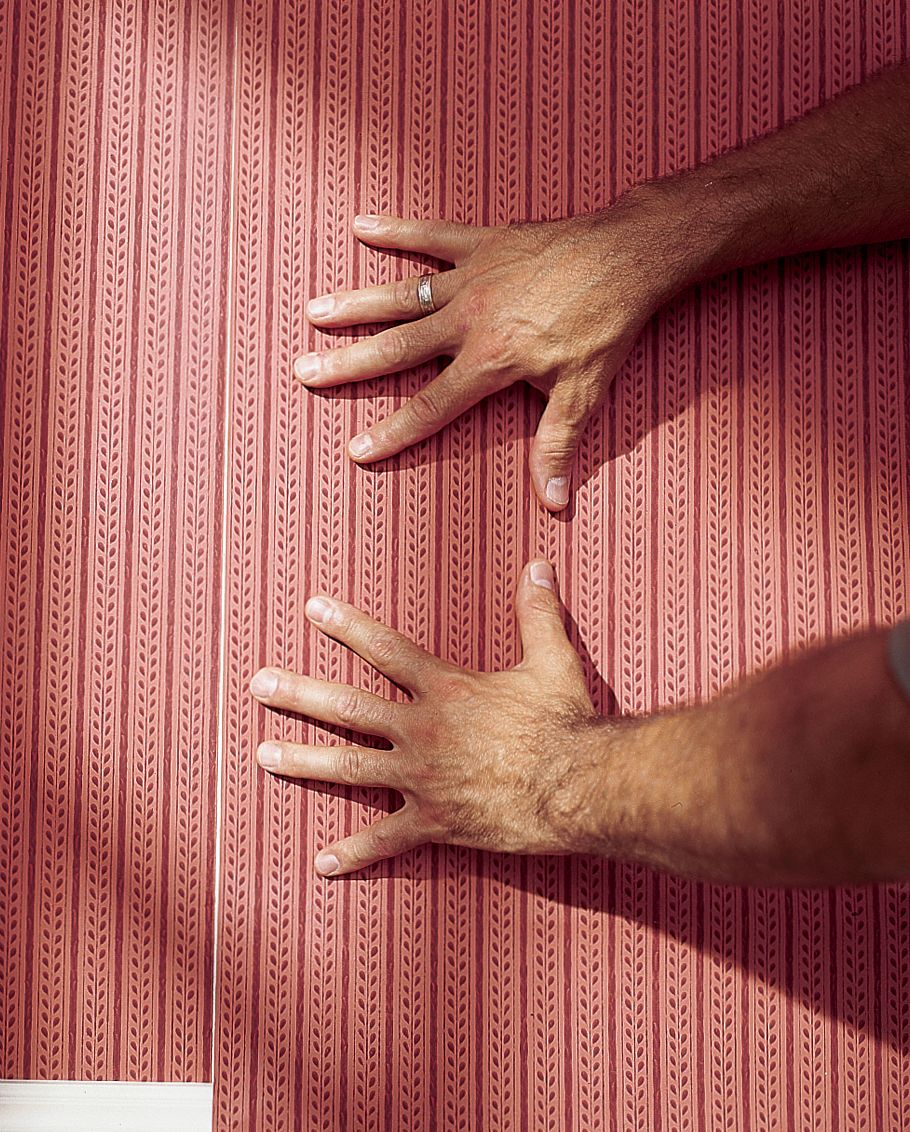
- For the next strip, unfold the top of the book and place it on the wall, matching the pattern as closely as possible. Leave just a hair’s breadth between the sheets.
To remove air bubbles, sweep the paper smoother from the center out to the edges. Wipe off any paste on the surface with a damp sponge.
Step 6: Close the Seams
Properly closing seams is crucial for a polished look:
- Lightly press the top of the paper to the wall.
- Use a seam roller to gently flatten the edges.
- Use your fingertips to push the seam closed.
- Unfold the bottom of the sheet and finish matching and closing the seam.
- Tightly roll down the entire seam, working a full 3 inches in from the edge. This locks the seam, preventing it from opening as you smooth the paper.
- Smooth the whole sheet and continue papering the room, overlapping and trimming corners as shown earlier.
If the booked end of the strip starts to dry out before you hang it, wipe the wall with a damp sponge to moisten the paste again.
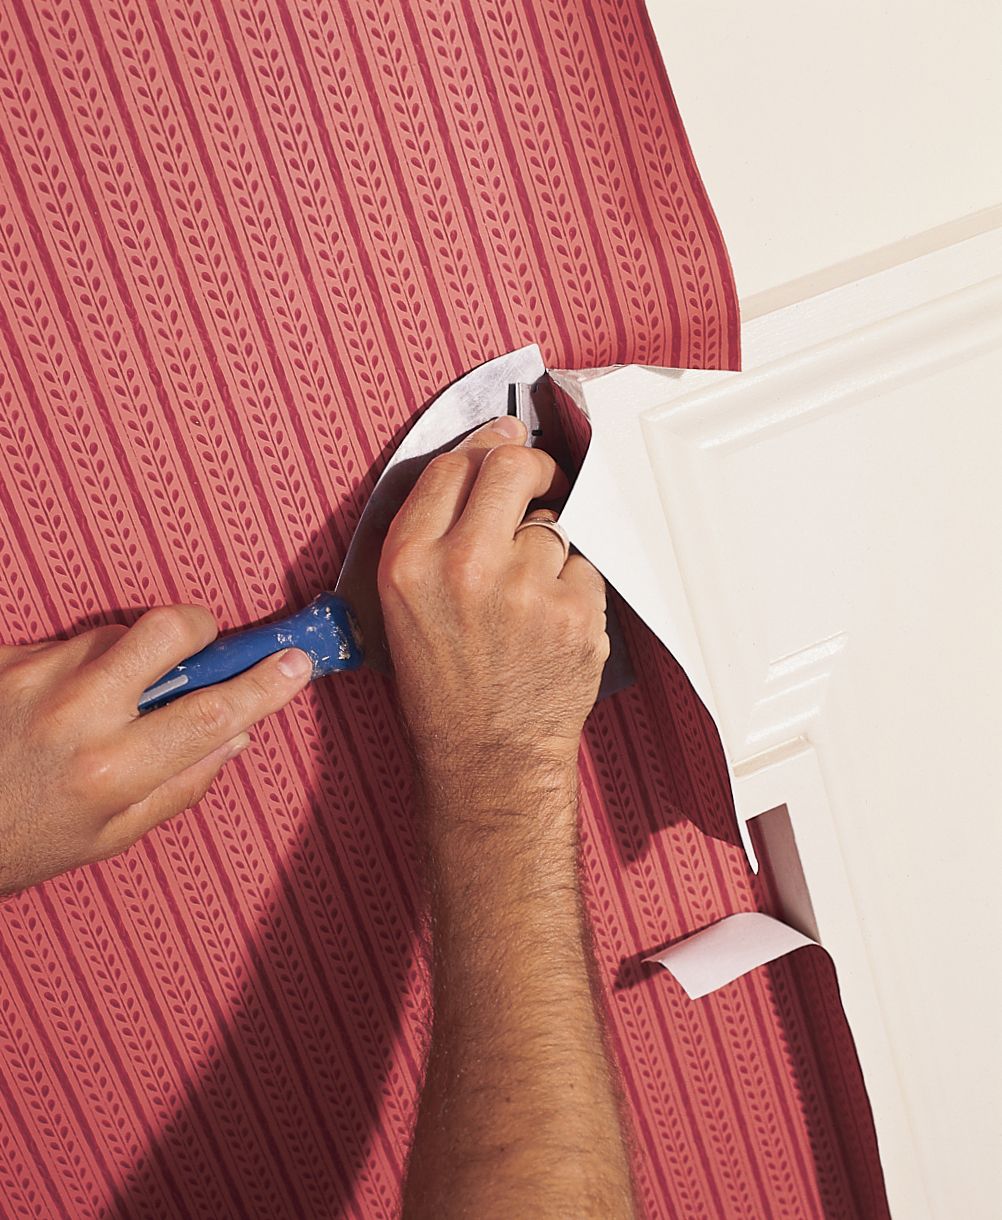
Step 7: Cut in Around Moldings
Cutting around your moldings requires precision:
- Let the paper overlap the molding by at least an inch.
- Make a relief cut in the paper using a razor, running from the molding corner out to the edge of the paper. Use the molding as a guide.
- Press the cut edge tight in the joint between the molding and the wall.
- Trim the excess paper flap with a taping knife and razor.
- Smooth down the whole sheet.
Tip: To hide small cutting errors on darker papers, color the wall or the white edge of the paper with a marker that matches the paper. Some professionals even color all the paper’s edges to make seams less noticeable if the paper shrinks as it dries.
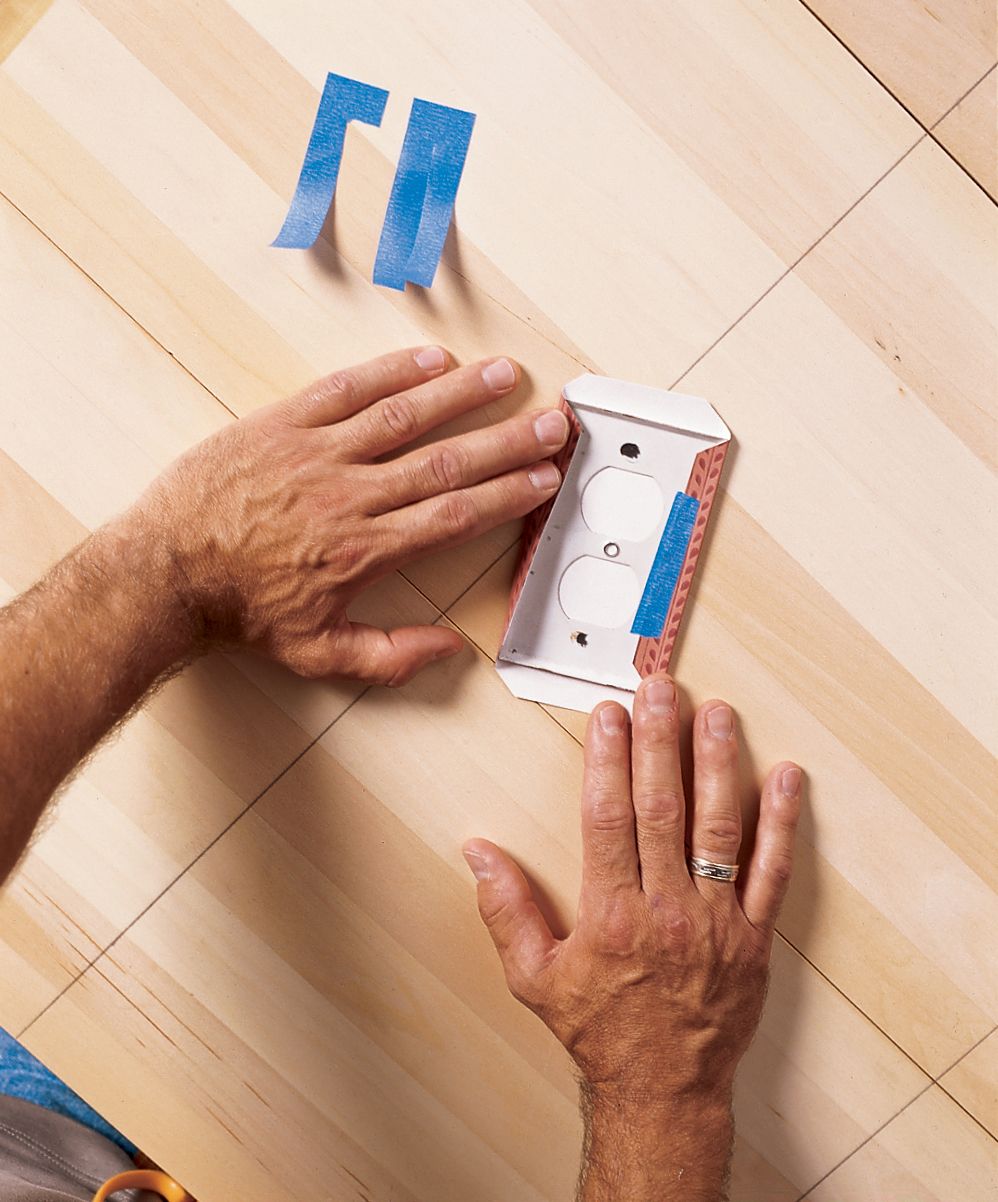
Step 8: Cover the Switches
For a seamless look, consider covering your light switch plates:
- Cut a piece of wallpaper larger than the plate from the part of the pattern that matches the wall around the switch.
- Apply paste to the plate, then lay it face down on the paper.
- Hold them both on the wall and adjust the paper to match the pattern.
- Turn the plate face down and cut off the corners 1/8 inch away from the plate.
- Wrap the paper over the plate and tape it on the back.
- Cut out the switch or receptacle holes with a razor and make Xs at the screw holes.
- Screw the plates back on the wall.
Covering the switch plates keeps the flow of the wallpaper’s pattern uninterrupted and gives a more professional finish.
Our Conclusion
Hanging wallpaper is a rewarding DIY project when done correctly. Follow these professional techniques for pasting, aligning, and trimming to achieve a polished, high-quality finish. Always take your time, especially when aligning patterns and closing seams.