
We may be compensated if you purchase through links on our website. Our team is committed to delivering honest, objective, and independent reviews on home products and services.
Project details
Skill
Cost
Estimated Time
*Cost information in this article sourced from Angi.
 Tape measure
- Miter saw
- Clamps
- Brad nailer
- Drill/driver
- spade bit – 1/2 inch
- drill bit – 1/4-inch
- Masonry bit
- level – 4-foot


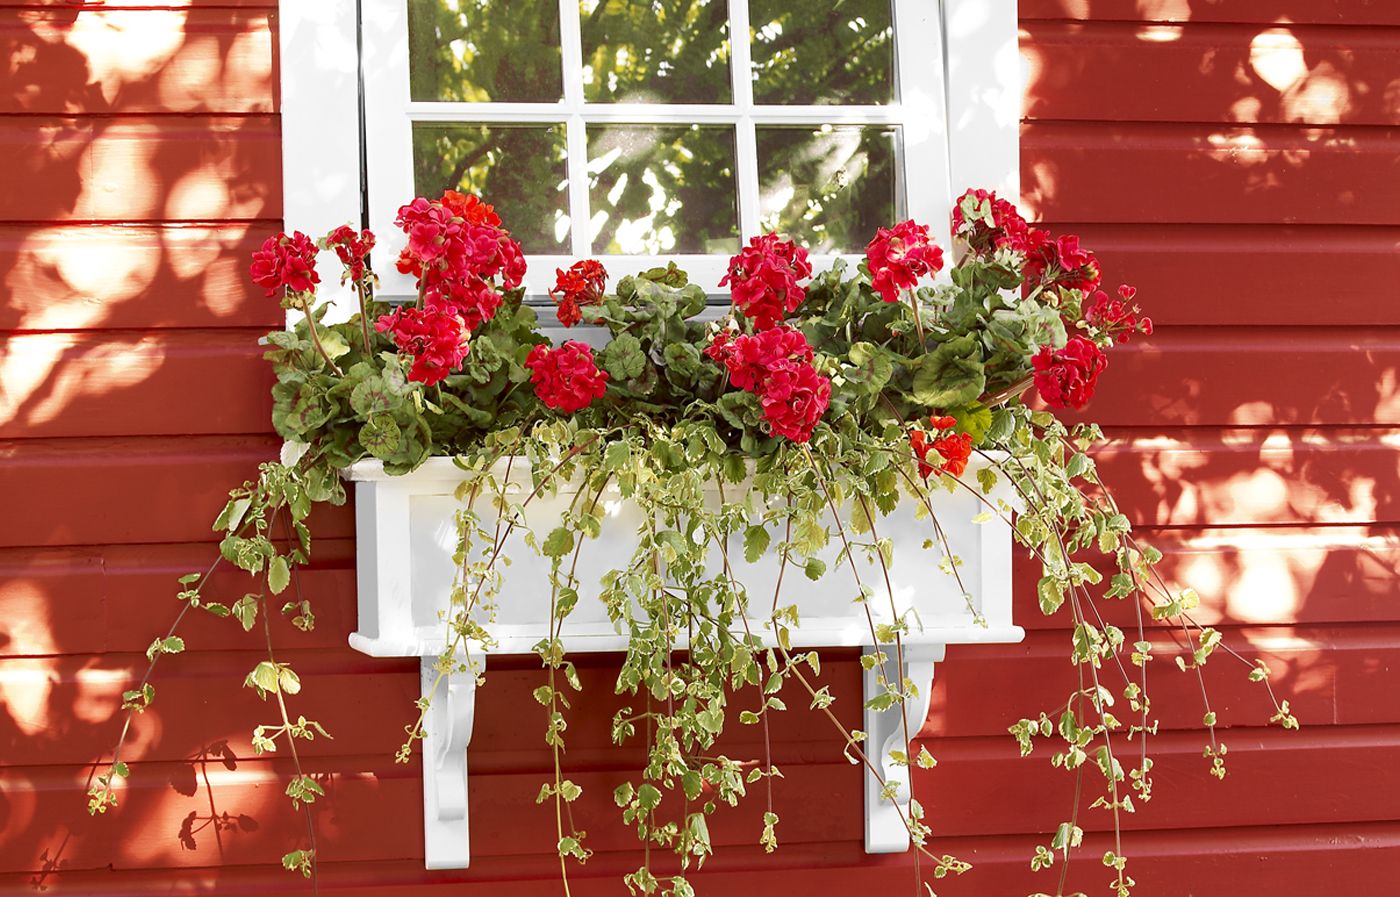
Building a polyvinyl chloride (PVC) window box is an excellent way to add charm and color to your home’s exterior. This DIY project is cost-effective and results in a durable, low-maintenance planter that can withstand various weather conditions.
In this guide, we’ll walk you through the process of creating a custom PVC window box, from planning to installation.
Understanding PVC Window Boxes
PVC window boxes offer a practical and attractive solution for outdoor planters. Before diving into the construction process, it’s essential to understand why PVC is an excellent choice for this project and how it compares to other materials.
Planning Your PVC Window Box Project
Before you begin buying materials, you’ll need to plan out your project properly. This section will guide you through the essential steps to ensure your window box fits perfectly and complements your home’s style.
Measuring Your Window
Follow these steps for accurate and concise window measurements:
- Measure the width of your window from outer edge to outer edge.
- Decide on the desired length of your box, typically 2 to 6 inches shorter than the window width.
- Determine the depth and height based on the plants you plan to grow and your aesthetic preferences.
Choosing the Right Design
Your window box should enhance your home’s style. We recommend considering these design elements:
- Color: Choose a color that matches or contrasts with your home’s exterior.
- Molding: Select molding that complements your home’s trim.
- Profile: Decide between a simple rectangular design or one with decorative panels.
Gathering Tools and Materials
Before starting, ensure you have all the necessary tools and materials:
- Brad nailer and brads
- Clamps
- Drill with spade and regular bits
- Level
- Measuring tape
- Miter saw or circular saw
- Screws and anchors for mounting
- PVC boards (see below)
Step 1: Overview
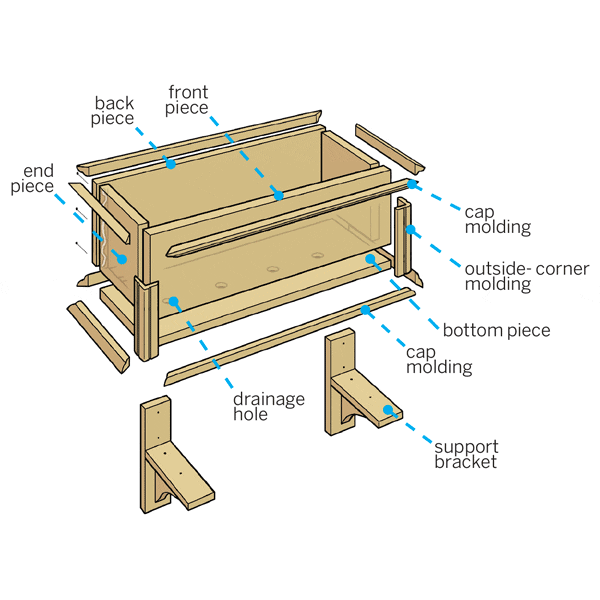
PVC windowbox cut list
We built a 30-inch-wide window box designed to sit beneath a 32-inch-wide window. For boxes longer than 48 inches, add a third bracket at the center of the box.
- 1-by-10 PVC front and back pieces: two @ 30 inches
- 1-by-10 PVC end pieces: two @ 7¾ inches
- 1-by-10 PVC bottom piece: one @ 30 inches
- 1⅛-by-1 ⅛-inch PVC outside-corner molding cut to fit
- PVC cap molding cut to fit
Step 2: Make the frame
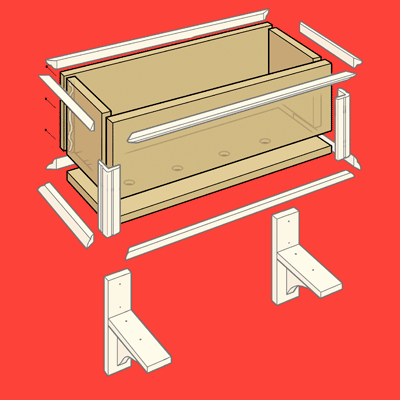
Use a sliding compound miter or circular saw to size the pieces according to the cut list. Sandwich the box’s end pieces between the front and back pieces, applying PVC cement to the captured edges. Clamp the assembly together. Tack the corners with 1½-inch brads. Use a ½-inch spade bit to drill drainage holes every 6 inches along the centerline of the bottom piece, and adhere and tack the piece to the box.
Step 3: Attach the molding
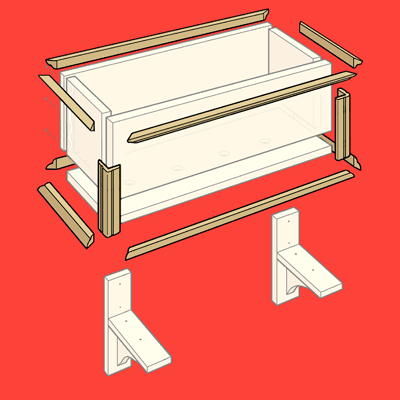
Measure the built box and cut the molding to fit, making 45-degree miter cuts at the corners. Apply cement and tack the molding in place with ¾-inch brads, covering the seam at the bottom.
Step 4: Install the brackets
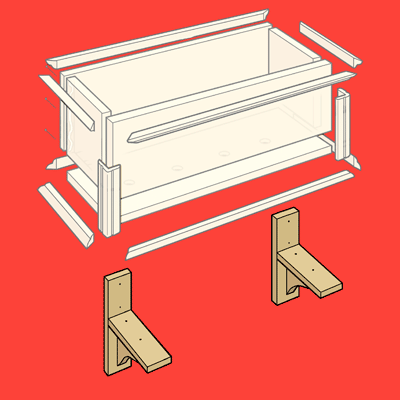
Position a support bracket on the wall just below the window to catch the sill framing, 3 to 6 inches in from the window’s sides. Drill ¼-inch pilot holes through the bracket and into the house, squeeze caulk into the pilot holes, and fasten the bracket with ⅜-by-3-inch lag screws. For brick or stone, use a masonry bit and masonry anchors. Use a 4-foot level to position the second bracket before installing it.
Step 5: Hang the box
In order to hang a window box, center the box on the brackets and fasten it with 1¼-inch wood screws, installed up through each bracket and into the box.
Window Box Finishing Touches and Maintenance
Once you’ve installed your PVC window box, a few finishing touches and regular maintenance will keep it looking great and functioning well for years to come.
Painting Your PVC Window Box
While PVC comes in white, you may want to paint it to match or complement your home’s exterior. To finish your window box, we recommend taking the following steps:
- Clean the box thoroughly with a mild detergent and let it dry completely.
- Apply a primer specifically designed for PVC surfaces.
- Once the primer is dry, apply exterior-grade paint in your chosen color.
- Consider adding a clear sealant for extra protection against the elements.
Caring for Your Window Box
Regular maintenance will extend the life of your window box:
- Clean the box annually with mild soap and water.
- Check for any loose screws or brackets and tighten as needed.
- Inspect drainage holes periodically to ensure they’re not clogged.
- Remove plants and soil at the end of each growing season to clean thoroughly.
Planting and Decorating Your Window Box
With your PVC window box securely in place, it’s time to bring it to life with plants and decorations.
Choosing Suitable Plants
Select plants that will thrive in your window box environment:
- Consider sun exposure: Choose plants that match the amount of sunlight your window box receives.
- Mix textures and heights: Combine trailing plants, upright flowers, and foliage for visual interest.
- Think seasonally: Plan for year-round appeal by including evergreens or switching out plants seasonally.
Creating Attractive Arrangements
Design your window box plantings for maximum impact:
- Add decorative elements like small garden ornaments or seasonal accents for extra charm.
- Consider color schemes that complement your home’s exterior.
- Follow the “thriller, filler, spiller” rule: Include a tall centerpiece, mid-height plants to fill in, and trailing plants to cascade over the edges.
Troubleshooting Common Window Box Issues
Even with careful planning and construction, you may encounter some issues with your PVC window box. Here are solutions to common problems you might face.
Addressing Drainage Problems
If you notice water pooling in your window box:
- Check that drainage holes are clear and unobstructed.
- Consider adding a layer of gravel at the bottom of the box to improve drainage.
- Ensure the box is slightly tilted away from the house to encourage water runoff.
Fixing Loose or Uneven Boxes
If your window box becomes loose or uneven:
- Check and tighten all mounting screws.
- Use shims between the box and brackets if necessary to level the box.
- Verify that brackets are still securely attached to the wall.
Our Conclusion
Remember, the key to success lies in careful planning, precise measurements, and attention to detail during construction and installation.
Whether you’re an experienced DIYer or a beginner, this project offers a great opportunity to improve your home while expressing your creativity through gardening. With your new PVC window box in place, you’re ready to enjoy the beauty of flowers and plants right outside your window, adding charm and character to your home’s exterior.