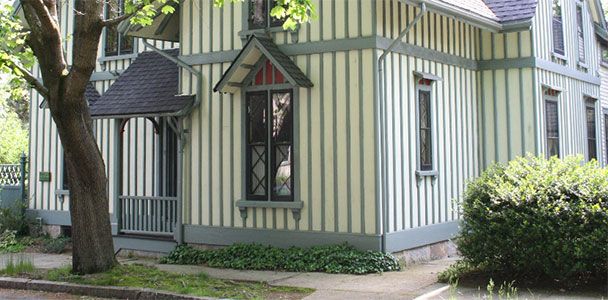

Board-and-batten siding is a popular choice for homeowners seeking a rustic, charming exterior. However, this type of siding—like all siding materials—can suffer damage over time. In this guide, we’ll explain the process of repairing board-and-batten siding, from identifying issues and comparing techniques to completing the repair.
Identifying Siding Damage
Spotting damage early prevents extensive repairs down the line, and regular inspections of your siding can help maintain its integrity and appearance.
Signs of Rot and Water Damage
If you notice any of these signs of siding damage, take action to prevent further deterioration:
- Discoloration or dark spots on the wood
- Peeling paint or warped boards
- Soft or spongy areas when you press on the boards
- Visible mold or mildew growth
Assessing the Extent of Repair Needed
After identifying the damage, determine whether you need to replace individual boards or sections of siding. You may be able to repair small areas of rot with wood filler, while more extensive damage may require a full board replacement.
Tools and Materials
Before you begin repairs, gathering the proper tools and materials to ensure a seamless process.
Tools Required
- Caulking gun
- Circular saw
- Hammer
- Level
- Nail gun
- Paintbrush or roller
- Pry bar
- Tape measure
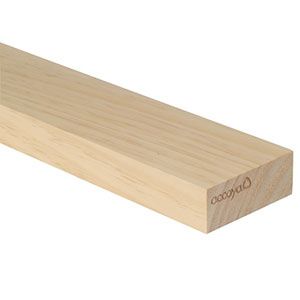
Choosing the Right Replacement Materials
Before choosing the right siding material for your home, compare the different materials below:
- Cellular PVC: For painted siding, cellular PVC is weather-resistant, non-combustible, and insulating, keeping your home cool in the summer and warm in the winter. This durable, low-maintenance alternative is also insect-resistant.
- Engineered wood: This option combines the look of wood with enhanced durability and moisture resistance, offering a perfect blend of aesthetics and resilience.
- Fiber cement: Durable and low-maintenance, fiber cement is rot- and insect-resistant. It’s a great option for those who want their siding to last for up to 50 years.
- Vinyl: This type of siding is a popular choice for many homeowners due to its affordability, durability, low maintenance, and energy efficiency. It’s available in a variety of colors and styles to match your home’s aesthetic.
- Wood: Traditional and versatile, wood siding offers a natural look but requires regular maintenance.
Step-By-Step Repair Process
Repairing your board-and-batten siding and ensuring it lasts for years to come involves removing the current damaged siding, prepping the area, and installing new siding.
Removing Damaged Sections
Before installing new siding, carefully remove any old or damaged sections:
- Use a pry bar to remove the battens covering the damaged boards.
- Cut out the damaged section of the board, making sure to cut at the center of a stud for proper support.
- Remove any nails or fasteners left behind.
Preparing the Area for New Siding
After removing the old siding, prep the area to ensure your new siding lasts for years to come:
- Inspect the underlying structure for any additional damage or moisture issues.
- Apply a water-resistant barrier if needed.
- Check that the area is clean and dry before proceeding.
Installing New Board-and-Batten Pieces
Gather all necessary tools and materials before installing your new siding:
- Caulk any gaps to prevent water infiltration.
- Cut the new board to fit the opening, allowing for expansion.
- Prime or seal all sides of the new board, including cut ends.
- Nail the board in place, ensuring it’s level with adjacent boards.
- Reattach the battens or install new ones if necessary.
Preventing Future Damage
Taking preventive measures can extend the life of your board-and-batten siding and reduce the need for future repairs.
Proper Installation Techniques
Follow these steps for proper installation to prevent water damage:
- Install flashing at all horizontal joints and around windows and doors.
- Leave a gap of at least 6 inches between the ground and the bottom of the siding.
- Use stainless steel nails to prevent rust stains and provide a long-lasting attachment.
Regular Maintenance Tips
Regular maintenance, including periodic cleaning and inspections, is key to prolonging the life of your siding. Here are some maintenance tips to follow:
- Clean your siding with a power washer once a year to prevent dirt and debris buildup.
- Inspect your siding annually for signs of damage or wear.
- Repaint or restain wood siding every 5–7 years to maintain its protective coating.
- Trim nearby vegetation to avoid moisture retention against the siding.
Enhancing Durability With Water Tables
A water table can significantly improve the longevity of your board-and-batten siding by directing water away from the vulnerable bottom edge.
What Is a Water Table?
A water table, also called a splash board or mud board, is a horizontal trim piece installed at the bottom of the siding. It creates a slight overhang that helps direct water away from the foundation and protects the end grain of vertical siding boards.
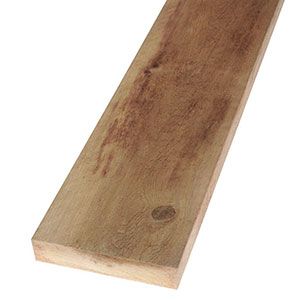
Types of Water Table Materials
When installing a water table, check for proper flashing and allow for expansion and contraction, especially with PVC materials. Compare the different water table materials below and choose one that complements your siding:
- Accoya: This natural, water-resistant wood offers excellent rot resistance and stability and won’t warp over time.
- Cellular PVC: For painted applications, PVC provides long-lasting performance without the risk of rot.
- Western red cedar: Naturally resistant to decay and insects, cedar is a popular choice for exterior trim.
DIY vs. Professional Repair: Making the Right Choice
Deciding whether to tackle board-and-batten repairs yourself or hire a professional depends on several factors, including the extent and location of the damage.
When To Attempt DIY Repairs
Do-it-yourself (DIY) repairs are cost-effective and rewarding if you have the right tools and time for the project. You may be able to repair board-and-batten siding on your own if it requires the following:
- Simple board replacements
- Small damage fixes
- Touch-up painting or sealing
Signs You Need a Professional
Professional siding contractors have the expertise to complete your repairs efficiently and effectively. Although professional siding installation costs more than DIY repairs, a professional’s experience can make a significant difference in the quality and longevity of the repair. Seek professional help in the following instances:
- The damage is extensive or affects multiple areas.
- The repair requires specialized tools or skills.
- You suspect underlying structural issues.
- You’re unsure about proper installation techniques.
Additional Considerations for Repair
From environmental impacts and cost implications, consider the following factors before completing your board-and-batten repairs.
Environmental Impact of Siding Materials
When choosing a siding material for your home, think about how much energy is used to produce the material, whether the material is recyclable, and how well the material insulates your home. Fiber cement and engineered wood are more sustainable options compared to traditional wood.
Cost Implications
Repair costs can vary based on the extent of damage and materials used. Expect low costs for minor repairs and more expensive pricing for larger projects requiring extensive replacement. Researching and budgeting for the necessary materials and labor will also help you avoid unexpected expenses. Consider requesting a quote from at least three different service providers to compare pricing and find a professional that offers services within your budget.
Historical Considerations
If you live in a historic home, you may need to adhere to specific guidelines regarding exterior repairs and obtain special permits or materials to maintain the home’s historical accuracy. Contact your local historical commission for specifics on your siding repairs.
Finishing Touches
After completing repairs, taking the time to paint, stain, seal, and weatherproof your siding will provide a lasting and attractive finish.
Painting and Staining Options
Consider the following practices for painting or staining your new siding:
- Apply paint or stain in thin, even coats for the best results.
- For painted siding, use a high-quality exterior paint that matches the existing color.
- If staining, choose a product that enhances the wood’s natural beauty while providing UV and moisture protection.
Sealing and Weatherproofing
Sealing and weatherproofing your siding can prevent water damage and rot over time. Follow these tips for maximum effectiveness:
- Apply caulk around all joints, corners, and where siding meets trim to prevent water infiltration.
- Consider applying a water-repellent coating to the end grain of wood siding for extra protection.
- Use a clear sealant on unpainted wood to protect against moisture.
Our Conclusion
Repairing board-and-batten siding requires attention to detail and the right approach for long-lasting results. By following the steps outlined in this guide, you can repair damaged siding and take measures to prevent future issues. Remember to regularly inspect and maintain your siding to catch problems early and keep your home’s exterior looking its best.