Project details
Skill
Cost
Estimated Time
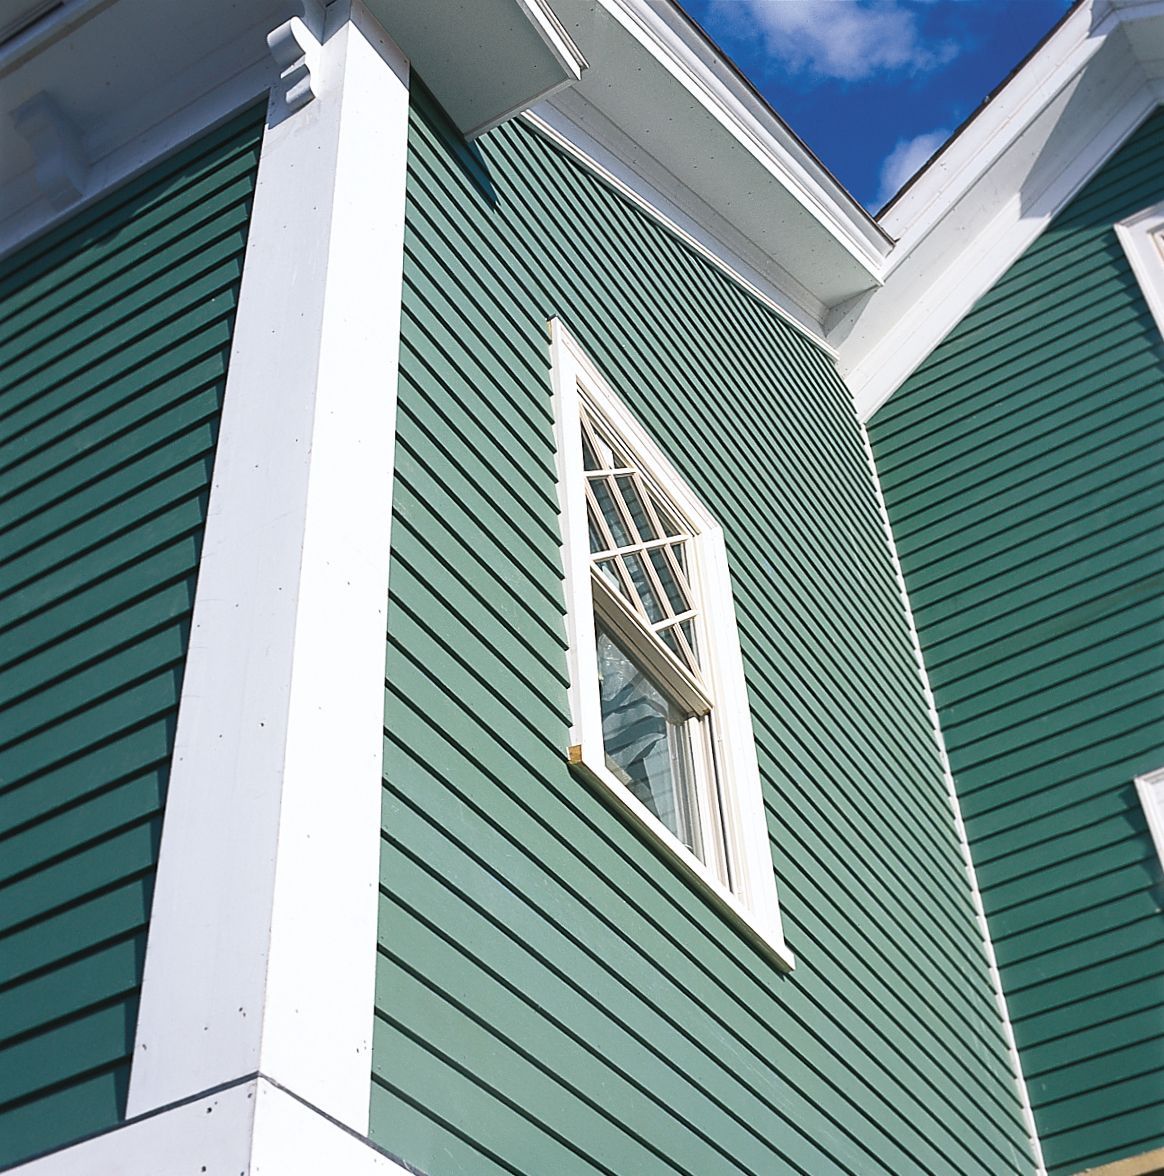
Since Colonial times, Americans have protected their houses from the weather with thin, overlapping wood planks known as clapboards. Today, clapboards are typically milled to precise dimensions for consistency and ease of installation. While this installation process may seem straightforward, doing it correctly is essential. We’ll walk you through the steps on how to hang clapboard siding, from preparation to finishing touches.
Types of Clapboard Materials
The traditional clapboard siding method involves overlapping thin, tapered wooden planks to create a weatherproof barrier. The name “clapboard” originates from the Dutch word “klappen,” meaning “to split,” as these boards were originally hand-split from logs.
Rather than just logs, clapboard now comes in a range of materials. Each material has its own set of pros and cons, so consider factors like climate, budget, and desired maintenance level when making your selection. Modern options include:
- Western red cedar: As This Old House general contractor Tom Silva notes, “It takes paint easily, goes up faster than shingles, and as long as it’s installed properly and well maintained, it can last the lifetime of the house. It looks great, too.”
- Pine and spruce: Affordable options that perform well when properly treated
- Fiber-cement: A durable, low-maintenance alternative that mimics the look of wood
- Vinyl: A budget-friendly option that requires minimal upkeep
- Engineered wood: Combines the look of real wood with added durability
Clapboard Siding Tools and Materials
Proper preparation with the right tools and materials can significantly impact the quality and efficiency of your work. To hang clapboard siding effectively, you’ll need the following tools:
- Hammer
- Circular saw or table saw
- Tape measure
- Level
- Chalk line
- Utility knife
- Caulking gun
- Nail gun (optional, but recommended for larger projects)
- Building paper or housewrap
- Flashing
- Galvanized nails (7d for most applications)
- Caulk or sealant
- Paint or stain (if finishing on-site)
- Corner boards
- Starter strips
Steps for How To Hang Clapboard Siding
Follow these steps to hang clapboard siding on your home.
1. Gather the Required Siding Needed
When estimating the amount of siding needed, measure the height and width of all walls to calculate the total square footage. Deduct the area of doors and windows, then add about 10% for waste and cuts. Your local lumber yard can help determine the linear feet required based on the width and exposure of your chosen siding.
2. Install the Housewrap
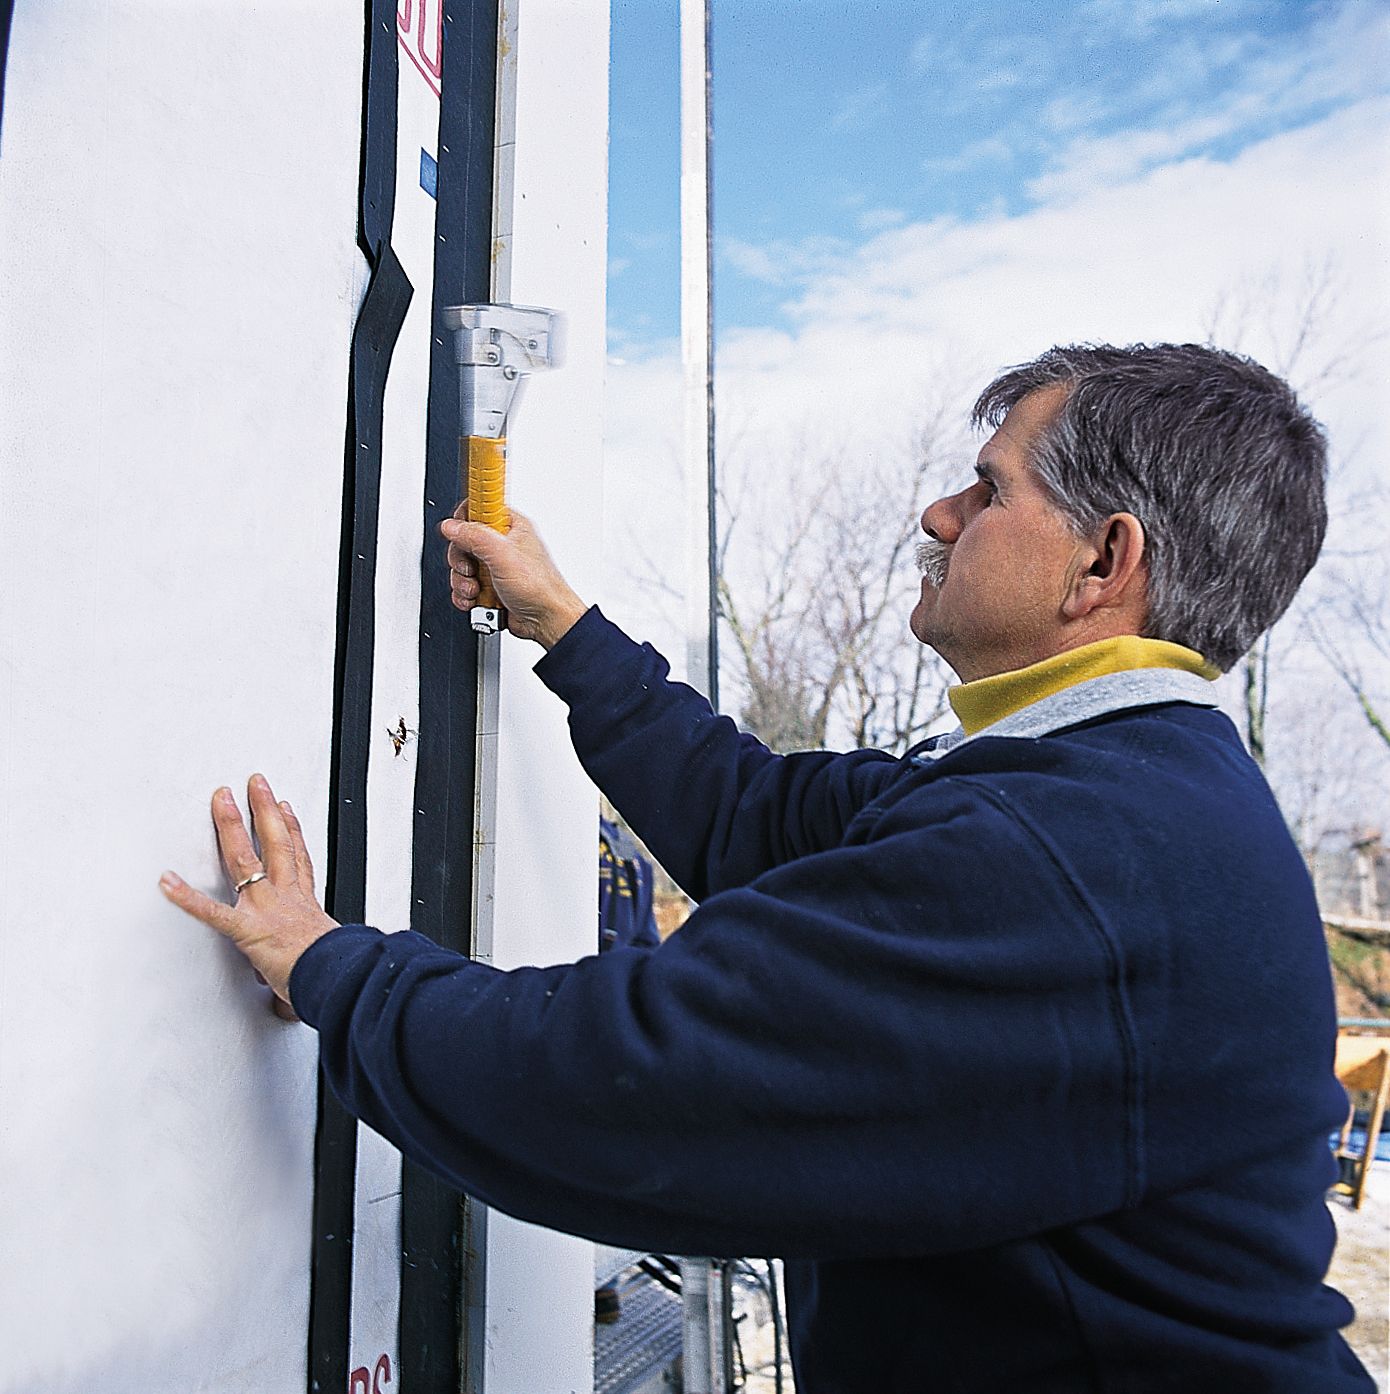
The first step in preparing the wall surface is to install the housewrap. This protects the home from moisture infiltration. Begin by covering the entire exterior wall with housewrap or building paper. This layer acts as a secondary water barrier and helps prevent air infiltration. Follow these steps:
- Tape all seams with housewrap tape to ensure a continuous barrier.
- Start at the bottom of the wall and work your way up, overlapping each row by at least 6 inches.
- Secure the housewrap with staples every 12 to 18 inches.
3. Add Flashing and Felt Paper
After the housewrap is in place, it’s time to add flashing and felt paper for additional protection, which will help protect your home from water damage and improve its overall energy efficiency.
- Create a breathing space by stapling two 2-inch-wide strips over each stud line. This provides an escape route for condensation that may form behind the siding.
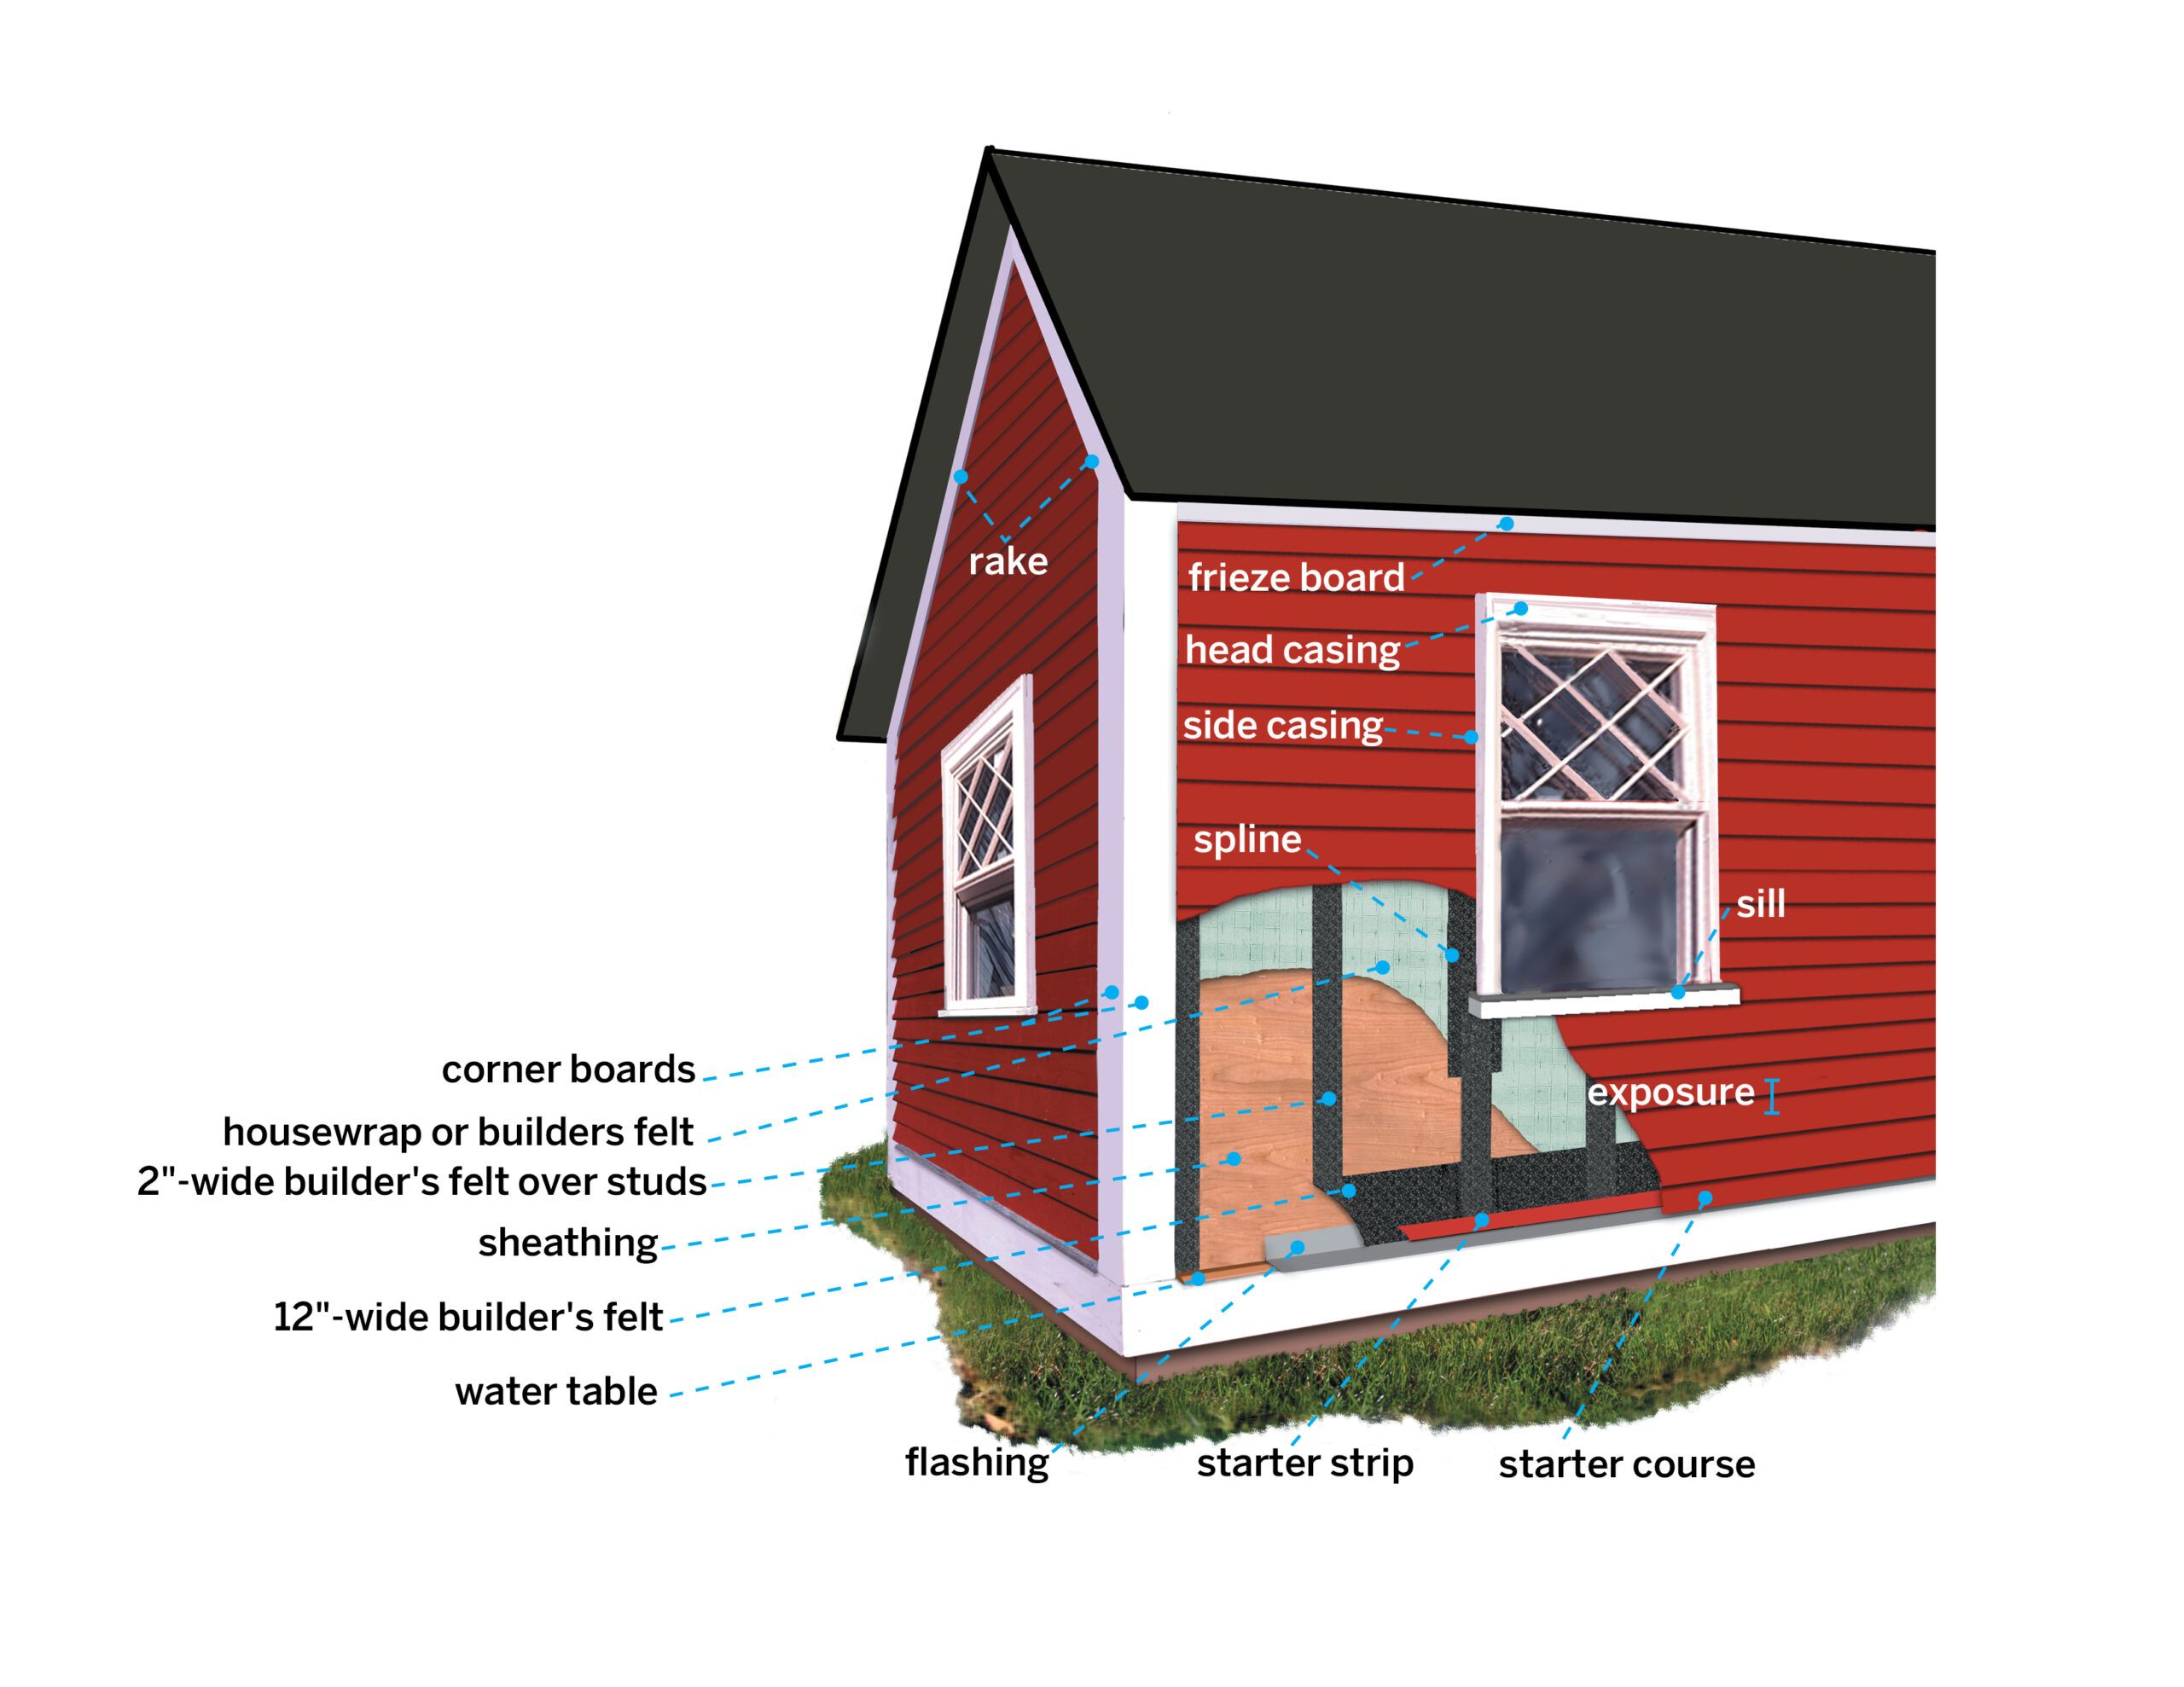
- Install flashing around windows, doors, and other openings. As Tom Silva recommends, “Bend flashing over the water table so it extends 1 inch up the wall. Secure the top edge of the flashing at the studs with 4d nails.”
- Apply 12-inch-wide strips of felt paper behind corner boards and along the edges of door and window casings.
- Staple 12-inch builder’s felt above the water table, covering the flashing.
4. Make a Swing Stick
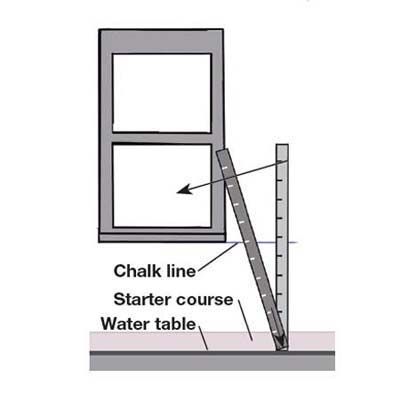
A swing stick helps ensure even spacing between clapboard courses. This method allows you to maintain consistent exposure even when working around windows and other obstacles. Here’s how to make and use one.
- Transfer all marks from the stick to the wall.
- Take a straight 1 x 3 board at least 6 feet long.
- Starting at one end, mark a series of lines along the edge, each equal to the clapboard’s exposure (typically 4 1/2 inches for 6-inch siding).
- Draw an arrow on the end where you began measuring.
- To use the swing stick, stand it upright on its arrow-marked end between a window and corner board, aligning the end with the bottom of the starter course.
- Tilt the stick until one of its marks aligns with the chalk line at the windowsill’s bottom edge.
5. Make a Story Pole
A story pole helps you transfer your layout marks to corner boards, ensuring alignment across the entire wall. By using both the swing stick and story pole, you’ll create a consistent guide for hanging your clapboard siding. Here’s how to create and use one.
- Repeat this process on the opposite corner board to create matching sets of marks.
- Take a length of clapboard as long as the wall is high.
- Hold it vertically, aligning one end with the butt edge of the starter course.
- Transfer the marks from the wall (made using the swing stick) onto this clapboard.
- Place the story pole vertically alongside a corner board, lining up its end with the starter course.
- Transfer the marks onto the corner board using a pencil and square.
6. Cut the Starter Strip
Next, you’ll need to install the starter course, which is the foundation of your clapboard siding installation. The first step in this process is to create a starter strip.
- Using a table saw, rip 1 1/2 inches off the top of a clapboard.
- This narrower piece will serve as your starter strip, ensuring the proper angle for the first full course.
7. Positioning and Nailing
With your starter strip prepared, follow these steps to install it.
- Position the starter strip so its thickest edge is 1/8 inch above the water table.
- Secure the strip to every other stud using one 7d nail per stud.
- For the first full-width clapboard (the starter course), align its lower edge to cover the starter strip, sitting just above the water table.
- Apply sealant along the corner boards before bedding the clapboard ends into it, leaving a 1/16-inch space along the corner board for expansion.
- Nail the starter course about an inch above its butt edge, driving one 7d nail into each stud.
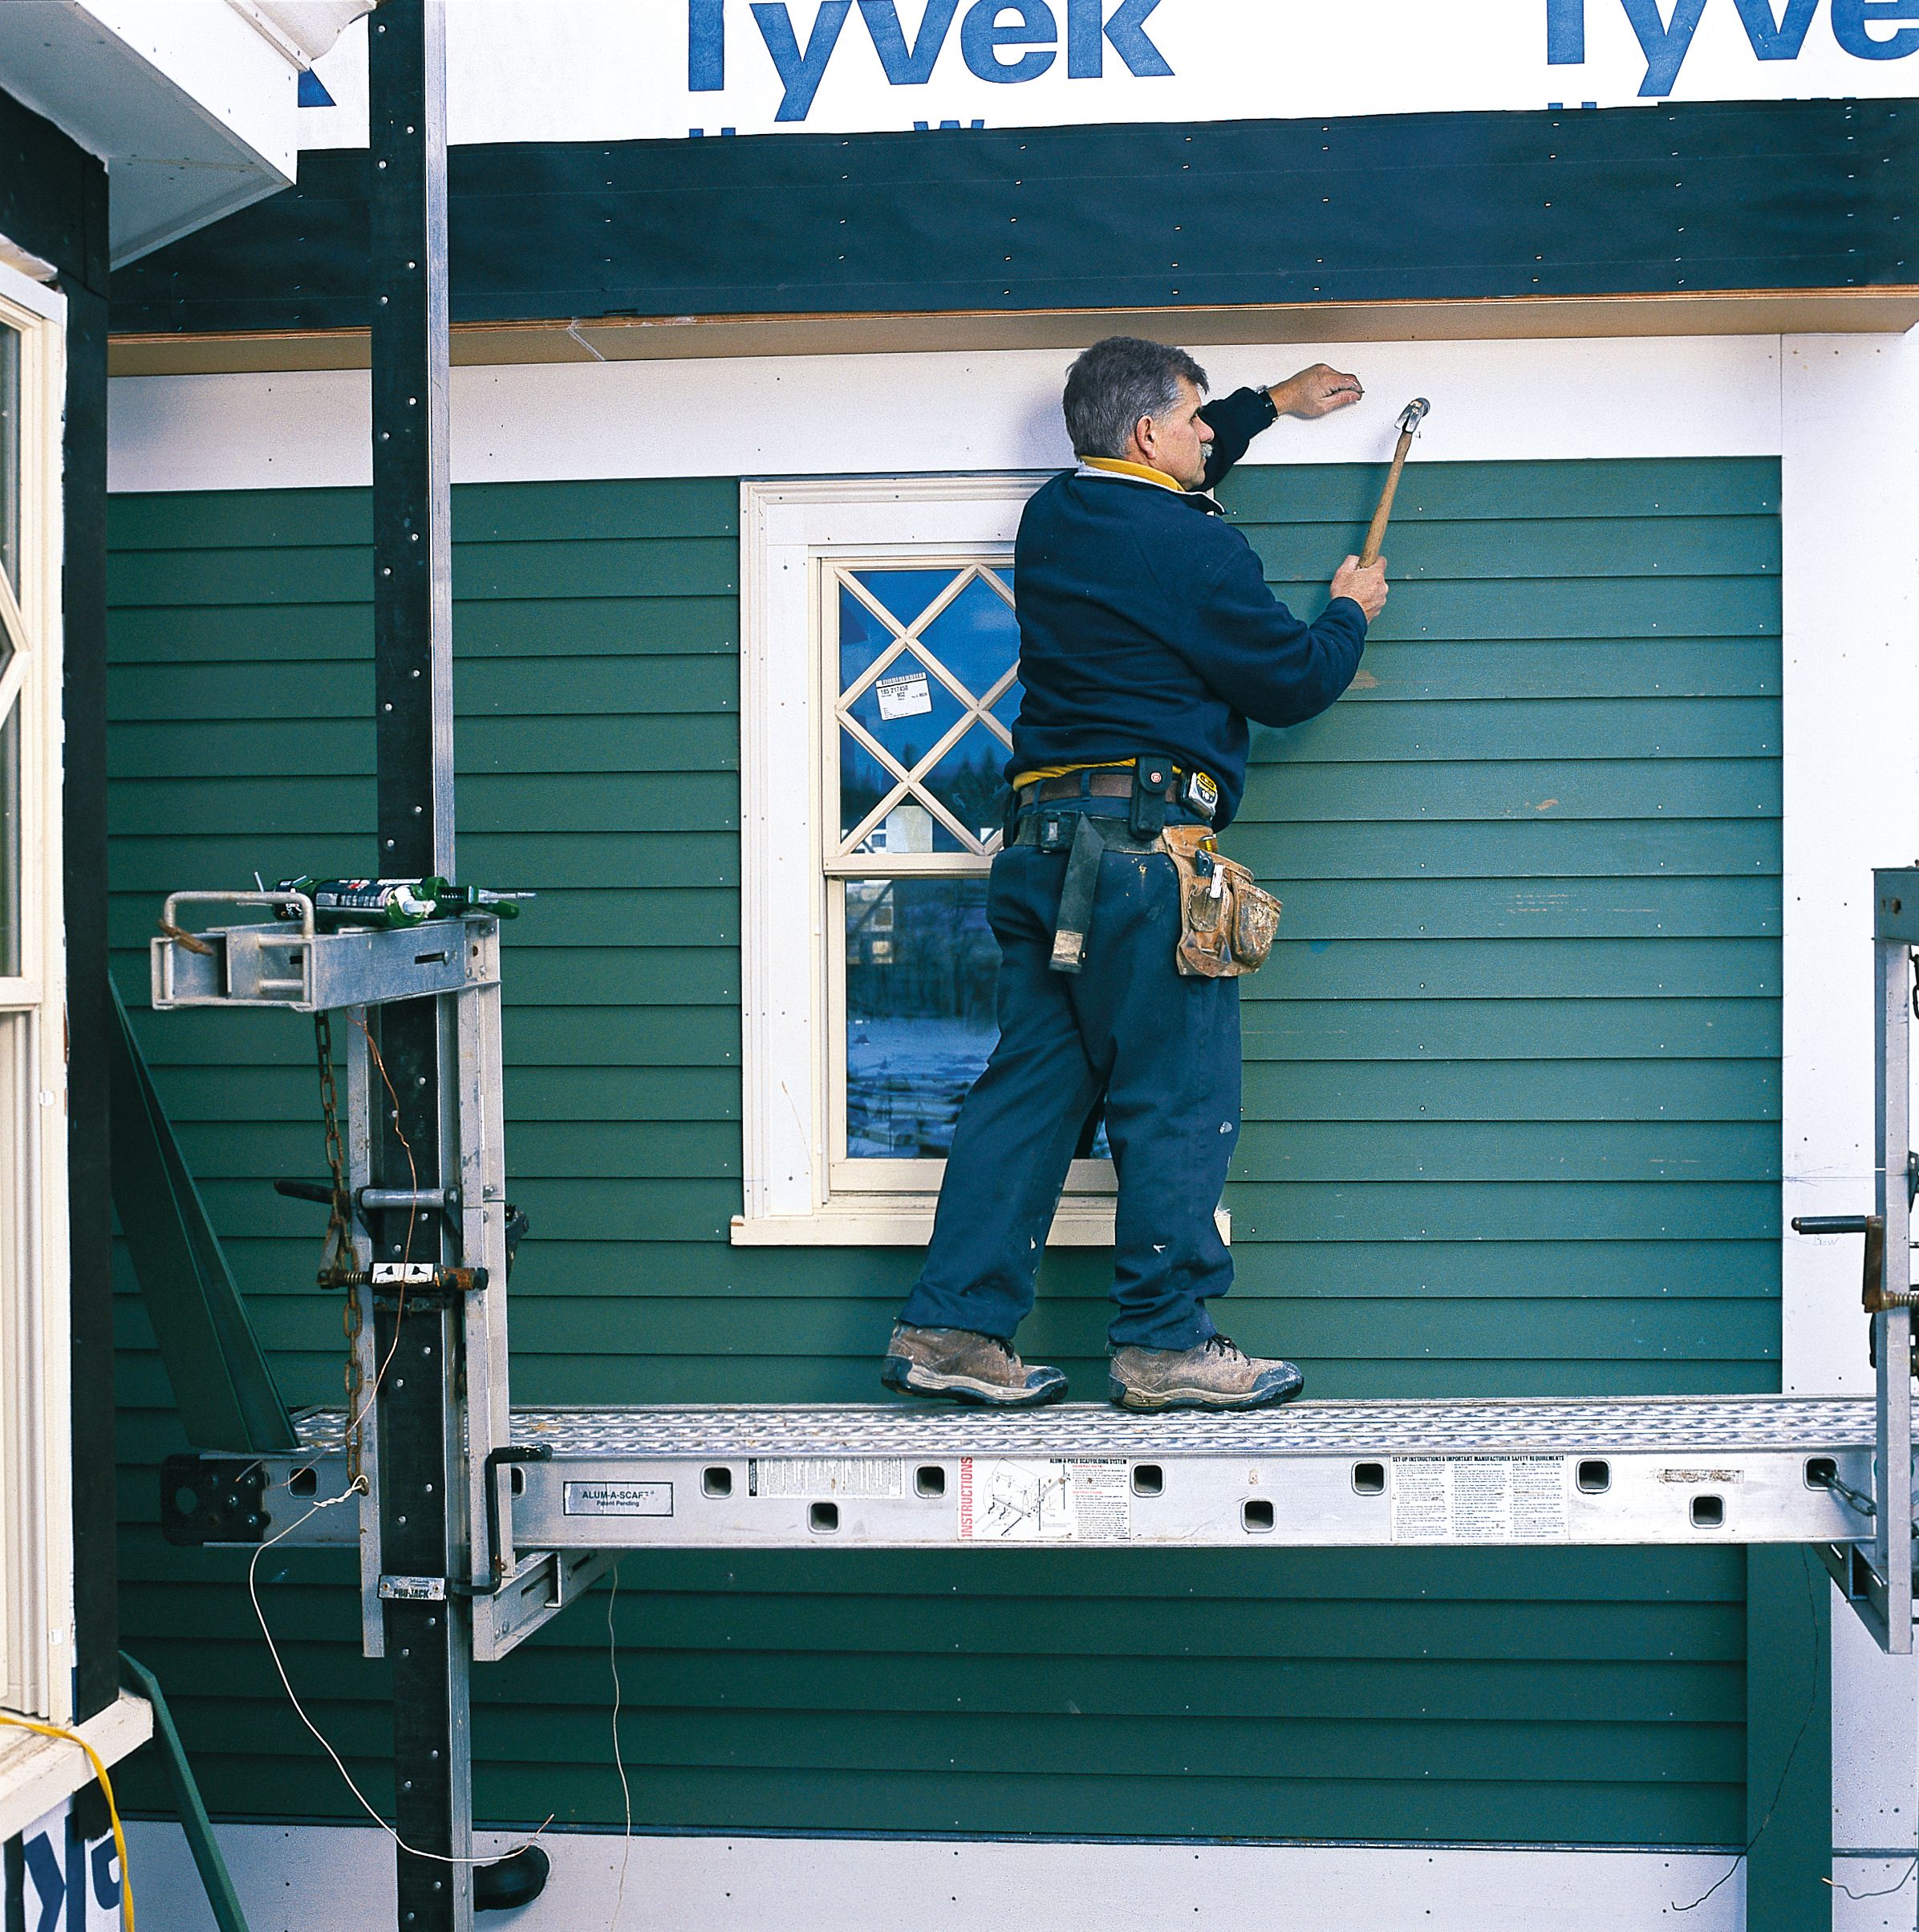
8. Hanging Subsequent Courses
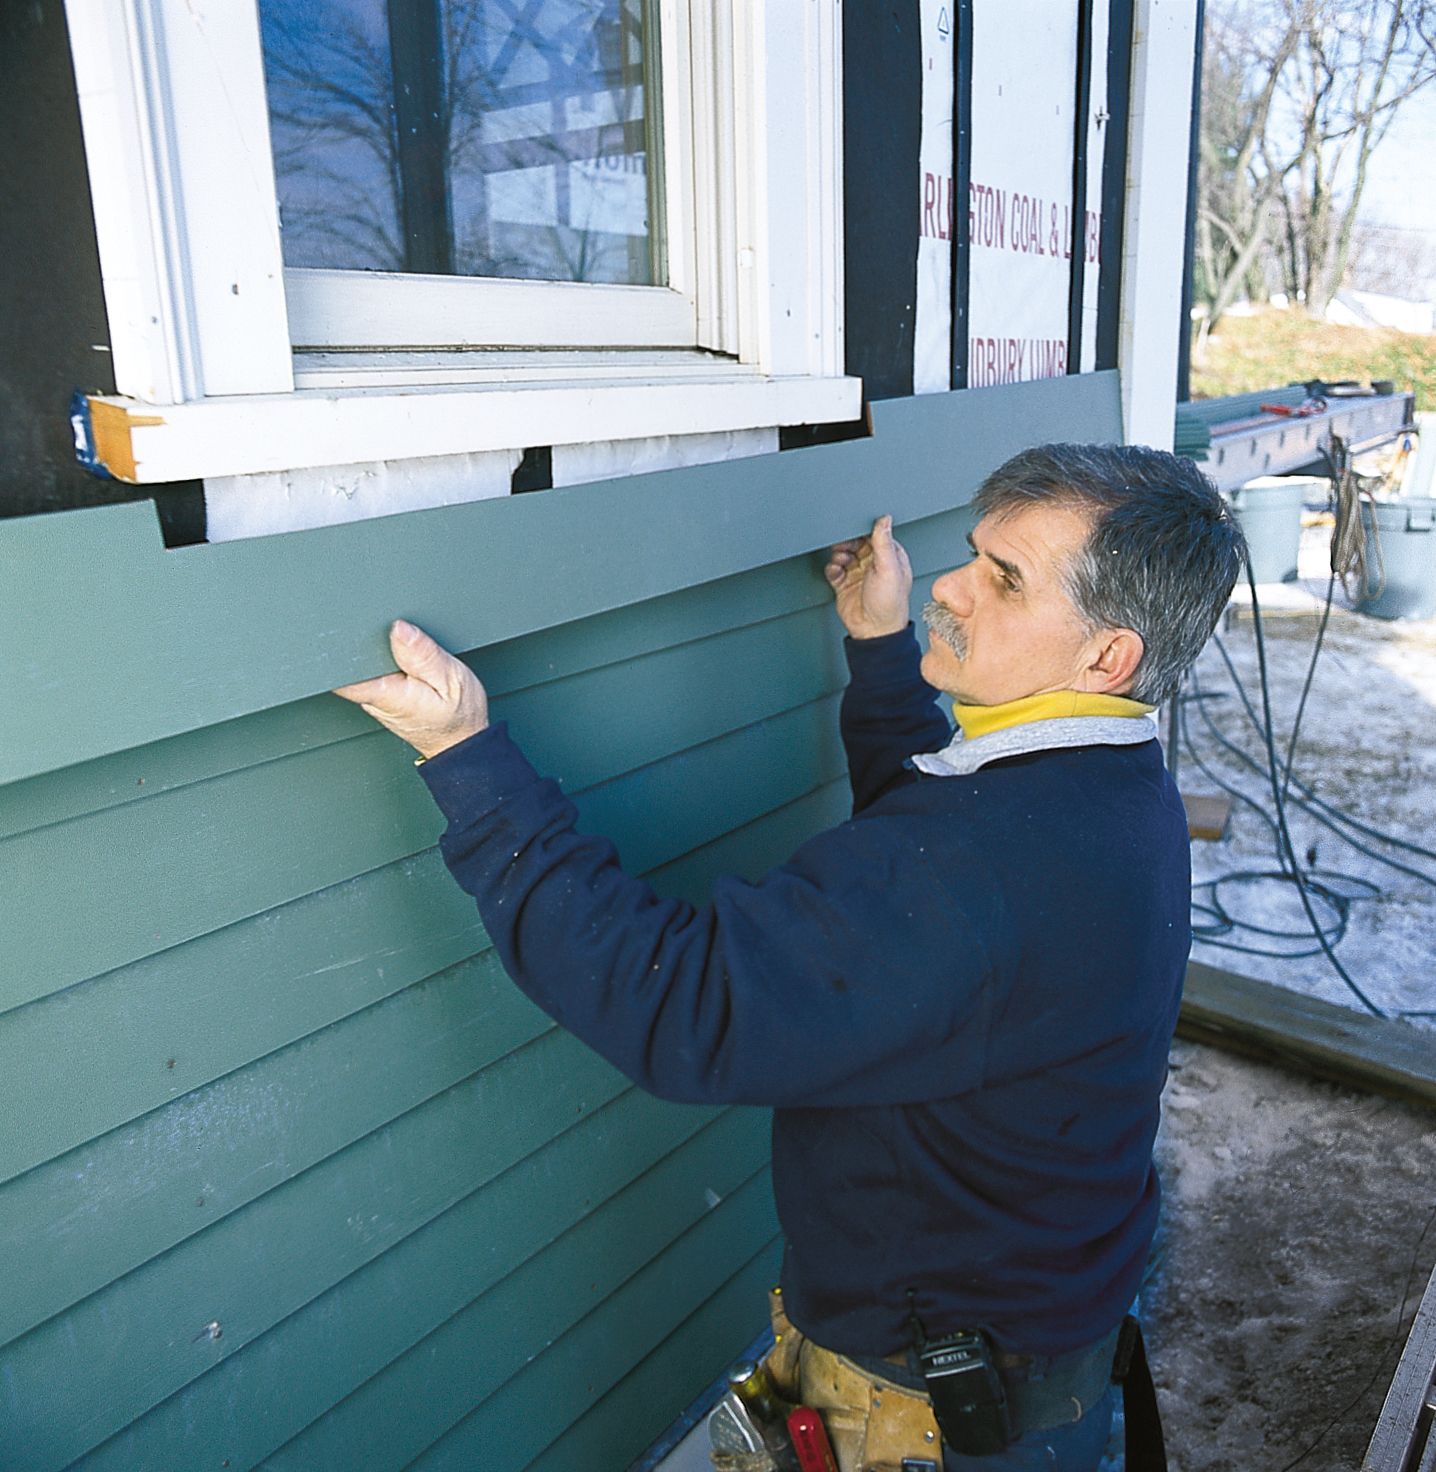
Once your starter course is in place, you can begin installing the subsequent courses of clapboard siding.
Proper Overlap Technique
The overlap between clapboard courses is necessary for effective water shedding. When considering “How much overlap on clapboard siding?” the general rule is to maintain a one to 1 1/2-inch overlap, depending on the width of your clapboards. Here’s how to achieve the right overlap.
- Align the bottom edge of each new course with the marks on your story pole or corner boards.
- For 6-inch clapboards, aim for a 4 1/2-inch exposure, which provides a 1 1/2-inch overlap.
- Use a level periodically to ensure your courses remain straight as you work up the wall.
Nailing Methods
Nailing should occur near the bottom of each clapboard, about an inch above the butt edge. This method secures the current board while also catching the top of the board below. Follow this nailing method to properly secure the clapboards and allow for natural expansion and contraction.
- Drive one 7d nail into each stud, about an inch above the butt edge of the clapboard.
- Nail through the thin upper edge of the clapboard below, which helps secure both pieces.
- Avoid overdriving nails, as this can cause splitting or buckling.
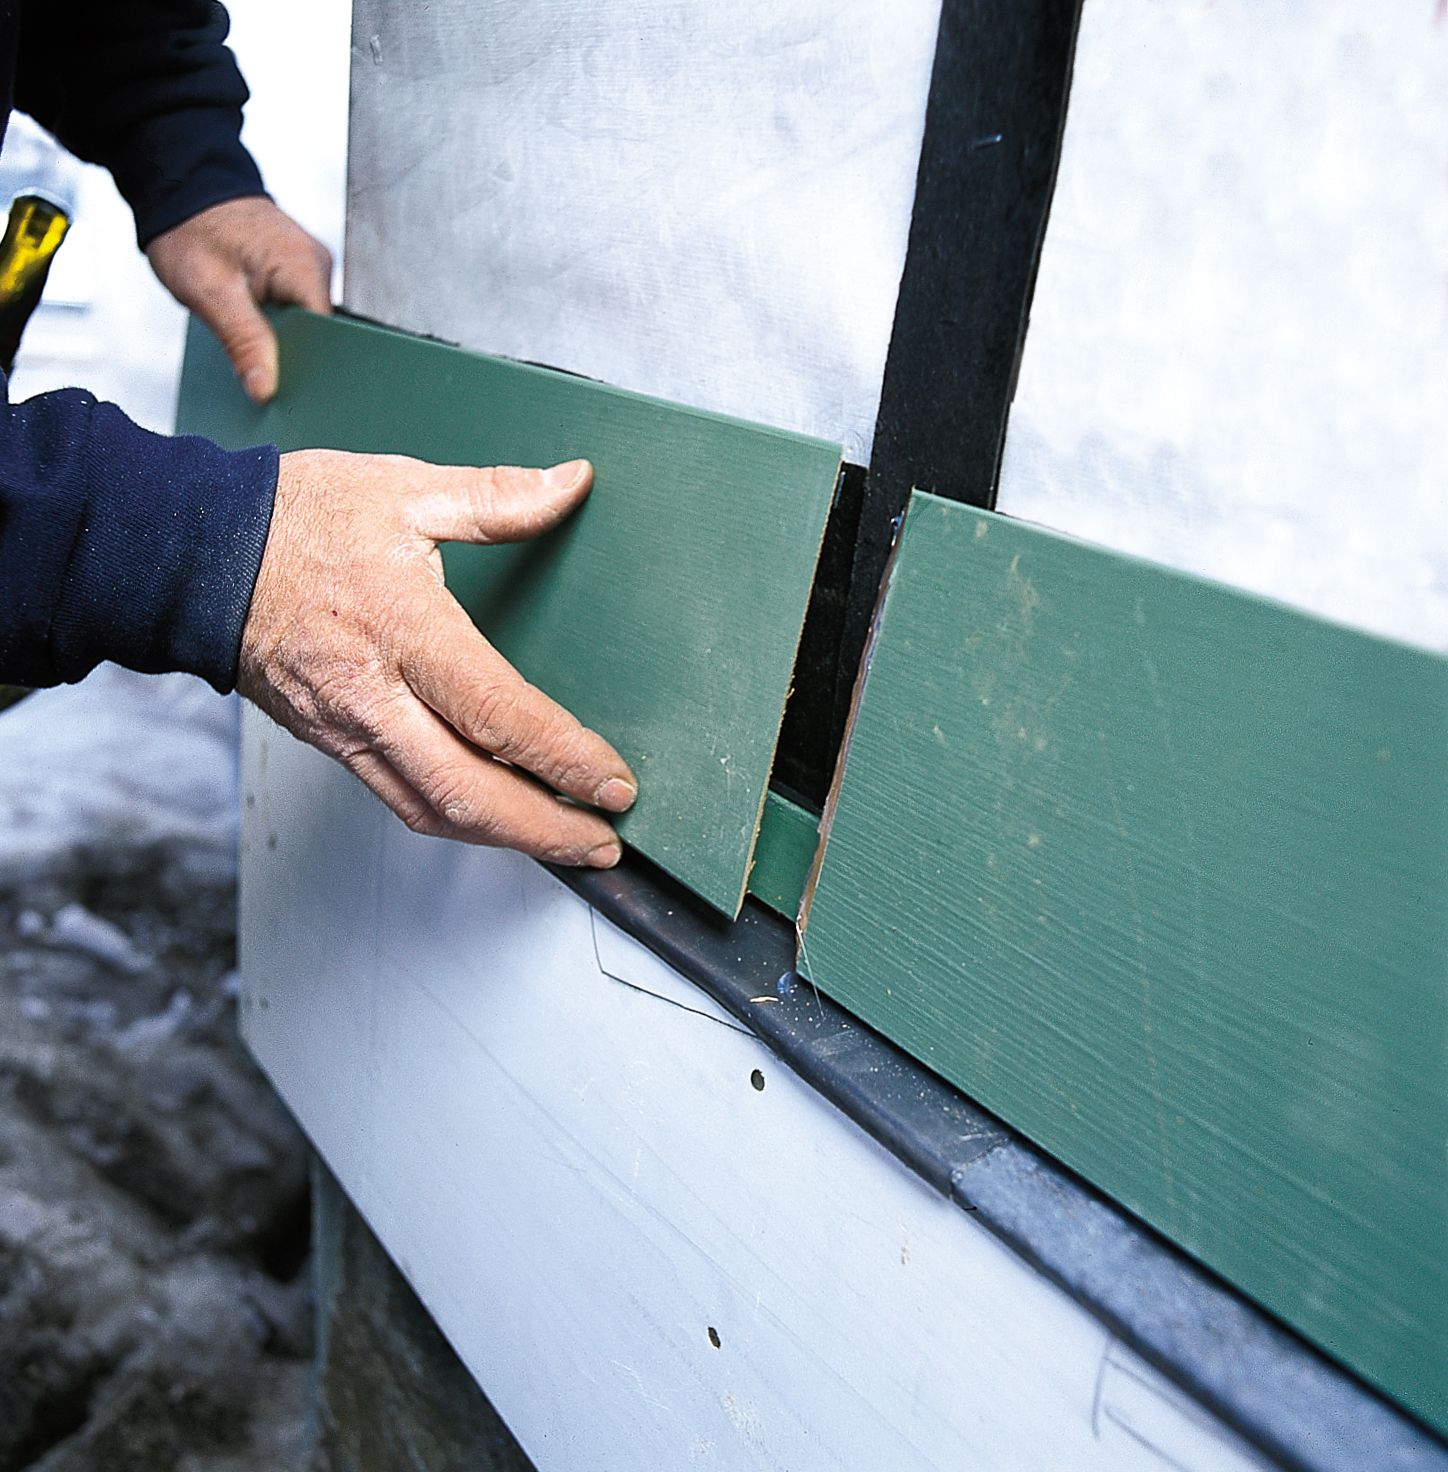
Staggering Joints
When working with clapboards that don’t span the entire length of the wall, you’ll need to join pieces.
- Stagger the joints between courses to prevent water infiltration and improve aesthetics.
- Create 45-degree scarf joints where boards meet.
- Apply sealant to the ends before fitting them together.
- Drive one nail through the overlapping board, 1/2 inch to the side of the joint.
Working Around Windows and Doors
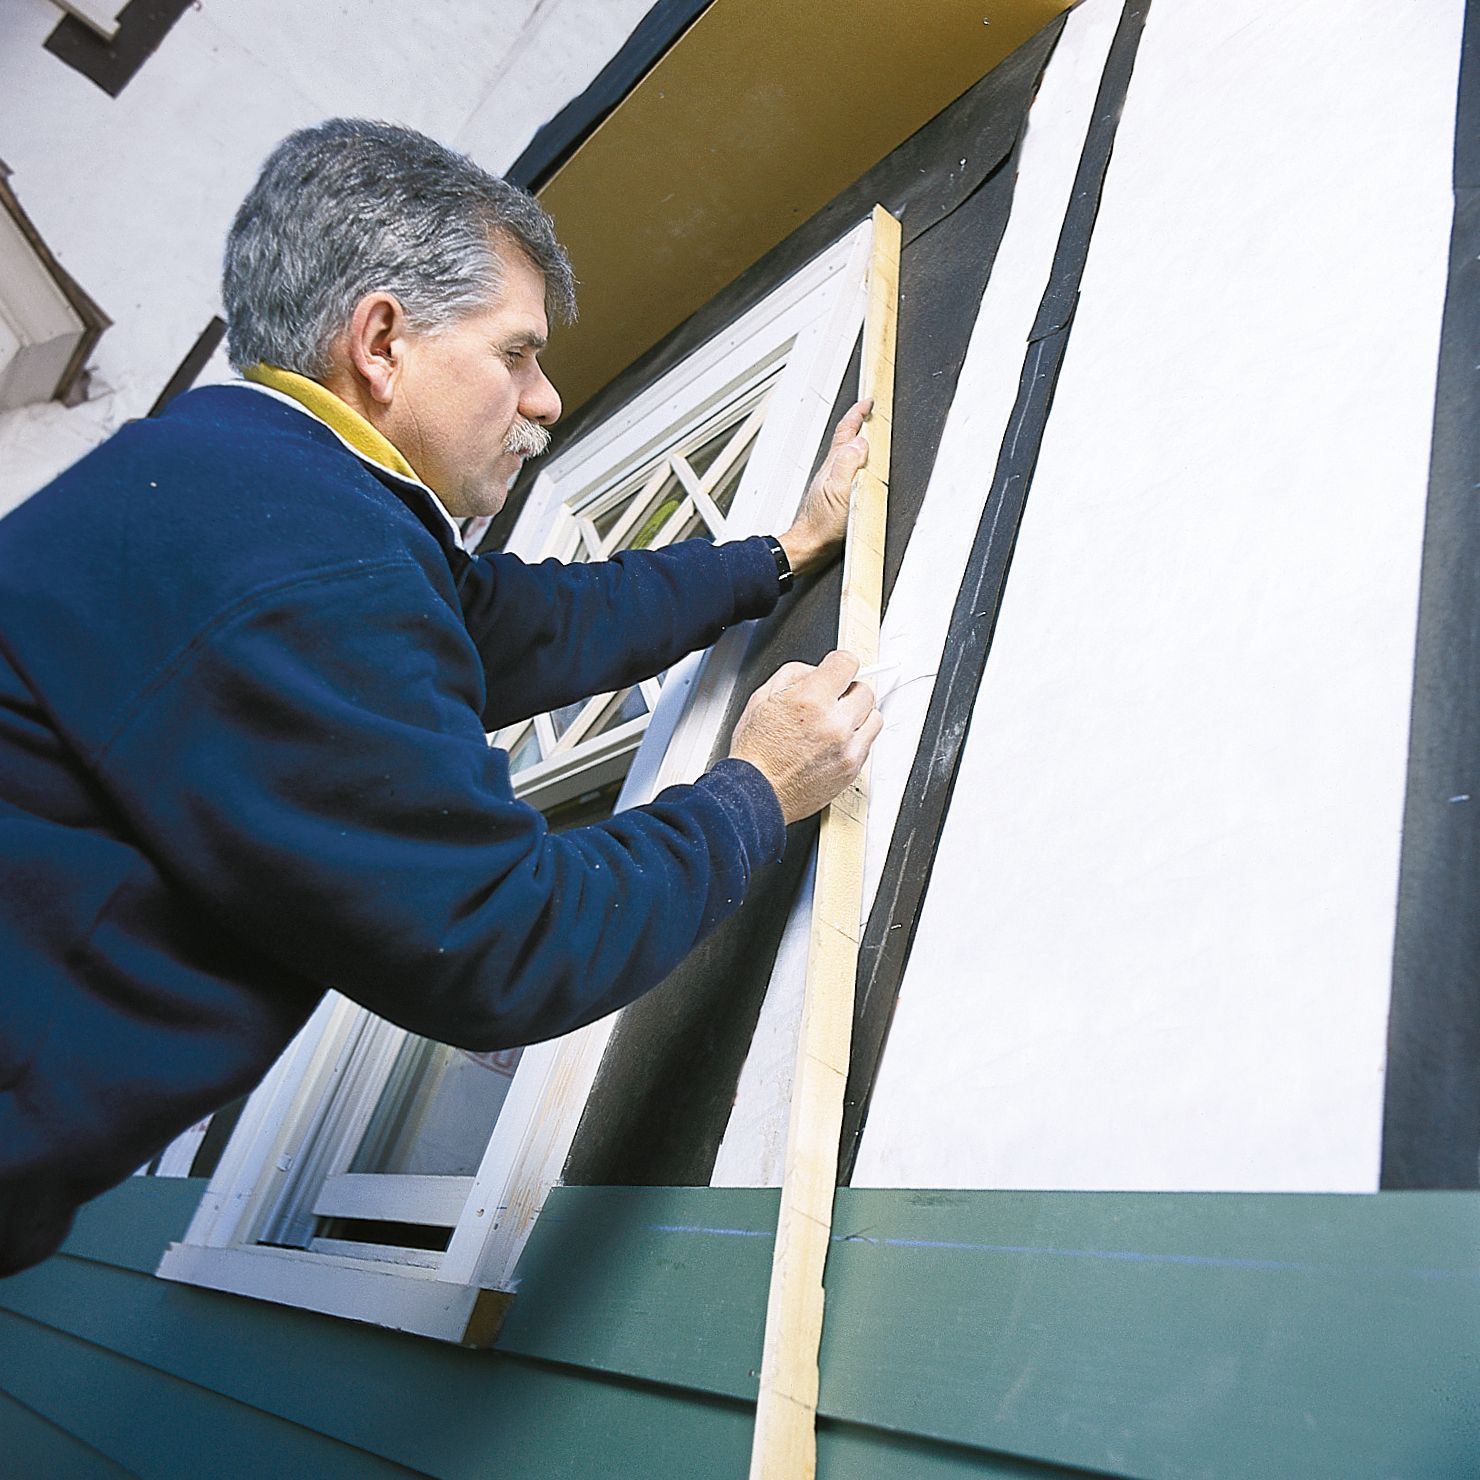
Installing clapboard siding around windows and doors requires careful cutting and fitting. This section will guide you through the process of cutting and fitting siding around these openings, as well as implementing waterproofing techniques.
Cutting and Fitting Siding
When you reach a window or door, follow these steps to properly fit the clapboard.
- Measure and mark the clapboard to fit around the opening.
- Use a utility knife to notch the top of the board to fit beneath the window or door frame.
- For the piece that goes above the window or door, cut a drip cap into the bottom of the board to direct water away from the opening.
- Apply sealant under and around the windowsill or door frame before sliding the notched piece of siding into place.
- Nail the clapboard to the studs as you would with regular courses.
Waterproofing Techniques
Proper waterproofing around windows and doors helps prevent moisture infiltration. Here’s how to ensure your openings are well-protected.
- Before installing siding around a window, apply an 8-inch-wide piece of waterproofing membrane above the head casing, extending it 2 inches past the casing on each side.
- Bend a 3-inch-wide piece of flashing over the membrane and the window casing, allowing it to overhang by 1/4 inch.
- Secure the top edge of the flashing with 4d nails.
- For doors, install a drip cap above the door frame and apply flashing over it, extending up the wall and onto the door frame.
Handling Corners and Edges
This section will guide you through installing corner boards and sealing joints to create a polished, weathertight finish.
Installing Corner Boards
Corner boards provide a clean, finished look to your siding installation and help protect the end grain of the clapboards. Here’s how to install them.
- Choose corner boards that are slightly wider than the thickness of your wall assembly (including sheathing and siding).
- Install the corner boards before beginning your clapboard installation.
- Nail the corner boards securely to the framing, ensuring they’re plumb.
- As you install clapboards, butt them against the corner boards, leaving a small gap (about 1/16 inch) for expansion.
Sealing Joints
Proper sealing of joints is necessary to prevent water infiltration. Follow these steps to seal joints.
- Apply a thick bead of high-quality exterior caulk or sealant along the vertical juncture where the wall meets the corner board.
- Push the ends of each clapboard into the sealant as you install them.
- For joints between clapboards (where they don’t span the entire wall length), create a 45-degree scarf joint.
- Apply sealant to both ends of the scarf joint before fitting the boards together.
- Drive a nail through the overlapping board, about 1/2 inch to the side of the joint.
Finishing Touches
This section covers the important steps of caulking, sealing, and applying the final protective coating to your siding. Properly executed finishing touches can add years to the lifespan of your siding and significantly improve its appearance.
Caulking and Sealing
Proper caulking and sealing can help prevent moisture infiltration. Apply a thin, continuous bead of caulk, smoothing it with your finger or a caulking tool. Allow the caulk to dry completely before painting or staining. Use a high-quality, paintable exterior caulk to seal all joints, including:
- Where siding meets trim around windows and doors
- Along corner boards
- At any penetrations through the siding, such as pipes and vents.
Painting or Staining
The final protective coating not only enhances the appearance of your clapboard siding but also provides an additional layer of protection against the elements. If you’ve opted for cedar siding, it’s particularly well-suited for paint application, as Tom Silva notes, “It takes paint easily.” However, some homeowners prefer the natural look of white cedar shingles, which can be left to weather naturally if desired. Choose a high-quality exterior paint or stain appropriate for your siding material.
If using paint, apply a primer specifically designed for your siding material. Once the primer is dry, apply two coats of exterior paint, allowing proper drying time between coats. If staining, apply the stain according to the manufacturer’s instructions, typically using a brush, roller, or sprayer. Consider applying a clear sealer over the stain for added protection.
Maintenance and Care
Proper maintenance can potentially extend the life of your clapboard siding and keep it looking its best. Regular care can also prevent minor issues from becoming major problems and help maintain your home’s curb appeal.
Cleaning Methods
Regular cleaning helps prevent the buildup of dirt, mold, and mildew.
- Wash your siding annually using a soft-bristled brush and a mixture of mild detergent and water.
- Rinse thoroughly with a garden hose to remove any soap residue.
- Inspect the siding for any signs of damage or wear during cleaning.
Inspecting for Damage
You have a better chance of catching issues early by performing routine inspections.
- Check for cracks, splits, or warping in the clapboards.
- Look for signs of insect damage or wood rot, especially near the ground and around windows and doors.
- Ensure that all caulking and sealant remain intact and reapply as needed.
Repainting or Restaining
Repainting or restaining every five to 10 years to maintain your siding’s appearance and protection.
- Scrape off any loose or peeling paint before applying a fresh coat.
- If staining, clean the surface thoroughly and apply a new coat of stain and sealer as recommended by the manufacturer.
Our Conclusion
Hanging clapboard siding can enhance the beauty and value of your home. By following the steps outlined in this guide on how to hang clapboard siding—from understanding clapboard siding to maintenance and care, you can achieve a professional finish that will protect your home.