
Installing new windows can lower your utility bills, increase your home’s value, and reduce noise pollution, but homeowners often wonder how disruptive upgrading them will be. To help take the some of the guesswork out of the window installation process, I spent a full day shadowing installers from Renewal by Andersen, which made our list of best replacement window companies. In this article, I’ll explain what I learned on the job site, questions to ask a potential window installer, and how to prepare for this home improvement project.
Before the Installation
A homeowner must undergo a consultation before setting an installation day. Some companies offer virtual consultations, but installers recommend an in-person consult to get the most accurate, thorough assessment.
The consultation is a time for your window installation company to learn about your vision and requirements for the project, as well as for you to ask questions. Renewal by Andersen recommends that homeowners also use this time to set expectations they want the crew to adhere to, such as navigating around pets during the installation. Here are a few other items to consider about the consultation:
Homeowners should ask how the company trains its installers. The Renewal by Andersen crew told me that on-the-job training is common and produces the best technicians.
The Renewal by Andersen installers I spoke to encouraged homeowners to vet companies during this stage by asking about lead certifications, as window contractors must update theirs every five years.
I learned that detailed measuring is one of the most important parts of the consultation. This step can take one to two hours to ensure it’s done correctly. Renewal by Andersen told me that technicians can now use augmented reality during the consultation to give you a rough idea of what a particular window design and style will look like in your home.
Homeowners who choose to proceed with the project after the consultation will receive a packet of information, including the estimated cost for the window replacement, the company’s warranty information, and other relevant details, such as measurements and hardware features. If you want more time to make a decision, you’ll receive a baseline quote but other details may be limited.
How Homeowners Can Prepare for Window Installation
Renewal by Andersen shared the following advice to prepare for a window installation. Use the dropdown tabs to explore each step in depth:
- Overcommunicate: One of the best things a homeowner can do is overcommunicate. This includes providing your own checklist with your wants and requirements for the project, such as how installers should deal with pets. The list will hold the installation team accountable and ensure any specific requests are fulfilled.
- Get a home inspection: Your home’s foundation and framing can complicate window installation, so get a home inspection before undergoing a huge project. This will help the installation team to fully prepare for any possible issues or challenges.
- Plan to be present: You should be present during the installation to streamline communication. You’ll be able to oversee the installers, and they can ask questions or come to you with any concerns. Many companies will also request that you clear furniture or personal items from in front of any windows that will be replaced. If there’s anything that still needs to be moved when the installers arrive, it’s best that you are on-hand to help with or oversee those efforts.
- Watch the weather: Watch the weather patterns and forecasts for your area. Renewal by Andersen told me that most jobs can proceed in the rain, as windows can be staged inside or protected by certain home features, such as a covered porch. I got to witness some of these workarounds firsthand, as it rained during the morning of my visit. Spring and fall are popular times to schedule window installation because the weather is often mild.
- Be ready for noise: Installers will be hammering, drilling, and sawing, leading to high noise levels. Be prepared to use noise-canceling headphones if you work from home. Parts of your house may also be occupied, and you may have to relocate your car. Additionally, installers may have to walk around the house and go in and out of doors frequently.
Day of Installation
Installations typically start early in the morning, at 7:30 a.m. or 9 a.m. My day began at 7:30 a.m. because we had to pick up boxed windows from a distribution center before going to the jobsite. A crew typically installs eight to 10 windows per day. I watched Renewal by Andersen install five windows at one house. However, one window was a large sliding window that replaced three full-frame windows, so technically I observed seven windows being replaced.
Here are some key things I noticed during the installation:
- The installation crew began by laying down runners throughout areas of the home they would be frequently walking through. This helped keep the home clean and prevented floor damage. Installers also placed bins around each window site to streamline cleanup and keep the area free of debris. I noticed a few screws fall here and there during more intensive parts of the job, but I was told that they go back and check for these during cleanup.
- The homeowner needed to move their car from the garage to the street so the new windows and other tools could be stored there. The installers also used the garage to cut wood. They parked their trailer in the driveway for easy access, as it held most of their supplies.
- I noticed that the crew attempted to protect the homeowner’s shrubs and bushes that were close to the windows by covering them with tarps. This worked well, but I could imagine the landscaping getting damaged if any mishaps occurred, such as scaffolding falling or heavy tools being dropped.

How Insert Windows Are Replaced
I observed the team replacing both insert and full-frame windows. An insert window is installed within the existing window frame rather than replacing the entire structure and casing. Insert windows are cheaper and quicker to install, but they’re slightly less insulated than full-frame options. Here are the steps that Renewal by Andersen followed to replace the insert windows during my visit:
- The installers began by walking through the home, placing runners in high-traffic areas, and remeasuring the windows. Then, they relocated or covered any furniture near the windows.
- The installers removed the sealant as well as the old windows and their parts, such as screens and frames. They used a drill and hammer, which caused moderate noise.
- The crew cleaned up the surrounding area with a shop vacuum, which also caused moderate noise.
- The team placed the new windows into the empty frames, then leveled them using spacers and shims. Installers drilled crucial parts of the windows into place. The windows could sit in the space at this point, but there were still gaps to fill in.
- The crew measured the spaces for whatever material was being used to surround the windows, such as metal or vinyl. In this case, the team used Renewal by Andersen’s Fibrex materials.
- Next, the installers added fiberglass insulation around the windows’ gaps.
- Adfoam, a type of polyurethane foam, was added around the windows.
- The team cut the window flashing on-site. They cut sheet metal in their trailer and in some areas of the jobsite, such as the garage.
- The flashing was added, and the surrounding areas were caulked and cleaned.
How Full-Frame Windows Are Replaced
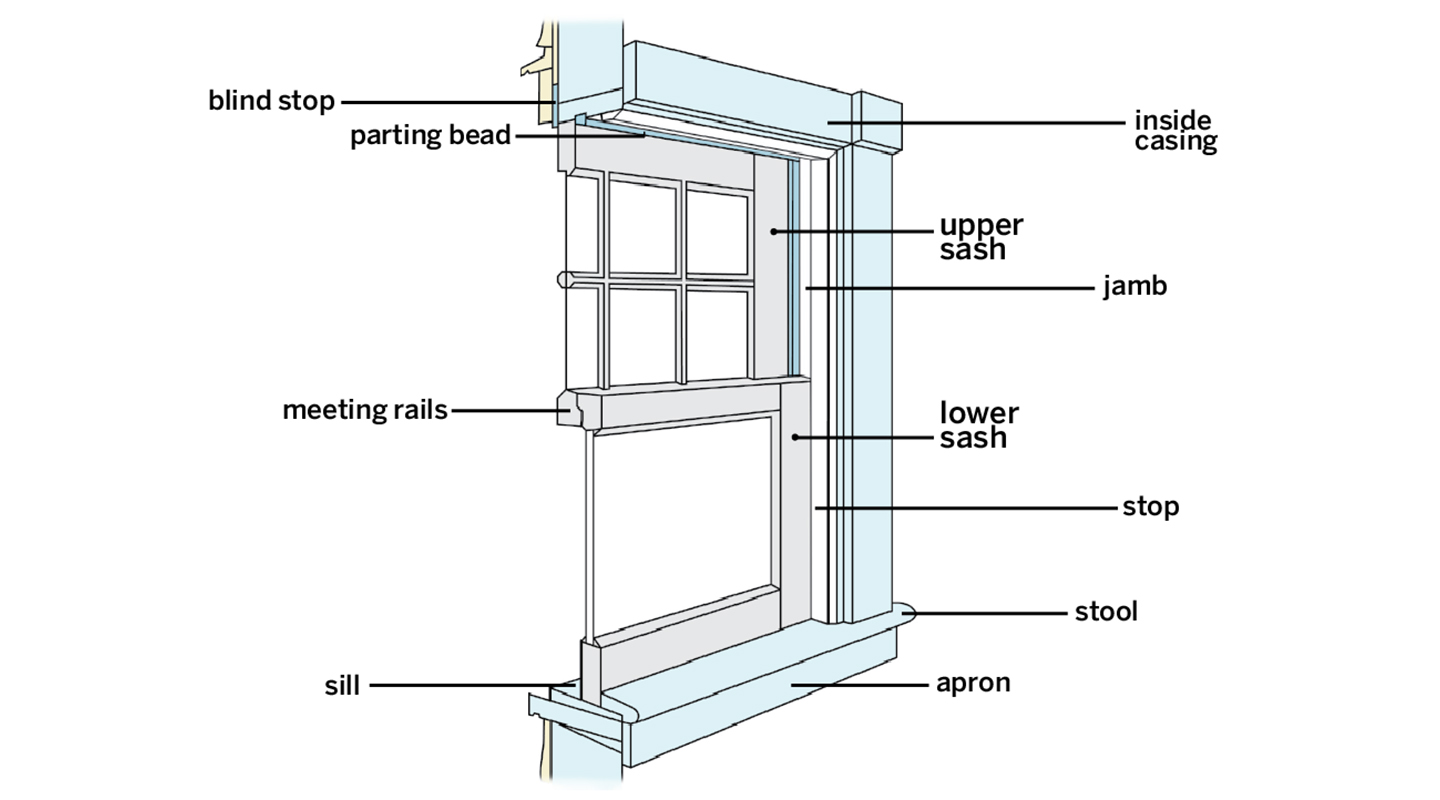
A full-frame window is a complete unit, including the glass, sashes, frame, and exterior casing or trim. The Renewal by Andersen crew informed me that full-frame windows are typically found in older homes, as the industry favors insert windows. However, a full-frame window can also be converted into an insert window for future replacements.
Here are the steps that Renewal by Andersen used to replace full-frame windows during my visit:
- The team had already prepped the home, but if they were starting fresh, they would follow the same initial steps as they did for insert windows, including placing runners and relocating nearby furniture.
- Unlike with inserts, the crew needed to remove the entire window and frame by cutting back to the framing studs with a saw. This step caused substantially more noise than the drills used to unscrew insert windows. It can also be considerably more messy depending on how the window opening is set up.
- Next, the team used a saw to cut the old windows’ jambs off. Both sawing steps were incredibly loud, especially as the saw got closer to the home’s framing.
- A shop vacuum was used to clean up the surrounding area.
- Wood pieces cut on-site were nailed into place for the new windows. This step was very noisy, but it occurred inside the garage or on the driveway. The hammering during the second part of this step also produced a fair amount of noise.
- Once the wood was in place, the team followed many of the same steps as they did when installing insert windows. The new windows were drilled into the openings with some remaining gaps.
- Fiberglass was added for insulation, and polyurethane foam was added around the windows.
- Flashing was measured and cut on-site before being added.
- The new windows were caulked and cleaned.

After the Installation
I didn’t see the end of the installation because the team was scheduled to install 12 windows at the home we visited. The team completed eight windows the first day day and planned to return the next day to complete the job. A few things caught my attention when I spoke to the installation team:
- Cleanup: The Renewal by Andersen crew said that the final cleanup should be fairly simple because cleaning occurs throughout the installation. The installers double-check each window opening for debris that was missed, and remove any sawdust and waste in the garage or driveway.
- Walkthroughs: They informed me that they invite the homeowner to walk through the home once the installation is complete. They showcase the new windows, test their functionality, and ask if the homeowner notices anything wrong or has any questions or concerns. If your installation team doesn’t offer this, consider asking for it.
- Window care: I asked the Renewal by Andersen team how homeowners should care for their new windows following installation. The crew told me that the best thing to do is clean your windows at least twice per year. They recommended using a soft, lint-free cloth plus soap and water. They advised avoiding abrasive cleaners, which typically come as a powder you need to apply and scrub off the window.
- Window inspections: Homeowners should also ensure drainage holes remain clear of dirt and debris and inspect window seals and caulking around the windows annually. You typically only need to re-caulk windows every five to 10 years, and it’s fairly easy to do. Caulk degrades over time and becomes brittle, so replacement is routine.
Important Questions To Ask a Windows Installer
Here are some questions to ask each window installer you consider hiring. These questions are based on what I learned during my visit and will help you vet the installer and ensure you receive the best service and products.
- Are you licensed and insured?
- Do you have lead certification?
- How long have you been in business?
- How were you trained for window replacement?
- Do you have any product samples I can see?
- Can you provide references from recent window installation jobs?
- How long will it take you to complete the job?
- How should I prepare my loved ones or pets for installation day?
- How will you protect my home during the installation?
- Will I need to relocate any furniture or belongings during the installation?
- Will the job require any structural changes to my home?
- What warranties do you offer?
Do I Really Need a Windows Installer?
Replacing windows, especially insert windows, seems easy enough that you could save money by doing it yourself. However, one thing that stood out during my visit was how many variables can quickly complicate the project.
For example, we discussed the trouble with mismeasuring windows. Replacement requires measuring windows down 3/8 of an inch from the original opening. The Renewal by Andersen team told me that seasoned installers can fix a mismeasurement as long as it’s within an inch of the needed size, but otherwise, it’s best to simply reorder the windows. This could create a huge headache and cost you money if you attempt the project yourself and measure your windows incorrectly.
Additionally, you may not be able to catch certain issues before starting the project that a professional can spot and handle quickly. The installers mentioned wood rot and framing as two unforeseen issues homeowners frequently encounter.
Ultimately, it’s possible to replace one or two windows yourself, but professional installation is always recommended, especially for large or complex projects. A professional has the expertise and knowledge to spot and resolve issues, rather than you removing your window, finding wood rot, and not knowing how to proceed. A professional will also be able to complete the job faster and ensure a proper fit.
My Takeaways
I’ve spent more than 400 hours researching and writing about window installation as well as interviewing experts, but there were still things I learned on the job. Here are my major takeaways from my experience with Renewal by Andersen:
- Be ready to allocate some space for the installation crew and their tools. You might have to forfeit your driveway and garage for a day.
- Know that rain and some other inclement weather can be worked around, but it’s best to try to schedule your installation for a clear, sunny day.
- Prepare for some noise, especially if you have full-frame windows. Standard window replacement requires hammering and drilling, which causes moderate noise. Full-frame windows require some sawing, which might cause rattling and ear-piercing noise.
- Installing windows yourself is possible, but hiring a professional inarguably makes window replacement easier and more efficient. You get an entirely new window, plus updated flashing and molding. This route also helps you avoid tedious cleanups and headaches from mismeasurement or unforeseen problems.
Learn More About Replacement Windows
This article outlines the basics of a standard window installation based on my visit to a Renewal by Andersen jobsite, but there’s much more to know. I suggest reading our guide to the best window brands and familiarizing yourself with common window types to determine what windows you might need. Feel free to use the tool below to kickstart the consultation process if you feel confident about what you need for your project.
Get Estimates from Window Experts in Your Area
Compare quotes from local pros
You can also learn more about Renewal by Andersen in our review and Renewal vs Andersen review or use the tool below to contact the company quickly.
Renewal by Andersen

Buy One Window or Door, Get One 40% Off
Pros and Cons
What We Liked
- Features proprietary window frame material that is stronger and more durable than vinyl
- Includes a transferable 20-year warranty on glass and a 10-year warranty on non-glass materials
- Provides full-service window replacement services
Keep in Mind
- Doesn’t sell aluminum, fiberglass, or wood frame windows
- Provides fewer window styles than other brands
Window Styles Offered
Renewal by Andersen offers up to eight window styles, which you can customize to fit your home’s aesthetic. Here is the full list of window styles Renewal by Andersen offers:
- Specialty
- Awning
- Bay
- Bow
- Casement
- Double-hung
- Picture
- Sliding
My Conclusion
Window installations start with a consultation. During that time, you’ll review safety precautions, the process, and design options with your window installer. Remember that window installations can get messy and loud, so take the proper steps to ensure you and your family stay safe the day your windows are installed. Once the work is complete, your installer should perform a walkthrough with you to cover questions and concerns. If you’ve decided to hire a pro, we recommend you request a company’s certification and licensing information and consult the Better Business Bureau (BBB) for reviews before signing a contract.
FAQs About Window Installations
How much does it cost to replace windows?
It costs between $300 and $2,100 to replace windows, but the average is $850. The cost to replace windows depends on several factors, including location, window type, and size.
What happens during a window installation?
During a window installation, your professional installer will prepare the workspace, extract your old window, and align and attach your new windows. They will also properly discard your old window and clean the area. A reputable window installer provides a homeowner with instructions to operate and clean their new window and answers any questions they may have.
How do I prepare for a window installation?
To prepare for a window installation, remove window treatments and alarms, move furniture and other items surrounding to ensure easy access, and stay clear of the area while your installer replaces your window.
Can I replace my own windows?
You can replace your own windows, but installing a window can be difficult and tedious. If you don’t have a lot of do-it-yourself (DIY) experience to install a replacement window on your own, consider hiring a reputable window installer who has the expertise, insurance, and proper lead certifications to replace your window.


