A square is a key component of any carpenter’s toolbox. When used properly, squares can make the difference between a professional-looking project and one that appears amateur. Whether you’re framing a house, building furniture, or installing trim, squares help you achieve clean lines, tight joints, and level surfaces.
Types of Squares
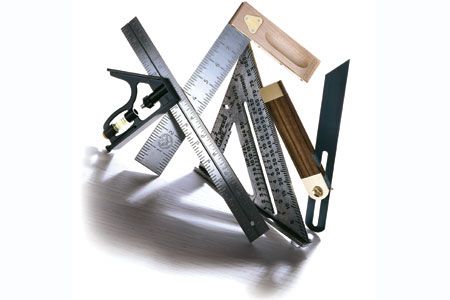
There are several types of squares, each designed for specific tasks. Understanding the differences between them will help you choose the right tool for your project. Choose squares made from durable materials like aluminum or stainless steel for longevity. Plastic squares can be accurate and lightweight but may not withstand heavy use or extreme conditions.
The most common squares are:
- Speed square
- Combination square
- Framing square
- Try square
- Drywall square
Let’s dive in to each type of square and when they should be used.
Speed Square
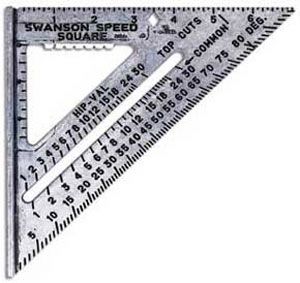
The speed square, also known as a rafter square or triangle square, is a versatile tool favored by many carpenters. Its triangular shape features a lipped fence that allows it to sit flush against a board’s edge. This type of square is the most common and can be used in all manner of construction projects. Chances are, you’ll end up buying more than one.
“The first square you buy should be a 12-inch speed square,” says Tom Silva, This Old House general contractor. On the job, Silva does most routine carpentry with his speed squares. “I use the 12-inch one as a crosscut fence for my saw and router, and the 6-inch one is always in my apron pocket — it’s especially handy when I’m up on a ladder.”
Speed squares are ideal for:
- Marking 90-degree and 45-degree angles
- Serving as a saw guide for crosscuts
- Measuring and marking rafter angles
- Checking for square on boards and framing
Combination Square
A combination square consists of a ruler blade and an adjustable head that can mark specific distances. This tool is useful for:
- Measuring and marking depths and heights
- Checking 45-degree and 90-degree angles
- Serving as a depth gauge
- Finding the center of round stock
Combination squares are good for laying out lines for ripping, crosscutting, mitering, and making notches. The head, with fences at 90 and 45 degrees, slides along the blade and locks, allowing you to transfer a distance accurately and hold it while you draw a line with a pencil.
For general carpentry and DIY projects, a speed square and combination square are often sufficient.
Framing Square
A framing square has an L-shaped design that makes it ideal for larger carpentry projects. Consisting of a long blade and shorter, narrower tongue, this tool comes in handy when marking up wide boards and sheet stock or checking their squareness. It’s also good for laying out rafters and stair stringers.
It’s particularly useful for:
- Laying out stairs and rafters
- Checking squareness on large boards
- Marking cut lines on sheet goods
- Determining roof pitch
Try Square
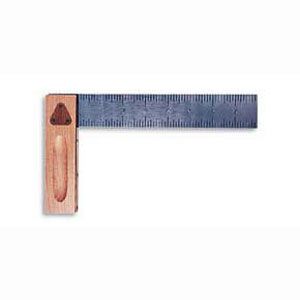
The try square is a fixed 90-degree square often used in woodworking. Its primary functions include:
- Checking the squareness of edges and corners
- Marking perpendicular lines
- Verifying the flatness of surfaces
Cabinetmakers like this fixed square for checking corners and edges, but for most carpentry tasks, a combination square is more versatile.
Drywall Square
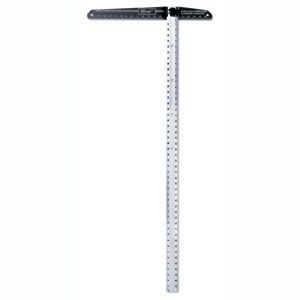
With its long blade, the drywall square is designed for working with large sheet materials. It’s used for:
- Marking cut lines on drywall and plywood
- Serving as a cutting guide for drywall
- Checking squareness on large panels
A drywall square has a 4-foot blade ideal for laying out cut lines on standard-size sheets of plywood, drywall, and other board materials. You can also use it as a guide when cutting drywall.
Essential Square Techniques
Mastering the use of squares will improve the quality and efficiency of your work. Here are the most common use cases for your square.
Marking and Measuring With Squares
You can make quick and straight lines for ripping a board or for locating a line of holes for a shelf with a speed square or combination square.
First, orient the square so the blade projects the correct direction from the head. Then, hold your pencil against the end of the blade and slide the body of the square along the edge of the board.
Checking for Square
Regularly check your work for squareness during construction. Place the square against the corner or edge you’re verifying, and look to see if both legs of the square make full contact. Any gaps indicate the piece is out of square and may need adjustment.
Using Squares as Cutting Guides
Use a 12-inch speed square to guide your circular saw when crosscutting. With the saw switched off, position the saw on the layout line, then slide the square up to the saw shoe. You can clamp the square in place to free up both hands for guiding the saw.
Finding the Center of a Circle Using a Square
You can use a framing square to find the center of a circle.
- Put the corner of a framing square anywhere on the edge of the circle.
- Mark where the blade and tongue pass out of the circle.
- Connect these two dots with a straight line
- Move the square and repeat steps 2 and 3.
- Where these two diameter lines cross is the circle’s center.
Cutting Drywall to Size With a Square
A drywall square is helpful for breaking pieces of drywall along a straight line.
- Align the drywall square so the top of the T rests on the board’s edge, and hold the blade with your toe.
- With a utility knife, score through the paper on the front, snap the sheet back to make a V.
- Reach over to score the paper in the valley.
- Snap the sheet to break it free.
- Use the square to mark the stud centers.
Our Conclusion
Squares are fundamental tools in carpentry and construction, essential for ensuring accuracy and quality in your work. Remember that practice and proper technique are key to mastering these versatile instruments. Whether you’re a professional carpenter or a DIY enthusiast, investing in durable metal squares and learning to use them effectively will significantly improve the outcome of your projects.