
Plumbing problems can be intimidating, even for the most experienced homeowners. The thought of water damage or expensive professional repairs may lead you to hesitate when faced with leaky pipes or dripping faucets. However, many common plumbing issues can be resolved without calling in a pro or risking further damage to your home. This guide will walk you through no-sweat plumbing repairs that you can tackle on your own so you feel more confident understanding the plumbing in your house.
Identifying Leaks
Leaks are among the most common and potentially damaging plumbing problems. They can occur in various places throughout your home’s plumbing system, from visible pipes under sinks to hidden lines within walls.
To identify leaks, look for water stains on walls or ceilings, listen for the sound of running water when no fixtures are in use, and check your water meter for unexpected increases in usage. These are some of the most common causes of leaks:
- Corrosion in older pipes
- Excessive water pressure
- Freezing and thawing cycles that cause pipes to expand and contract
- Loose connections between pipes and fittings
Signs of Pipe Damage
Pipe damage can manifest in several ways, and early detection is key to preventing extensive repairs. If you notice any of these signs, it’s time to investigate further and consider repairs:
- Discolored water, which may signal rust in your pipes
- Foul odors coming from drains or fixtures
- Reduced water pressure throughout your home
- Unusual noises like banging or whistling when water is running
Tools for DIY Plumbing Repairs
Having the right tools on hand can make the difference between a successful repair and a plumbing disaster. Stock your toolbox with these essentials before tackling any plumbing project:
- Adjustable wrenches in various sizes
- Pipe wrench for gripping and turning pipes
- Pliers, including needle-nose and channel-lock varieties
- Plunger for clearing minor clogs
- Screwdrivers (both flathead and Phillips head)
For more complex repairs, you may need some of the following tools:
- Hacksaw for cutting through metal pipes
- Pipe cutter for clean cuts on copper and PVC pipes
- Plumber’s putty for creating watertight seals around fixtures
- Plumber’s tape (also known as Teflon tape) for sealing threaded connections
Quick Fixes for Copper Pipe Leaks
Copper pipes are common in many homes due to their durability and resistance to corrosion, but they can develop leaks over time. Here are some quick fixes for copper pipe issues.
Using Compression Repair Couplings
Compression repair couplings offer a solderless solution for fixing leaks in copper pipes. This method provides a quick and effective repair without the need for soldering skills or equipment. Here’s how to use them:
- Shut off the water supply and drain the affected pipe.
- Clean the area around the leak and mark 1 inch from each end of the damaged section.
- Cut out the damaged pipe section using a tubing cutter or hacksaw.
- Slide the compression nuts and ferrules onto the pipe ends.
- Insert the repair coupling and tighten the nuts with two wrenches.
Applying Flexible Connectors
Flexible connectors can be a lifesaver for leaks near fittings or in tight spaces. These braided stainless-steel connectors can bend around corners and adapt to various pipe configurations. They’re particularly useful for replacing leaky elbow fittings or connecting pipes that don’t align perfectly. Here’s how to apply them:
- Turn off the water and drain the pipes.
- Remove the damaged section, including any fittings.
- Attach the flexible connector using compression fittings on each end.
- Tighten the nuts securely and check for leaks after turning the water back on.
Tackling Galvanized Iron Pipe Issues
While less common in modern homes, many older properties still have galvanized iron pipes. These pipes are prone to corrosion over time. Pinhole leaks are a common problem. These leaks are small and pore-like. If you don’t patch the hole, it will grow larger without you being aware of it.
The quickest, easiest way to repair a pinhole leak is with a stainless-steel pipe repair clamp. It consists of a steel band lined with a thick rubber gasket. When the clamp’s bolt is tightened, the gasket plugs the leak. Pipe repair clamps come in two lengths, 3 inches and 6 inches, for use on pipes ranging from 3/8 to 3 inches in diameter. The 1/2- and 3/4-inch clamps are the most common sizes.
After shutting off the water and draining the system, use a putty knife to scrape away all rust, corrosion and dried gunk from the area around the pinhole leak. Wipe the pipe clean with a cloth soaked in warm water, then dry the pipe. Next, spread open the clamp and slip it around the pipe. Rotate the clamp so that its rubber gasket is centered over the pinhole. Pinch the clamp closed and press the clamp’s bolt down between the prongs of the iron lug (the U-shaped fitting attached to the steel band). Use a wrench to tighten the nut on the bolt.
Turn the water back on and immediately check for leaks. Check once a day for the next few days to make sure that no water is leaking out from under the gasket.
Pipe repair clamps won’t stop corrosion from spreading. Once you’ve repaired the leak, have a plumber check out the condition of all the pipes in the system. For a long-term solution, consider replacing galvanized pipes with modern materials like copper or PEX.
Repairing Split Pipes
Split pipes, often caused by freezing, require immediate attention to prevent water damage. For those less comfortable with soldering, compression fittings offer an easier alternative to joining copper pipes without heat. Here’s how compression fittings to a split pipe.
Start by shutting off the water to the entire house at the meter or well-pump pressure tank. Drain the system by opening all the faucets on the lowest level. Place a bucket under the damaged area to catch any residual water.
Next, remove the compression nut and ferrule (ring) from each end of the repair coupling. Hold the copper coupling up to the pipe, making sure it’s centered on the damaged spot. Mark the pipe 1 inch in from each end of the coupling. This overlap is necessary to allow the coupling to slip over the pipe ends.
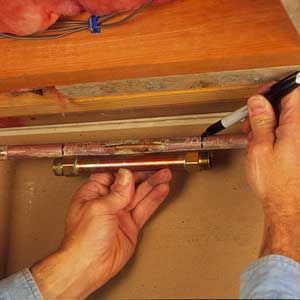
Cut out the damaged pipe section with a hacksaw or tubing cutter. If space is limited, use a mini-tubing cutter.
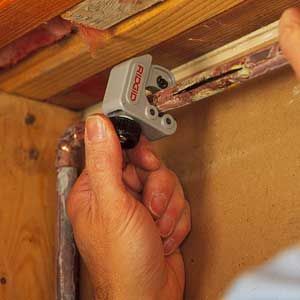
Remove the burrs and any rough spots from the just-cut pipe ends with a strip of emery cloth or fine-grade sandpaper. Take the compression nuts and ferrules that you removed earlier from the coupling and slide them onto the pipe ends. Then, slip the repair coupling into place.
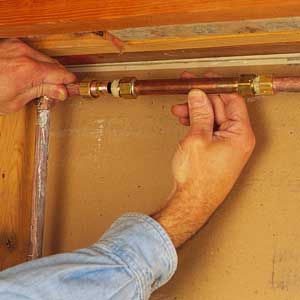
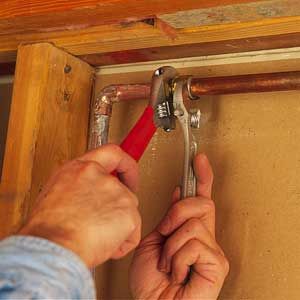
Tighten the nuts with two wrenches. Turn the water back on and carefully check for any leaks.
Joint Replacement
Repair couplings work well on straight pipe sections, but they can’t fix a leaky elbow fitting. For that job, you need a plumbing connector with a strong yet flexible braided-stainless-steel jacket that easily bends around corners.
First, turn off the water and drain the system, as described above. Remove the compression nut and ferrule from each end of the connector. Hold the flexible pipe connector against the leaky elbow and mark the pipe approximately 1 inch in from each end. Cut through the copper pipes with either a tubing cutter or hacksaw. Smooth the pipe ends with a strip of emery cloth or fine-grade sandpaper. Remove all burrs and rough spots or you won’t be able to install the connector.
Slip a compression nut and ferrule onto each pipe. If a ferrule doesn’t easily slide on, use the emery cloth to smooth the pipe end again. Next, while backholding the fixed nut on the connector with one wrench, use a second wrench to tighten the compression nut. Turn the water back on, wait a few minutes, and check for leaks. If you do spot a leak, try tightening both nuts a little more.
Money-Saving Tips for Plumbing Repairs
Smart DIY plumbing can save you significant money on repairs and maintenance.
When To DIY vs. Hire a Professional
While many plumbing repairs are DIY-friendly, some situations call for professional help. When deciding whether to DIY or call a pro, consider your skill level, the complexity of the job, and the potential consequences of beginner plumbing mistakes.
- DIY: Minor leaks, fixture replacements, and simple pipe repairs
- Professional: Major renovations, sewer line issues, and whole-house repiping
Cost-Effective Material Choices
Choosing the right materials can save money without sacrificing quality. For example, PEX tubing is often cheaper and easier to work with than copper for new installations. For temporary fixes, pipe repair clamps and epoxy putty are inexpensive options. Opt for materials rated for your specific plumbing needs to ensure longevity and compliance with local codes.
Avoiding Common DIY Plumbing Mistakes
Even experienced DIYers can make mistakes. Here are some common plumbing pitfalls to avoid.
Proper Pipe Measurement Techniques
Accurate measurements are crucial for successful plumbing repairs. Taking the time to measure properly can prevent wasted materials and ensure a proper fit. Always measure twice before cutting, and account for the depth of fittings when cutting pipes to length. Use a pipe cutter for clean, square cuts on copper and PVC pipes.
Ensuring Watertight Connections
Leaks often occur at connections. After completing any repair, run water through the system and check for leaks before considering the job done. To prevent leaks, follow these steps:
- Clean and dry all surfaces before applying sealants or soldering.
- Use the appropriate amount of pipe joint compound or plumber’s tape.
- Tighten fittings securely, but avoid over-tightening, which can damage pipes or fittings.
Maintaining Your Plumbing System
Regular maintenance can prevent many common plumbing issues and extend the life of your pipes and fixtures.
Regular Inspection Routines
As part of your routine maintenance and inspections, follow these tips to ensure your system stays functional and working properly:
- Check visible pipes under sinks and in basements for signs of corrosion or leaks.
- Listen for unusual sounds in your plumbing system, such as banging or whistling.
- Monitor your water bill for unexpected increases, which could indicate hidden leaks.
Preventative Measures To Avoid Future Issues
By staying proactive with maintenance, you can avoid costly repairs and keep your plumbing system running smoothly. You can help prevent major plumbing problems by addressing small leaks promptly. Avoid using chemical drain cleaners, which can corrode pipes over time. We also recommend installing a whole-house water softener if you have hard water to reduce mineral buildup in pipes. If you live in a cold climate, insulate pipes in unheated areas to prevent freezing.