
Sprinklers save you a great deal of time and effort when it comes to creating and maintaining a lush, green lawn, but they require routine maintenance. Part of that routine maintenance may include shutting your sprinkler system down in the fall and bringing it back online in the spring. Any water that freezes inside the system may burst the pipes and crack the fittings.
If you live in an area where ground temperatures dip below freezing, you’ll want to make sure that you’ve properly prepared the system for winter weather by draining the water and insulating the sprinkler components. We’ll show you how to winterize your sprinkler system in four easy steps.
Find Lawn Help
- See our list of top lawn care companies based on in-depth research.
- Select the company that best meets your needs.
- Get a free, no-obligation quote for your home.
Get a Quote From Lawn Professionals Near You
Compare quotes from local pros
Lime Soil Amendment

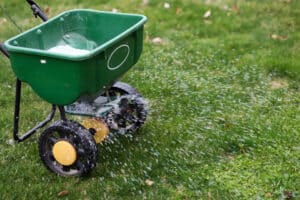
Lawn Fertilization
Steps for Winterizing Your Sprinkler System
Some of the following steps are easy to do on your own, but others require specialized machinery and expertise. Keep in mind that if you don’t have much do-it-yourself (DIY) experience or the proper tools, you can contact a lawn care professional to assist you. However, if you’re ready to winterize your sprinkler system yourself, take the steps in the dropdown sections below:
Step 1: Shut off the water
You can turn off the water to the system with the main valve, which you can find near your water meter. Some systems have valves to prevent backflow. You’ll also need to shut this valve off, but if your system doesn’t use potable water, it might not have a backflow preventer.
Step 2: Turn off the timer
If your system runs on an automatic timer, turn it off. Some systems have a “rain mode” that allows you to power down the timer without losing any programmed information or settings. Allowing the system to run in rain mode throughout the winter is usually safe and shouldn’t run up your energy costs. In the spring, you can turn the rain mode off, and your system should return to its previous settings.
Step 3: Drain the water
In addition to turning off the water, you need to drain the system. Depending on the type of sprinkler system you have, there are three ways to empty it. The instructions for each method are below:
- Manual draining: Some sprinkler systems may allow you to drain the water manually. These systems have shut-off valves at low points or ends of the piping. Make sure to wear eye protection while completing this step because the water supply in the system is under pressure. Slowly open the valves one at a time and let the water run out, then close them when finished.
- Automatic draining: Other systems have components that will automatically drain the water once the main valve is shut off and the water pressure drops. You can usually activate the system by running one of the sprinkler heads with the water supply off. However, there will still be some water trapped within the valves themselves. Locate each valve’s solenoid, which is a plastic cap with wires coming out of the top, and loosen it. This will allow air to flow into the system and water to flow out.
- Blow-out draining: Some sprinkler systems allow you to hook an air compressor up to the pipes to force the remaining water out of the sprinkler heads. However, this method is destructive and even dangerous when tried on a sprinkler system that isn’t built for it. While home air compressors might create the PSI (pounds per square inch) of pressure needed to clear out the piping, they can’t usually generate the CFM (cubic feet per minute) of volume needed to blow out the water quickly and completely. For this reason, we don’t recommend attempting the blow-out draining method on your own. Even if this method doesn’t damage your system, you may still leave water behind, and a little water left in a sprinkler system over the winter can cause problems. Consider hiring a professional if you choose blow-out draining. However, if you feel confident using an air compressor, find or rent one with a rating of 80–100 CFM and follow the steps below.
- First, put on your goggles and ensure that the water is turned off and backflow valves are closed.
- Attach the compressor to the sprinkler system using the appropriate coupler or hose bib.
- Locate the sprinkler head that’s highest and farthest from the compressor and activate it.
- Slowly open the compressor valve to begin allowing air into the system. Don’t use more than 50 PSI for flexible polyethylene pipes or 80 PSI for rigid PVC pipes. Keep the air flow steady once you begin to see water spraying out of the system.
- Starting with the farthest sprinkler head and working your way back to the compressor, activate each head in turn until the water stops flowing out of it. Then shut it off and proceed to the next one.
- When the system is empty, shut off and disconnect the compressor.
- Open and close manual drain or backflow valves to release extra air pressure from the system, but make sure all valves are closed when you’re done.
Step 4: Insulate above-ground components
Finally, make sure that all the above-ground parts of the sprinkler system are properly insulated from the cold weather. You can wrap the main shut-off valve and any exposed pipes or backflow preventers in foam covers or insulation tape. On the backflow preventers, make sure not to block any air vents or drain outlets.
Double-Check the User Manual
Always consult your manufacturer’s user manual before winterizing your sprinkler system, especially if you’re taking the DIY approach for the first time. The steps presented here apply to most systems, but you should find out whether you need to take any specific actions for your sprinklers.
Lawn Care Help
If you don’t feel comfortable winterizing your sprinkler system on your own, there are plenty of professional lawn and sprinkler care services ready to help each fall.
We recommend the nationwide provider TruGreen, which offers annual sprinkler maintenance plans that include preparing your system for winter.
FAQ About Winterizing Your Sprinkler System
Can I winterize my own sprinkler system?
To winterize your sprinkler system, you can shut off the water, turn off any timers, and insulate above-ground components. You will still need to drain the water—you can drain the water manually, or your system may have an automatic draining function. If you have an air compressor, you may be able to use this for blow-out draining, but we recommend hiring a professional.
What happens if you don’t winterize your sprinkler system?
If your sprinkler system isn’t properly winterized, any water that’s left in the pipes could freeze when outdoor temperatures plummet. The frozen water will expand in the pipes, potentially leading to cracked pipes or fittings.
How do I winterize my sprinklers when I don’t have a pump?
Your sprinkler system may allow you to drain the water manually. These systems feature shut-off valves either at low points or ends of the piping. To drain the water in the pipes, open the valves one at a time and let the water run out, then close them when finished.


