Heirloom furniture represents the pinnacle of woodworking craftsmanship, where skilled artisans transform raw materials into timeless pieces that can be passed down through generations. This art form combines traditional techniques with a deep respect for nature, resulting in furniture that is both beautiful and enduring. In this article, we’ll explore the meticulous process of creating heirloom furniture, from selecting the perfect wood to applying the final finish. Building heirloom furniture is a multistep journey that intertwines artistry and technique, ensuring each piece stands the test of time.
The Art of Selecting Wood for Heirloom Furniture
The creation of heirloom furniture begins with the careful selection of wood. This process is crucial, as it sets the foundation for the entire piece and determines its overall quality and appearance. Quality wood is more than just the source material; it is the essence of the furniture’s character and longevity.
Sourcing High-Quality Cherry Wood
Many heirloom furniture makers prefer cherry wood for its rich color and durability. At Thos. Moser Cabinetmakers in Auburn, Maine, cherry wood is sourced from a sustainably managed 119,000-acre parcel in Pennsylvania’s Allegheny Plateau. These 75- to 100-year-old trees produce clear, rich-colored wood that is unmatched in quality. The careful selection of wood ensures that each piece has a consistent, beautiful finish that will only improve with age.
The Importance of Wood Grain and Color Matching

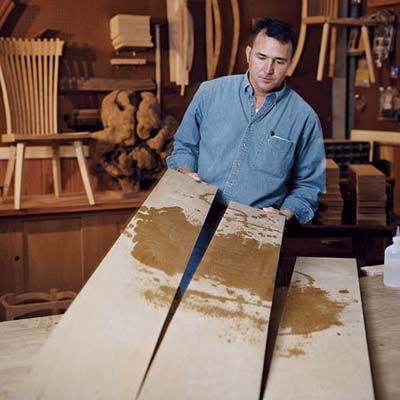
Selecting the right pieces of wood involves more than just choosing high-quality lumber. Craftsmen must carefully match the grain and color of different boards to create a seamless appearance. This process can sometimes take longer than cutting and assembling the piece itself. To aid in this selection, artisans may use techniques such as applying naphtha to the wood to preview its finished appearance. This meticulous attention to detail is what sets heirloom pieces apart from mass-produced furniture.
Essential Tools and Techniques in Heirloom Furniture Making
Heirloom furniture makers rely on a combination of traditional tools and modern machinery to create their pieces. This blend of old and new allows for precision, efficiency, and the preservation of time-honored techniques. The tools and techniques used are as varied as the artisans who wield them, each adding a unique touch to the final product.
Traditional Woodworking Tools
Hand tools remain essential in heirloom furniture making. Chisels, hand planes, and hand saws allow craftsmen to make precise cuts and adjustments that machines cannot replicate. These tools also enable artisans to work with the natural characteristics of the wood, resulting in a more organic and authentic final product.
Modern Machinery in Heirloom Craftsmanship
While traditional tools are irreplaceable, modern machinery plays a crucial role in heirloom furniture production. Tools like table saws, planers, and jointers help ensure consistency and precision in cutting and shaping wood. For example, a planer is used to make board thicknesses identical, while a jointer squares and straightens edges for seamless gluing. The incorporation of these tools allows for greater accuracy and efficiency in producing heirloom-quality pieces.
The Joinery Methods That Define Heirloom Quality
Heirloom furniture’s strength and longevity largely depend on the joinery methods used. These techniques not only provide structural integrity but also showcase the craftsman’s skill and attention to detail. Joinery methods are the backbone of heirloom furniture, ensuring that each piece can withstand generations of use.
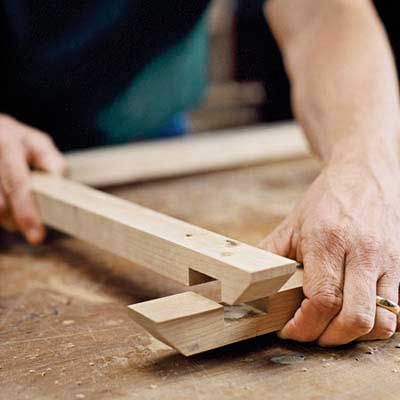
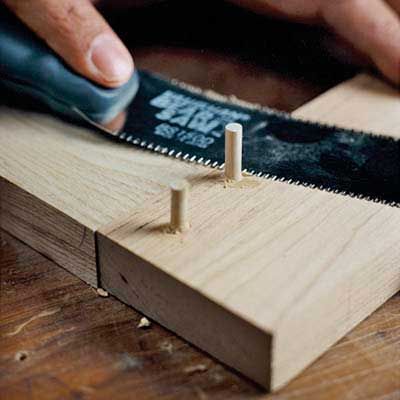
Mortise and Tenon Joints

Mortise and tenon joints are among the strongest and most traditional woodworking joints. In heirloom furniture, these joints are often pegged for added strength and visual appeal. The process involves creating a cavity (mortise) in one piece of wood and a corresponding projection (tenon) on another, which fit tightly together. This method has been used for centuries and remains a cornerstone of quality craftsmanship.
Half-Lap Joints
Half-lap joints are used where two pieces of wood intersect, such as in drawer support rails. This joint involves removing half the thickness of each piece where they overlap, creating a strong and flush connection. In some designs, screws may be added for extra stability, with the heads concealed by wood plugs. These joints help maintain the furniture’s structural integrity over time.
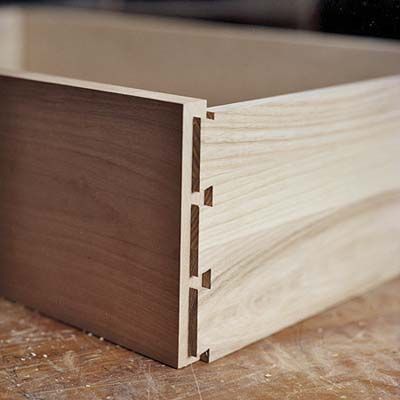
Dovetail Joints
Dovetail joints are prized for their strength and beauty, particularly in drawer construction. These interlocking joints consist of pins and tails that fit together like puzzle pieces. Half-blind dovetails are often used in drawer fronts, visible only when the drawer is open. This method not only ensures a strong connection but also adds an element of visual interest to the piece.
The Step-by-Step Process of Building Heirloom Furniture
Creating heirloom furniture is a meticulous process that requires patience, skill, and attention to detail. Each step builds upon the last, culminating in a piece that is both functional and beautiful.
Preparing the Raw Materials
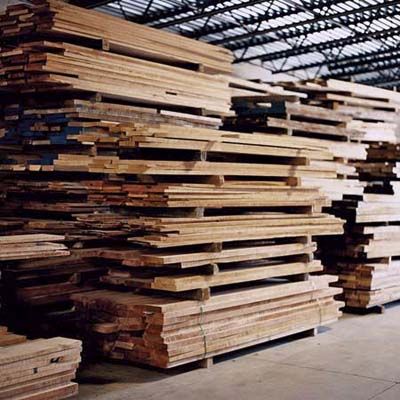
The process begins with preparing the wood. Boards are air-dried for several months and then kiln-dried to achieve the ideal moisture content. This careful preparation ensures the wood remains stable and resistant to warping or cracking over time.
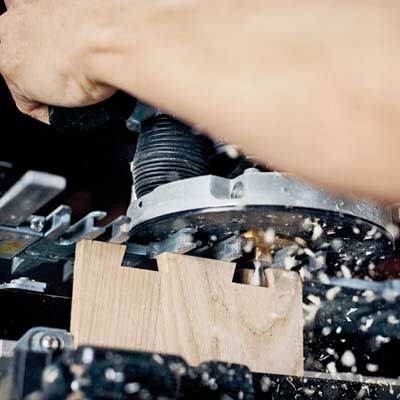
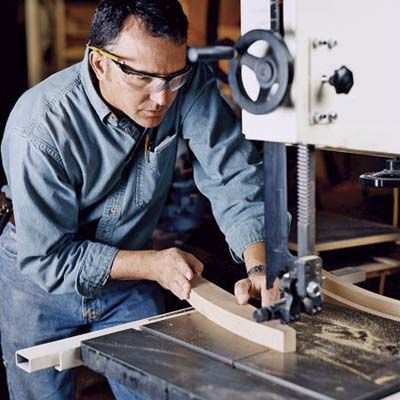
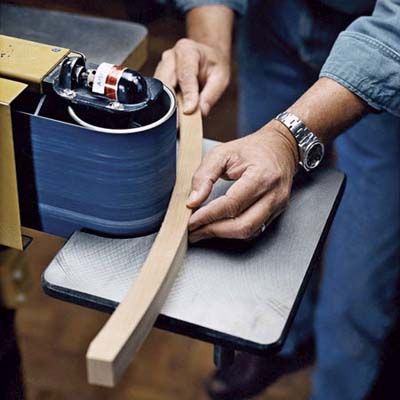
Cutting and Shaping Wood Pieces
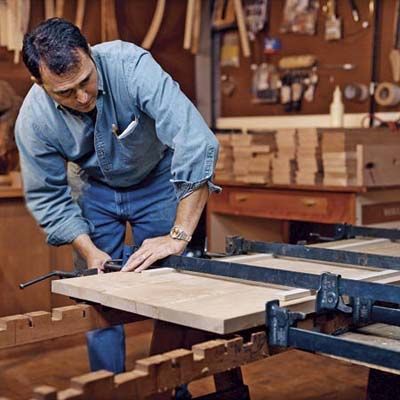
Once the wood is prepared, it’s cut and shaped according to the furniture design. This may involve using a table saw for straight cuts, a band saw for curves, and various other tools to achieve the desired shapes and dimensions. Precision in this step ensures that the pieces fit together seamlessly during assembly.
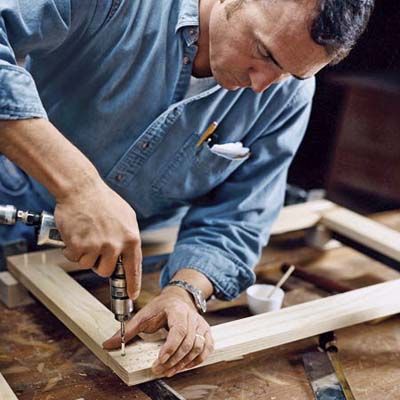
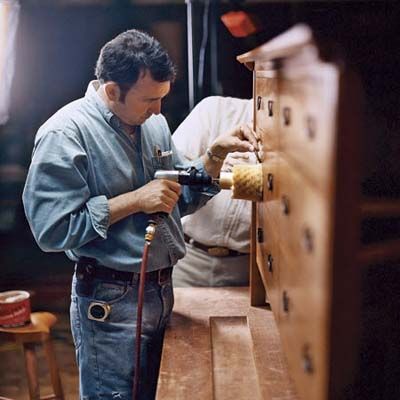
Assembling the Furniture Frame
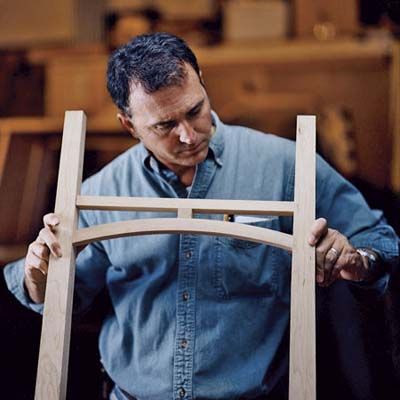
Assembly is a critical phase where the various components come together. This is where joinery techniques shine, with mortise and tenon joints, dovetails, and other methods being employed to create a sturdy frame. Glue and clamps are used to secure joints, with careful attention paid to alignment and squareness. The assembly process requires a keen eye for detail and a steady hand to ensure the final product is both sturdy and beautiful.
Creating and Attaching Drawers
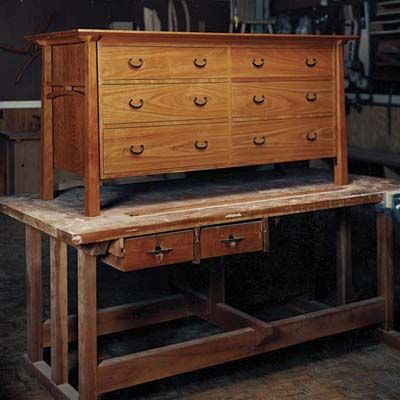
For pieces with drawers, such as dressers, the drawer construction is a separate process. Dovetail joints are often used to connect drawer fronts, sides, and backs. Once assembled, drawers are carefully fitted to the frame, ensuring smooth operation and proper alignment. This step requires precision to ensure that the drawers operate smoothly and fit perfectly within the frame.
Final Touches: Sanding and Finishing
Before the furniture can be finished, it must be meticulously sanded to remove any imperfections and prepare the surface for finishing. Sanding ensures a smooth, even surface that will absorb the finish evenly. Once sanded, the furniture is ready for the finishing process, which enhances the wood’s natural beauty and protects it from wear and environmental factors.
The Role of Finishing in Heirloom Furniture
The finishing process is the final step in creating heirloom furniture, enhancing the wood’s natural beauty and providing protection against wear and environmental factors. Finishing is both an art and a science, requiring skill and an understanding of the wood’s properties.
Applying Oils and Waxes
Many heirloom furniture makers prefer natural finishes that highlight the wood’s inherent qualities. At Thos. Moser, pieces are treated with boiled linseed oil heated to 130 degrees Fahrenheit, applied over three days to ensure deep penetration. This is followed by a hand-rubbed coat of clear paste wax, combining carnauba and beeswax. This method enhances the wood’s natural luster and ensures a long-lasting finish.
The Beauty of Natural Wood Finishes
Natural finishes allow the wood’s grain and color to shine through, developing a rich patina over time. This approach aligns with the philosophy of honoring the wood’s natural beauty rather than concealing it under paint or heavy stains. The beauty of natural finishes is that they allow the wood to age gracefully, becoming more beautiful over time.
Preserving Tradition: Apprenticeships and Craftsmanship
The art of creating heirloom furniture is preserved through dedicated training and a commitment to excellence. This approach ensures that the skills and knowledge required to create these enduring pieces are passed down to future generations. The tradition of craftsmanship is not just about creating furniture; it’s about preserving a way of life and a way of working that values quality and skill.
The European Model of Furniture Making
Many heirloom furniture makers follow the European model of apprenticeship, where aspiring craftsmen undergo extensive training under experienced artisans. This long-term approach allows for the development of deep skills and an understanding of the nuances of woodworking. Apprenticeships ensure that the techniques and traditions of heirloom furniture making are preserved and passed down through generations.
Quality Control in Heirloom Furniture Production
In true heirloom furniture workshops, quality control is not a separate department but a responsibility shared by all craftsmen. Each artisan is empowered to identify and address any issues, ensuring that every piece meets the highest standards of quality and craftsmanship. This collective commitment to quality ensures that every piece of furniture that leaves the workshop is worthy of being called heirloom.
Environmental Considerations in Heirloom Furniture Making
Heirloom furniture makers often prioritize environmental sustainability in their practices, recognizing the importance of preserving natural resources for future generations. The commitment to sustainability is not just about sourcing materials responsibly; it’s about creating furniture that lasts, reducing the need for disposable, mass-produced items.
Sustainable Wood Sourcing
Many heirloom furniture companies source their wood from sustainably managed forests. This approach ensures a continuous supply of high-quality wood while protecting forest ecosystems. By choosing responsibly harvested wood, furniture makers contribute to the long-term health of forests and the environment. Sustainable sourcing practices ensure that heirloom furniture has a minimal environmental impact.
The Longevity Factor: Building Furniture to Last Generations
Perhaps the most significant environmental benefit of heirloom furniture is its longevity. By creating pieces that can last for generations, these craftsmen reduce the demand for disposable furniture, minimizing waste and resource consumption over time. The focus on durability means that heirloom furniture can be passed down through generations, reducing the need for new resources and contributing to a more sustainable future.
Restoring and Maintaining Heirloom Furniture
Maintaining heirloom furniture involves periodic care and sometimes restoration to preserve its beauty and functionality. Understanding how to care for these pieces ensures they can be enjoyed by future generations.
Regular Maintenance and Care
Regular maintenance of heirloom furniture includes dusting, polishing, and occasionally applying a new coat of wax or oil to protect the finish. Proper care prevents wear and damage, allowing the furniture to remain in excellent condition. Simple steps like keeping the furniture away from direct sunlight and using coasters can also help preserve its beauty.
Professional Restoration Services
Over time, even heirloom furniture may require professional restoration to address wear, damage, or aging finishes. Skilled restorers can repair joints, replace damaged wood, and refinish surfaces to bring the furniture back to its original condition. Restoration ensures that heirloom pieces can continue to be used and enjoyed for many more years.