Project details
Skill
Cost
Estimated Time
Building a window seat is an excellent way to add charm, functionality, and extra storage to your home. This project can transform an ordinary window into a cozy nook perfect for reading, relaxing, or simply enjoying the view. While it may seem like a complex undertaking, with the right approach and materials, you can create a beautiful DIY window seat in just a few days with our guide here.
Planning Your Window Seat Project
Proper planning leads to a successful window seat installation. This phase involves measuring, design considerations, and budgeting.
- Budgeting for Your Window Seat: The cost of building a window seat can vary widely depending on materials and complexity. On average, expect to spend $775 –$6,000 for a basic window seat using stock cabinets.* Custom designs or high-end materials can increase the cost. Factor in additional expenses for cushions, hardware, and any necessary modifications to heating or electrical systems.
- Choosing the Right Style: The style of your window seat should complement your home’s existing decor. Consider factors such as the cabinet design, molding style, and overall aesthetic. You can opt for a traditional look with raised panel cabinets or a more modern approach with sleek, flat-front designs.
- Measuring Your Space: Accurate measurements lead to a well-fitted window seat. Measure the width of the window area and the height from the floor to the windowsill. Also, consider the depth of the seat, typically between 16 and 20 inches, for comfort. Don’t forget to account for any baseboards or heating vents in the area.
*Cost information based on 2024 reports from Angi and Fixr.
Tools and Materials to Build a Window Seat
Gathering the right tools and materials before starting your project will make the whole process go more smoothly.
Tools
To build your window seat, you’ll need the following tools:
- Caulk gun
- Clamps
- Countersink drill bit
- Drill/driver
- Finish nailer
- Flat pry bar
- Level
- Stud finder
- Tape measure
Materials
The materials required for your window seat project include:
- 2x4s or 2x6s for the toekick base
- Decorative molding (crown, baseboard, and waist-band)
- Paint or stain (if finishing on-site)
- Plywood for cabinet skins (if needed)
- Screws (2½-inch drywall screws and 3-inch wood screws)
- Stock kitchen cabinets (over-the-refrigerator cabinets work well for the seat)
- Upholstered cushion
- Wood filler and caulk
 Drill/driver
- Finish nailer
- Tape measure
- Level
- Clamps
- Flat pry bar
- Stud finder
- Countersink drill bit
- Caulk gun


Preparing the Space for Your Window Seat
Proper preparation of the installation area leads to a successful window seat project.
- Removing Existing Baseboards: If there are baseboards in the area where you’ll install the window seat, carefully remove them using a flat pry bar. Save the baseboards if you plan to reuse them or need to match the style elsewhere in the room.
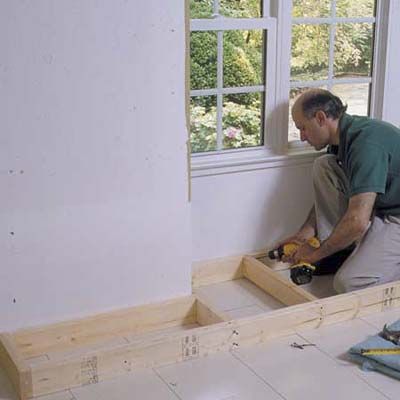
- Building the Toekick Base: Start by constructing a perimeter base, known as the toekick, using 2x4s or 2x6s. Build it to the same height as the existing baseboard. The depth of the toekick should match the depth of the cabinets, excluding their doors. Check that the toekick is level and secure it to the floor or wall studs with screws.
Installing the Cabinets
With the base in place, you can begin installing the cabinets that will form your window seat.
Positioning the Main Seat Cabinets
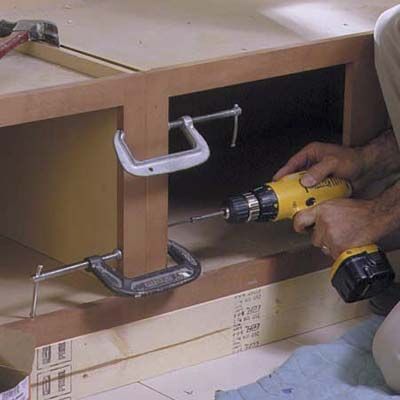
Begin by placing two over-the-refrigerator cabinets side-by-side on the toekick. Center these units under the window and clamp them together, ensuring their face frames are perfectly flush. Drill through the first face frame and partially into the second one with a countersink drill bit. Fasten the cabinets together using 2½-inch drywall screws.
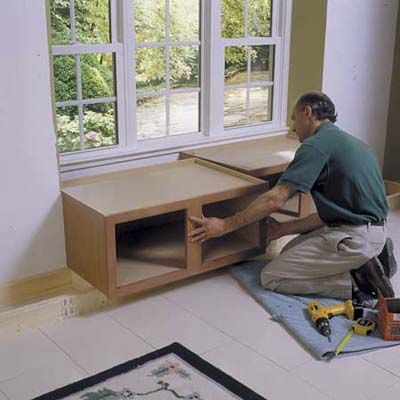
Begin the assembly by setting the two over-the-refrigerator cabinets onto the toekick. Center the two units under the window, then clamp them together with their face frames perfectly flush.
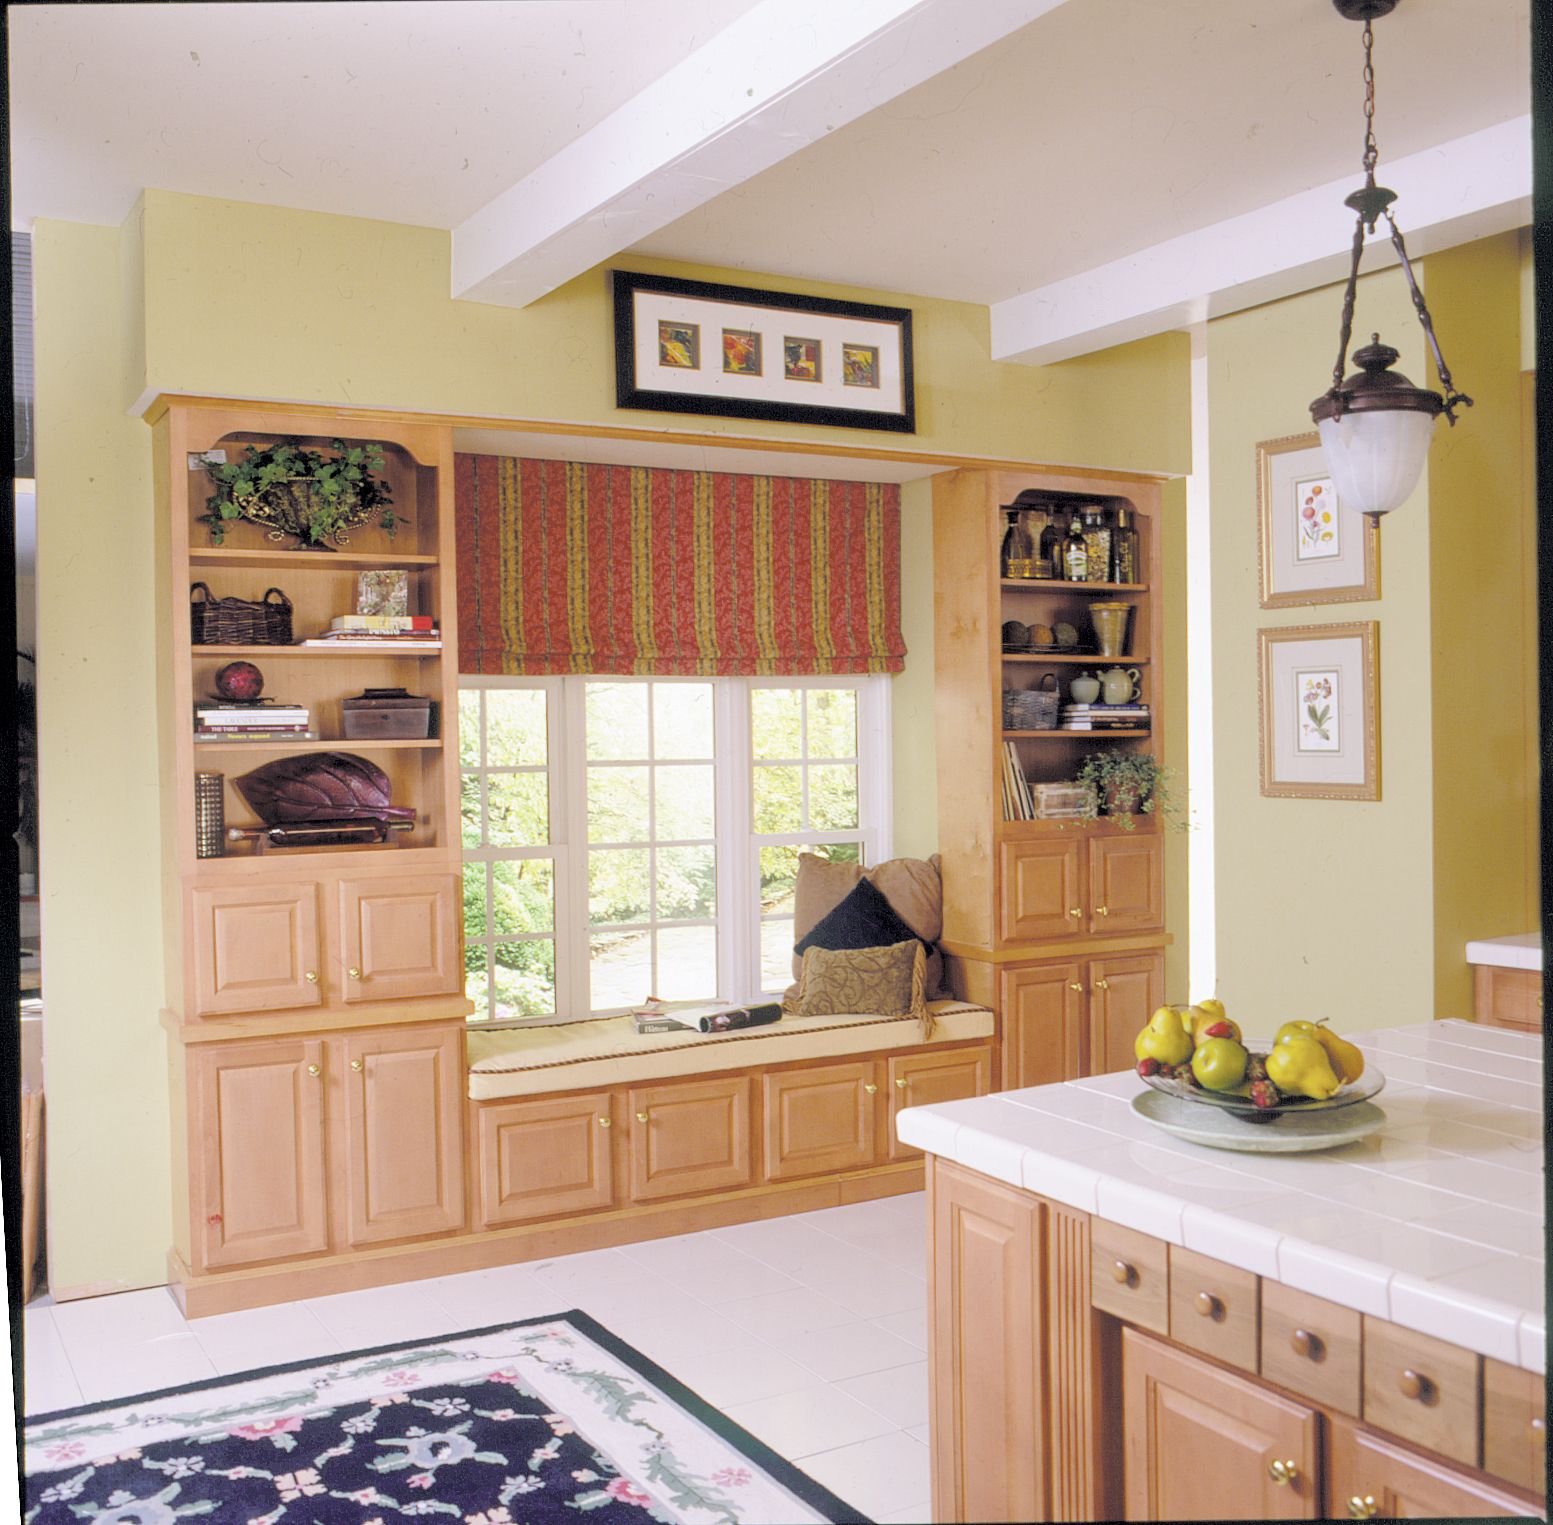
The cabinets used here feature solid-maple raised-panel doors, concealed hinges, and a honey-tone Spice Maple finish. The total cost of all the cabinets and prefinished molding was around $1,700. If that’s a budget-breaker, you can save up to 40 percent by using plastic-laminate cabinets or oak cabinets with recessed, flat-panel doors.
Adding End Cabinets
Next, install 12-inch-deep x 24½-inch-tall x 30-inch-wide cabinets on each end of the toekick. Clamp these end cabinets to the window seat cabinets, again ensuring the face frames are flush before securing them with screws.
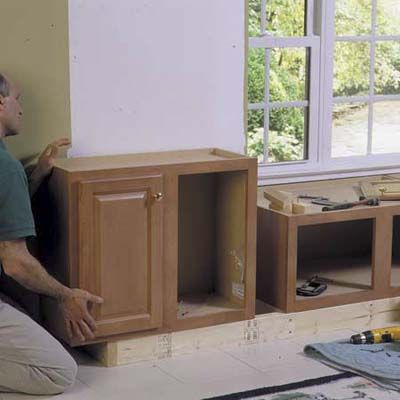
Securing Cabinets to the Wall
Use a level to check each end cabinet, then secure them to the wall with screws driven into the wall studs. If necessary, use shims behind the cabinets to prevent the screws from pulling them out of alignment.

Fasten Blocks to Add Height if Needed
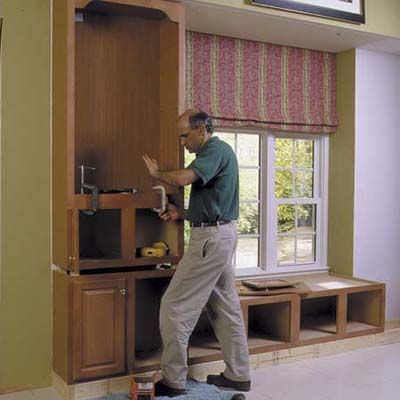
The end cabinets are topped with 15-inch-tall intermediate cabinets, which then receive the bookcase units. However, before proceeding, fasten six 3½-inch-long 2×2 blocks to the top of each end cabinet. These blocks raised the overall height of the cabinets so that the bookcases reached the soffit above.

Fit All Components Together and Install Bookcases
Continue the assembly by setting the intermediate end cabinets on top of the end cabinets and screwing them to the wall. Next, install the bookcase units by first clamping them to the intermediate cabinets, and then fastening them with 2 ½-inch screws driven through the face frames.
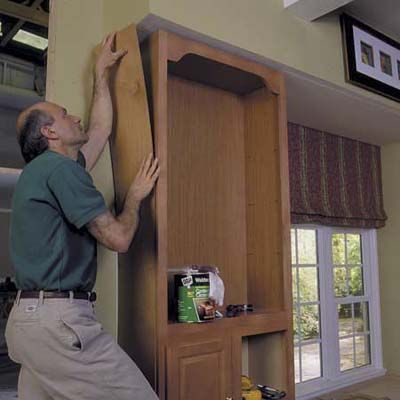
Conceal the Joints
To create the look of a custom-made window seat, it’s important to use matching prefinished moldings and accessories, which are sold by the cabinet manufacturer. Start by concealing the joints between the three cabinets on each end with prefinished plywood skins. Cut the skins to length, then attach them with contact cement.
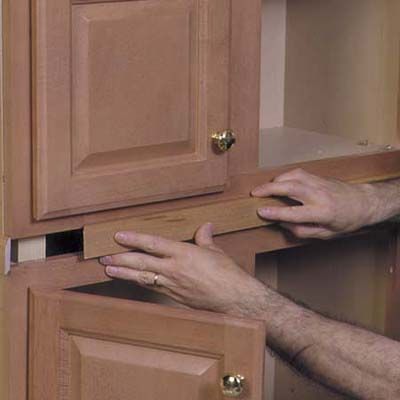
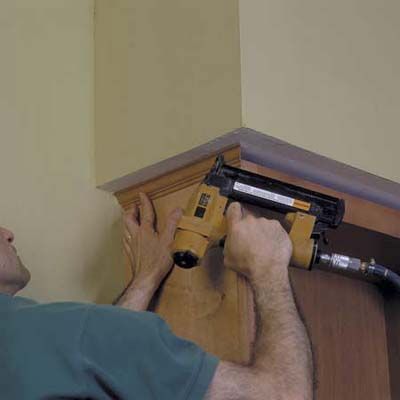
Install Waist-Band and Baseboard Molding
Next, nail the waist-band molding along the joint between the end cabinets and the intermediate cabinets. This narrow piece of trim covers the large gap created by the 2×2 blocks. Install baseboard molding around the bottom of the cabinets to hide the rough toekick. If the molding is too tall, rip it down to the proper width on a table saw.
Enhancing Your Window Seat
To create a custom look and add functionality, consider these enhancements to your basic window seat structure.
- Adding Decorative Molding: To achieve a polished, custom-made appearance, use matching prefinished moldings. Install waist-band molding along the joint between the end cabinets and intermediate cabinets. Add baseboard molding around the bottom of the cabinets to conceal the rough toekick. Finally, nail 1½-inch crown molding along the tops of the cabinets.
- Choosing and Installing Hardware: Select hardware that complements your home’s style and the cabinet finish. Install drawer pulls, knobs, or handles according to the manufacturer’s instructions, ensuring they’re aligned and securely fastened.
- Installing Bookcases: For additional storage and a built-in look, you can install bookcase units above the end cabinets. First, add 15-inch-tall intermediate cabinets on top of the end cabinets. Then, place the bookcase units on top of these, clamping them in place and securing them with screws through the face frames.
Creating a Comfortable Seating Area
A comfortable cushion makes your window seat more inviting and functional.
Selecting the Right Cushion
Choose a cushion that perfectly fits the dimensions of your window seat. The thickness typically ranges from two to four inches, depending on personal preference and the seat’s intended use. When selecting cushion materials, consider factors such as durability, ease of cleaning, and comfort.
DIY Cushion Options
For a custom fit and personal touch, you can create your own cushion. Purchase high-density foam, cut it to size, and cover it with a fabric of your choice. This DIY approach allows for complete customization of color, pattern, and texture to match your decor.
Professional Upholstery Considerations
If you prefer a more polished look or lack the time for a DIY project, consider hiring a professional upholsterer. They can create a custom cushion that perfectly fits your window seat and complements your home’s style.
Finishing Touches
The final steps in your window seat project involve aesthetics and functionality.
Painting or Staining
If you’ve used unfinished cabinets or want to change the color of prefinished ones, now is the time to paint or stain. Choose a finish that complements your room’s decor and protects the wood. Allow ample drying time before adding cushions or using the seat.
Adding Storage Solutions
Incorporate storage solutions to maximize the functionality of your window seat. Install adjustable shelves inside the cabinets, add drawer organizers, or use decorative baskets to keep items tidy and easily accessible.
Troubleshooting Common Window Seat Issues
During the installation process, you may encounter some challenges. Here’s how to address them.
- Dealing with Uneven Floors: If your floor is uneven, use shims under the toekick or cabinets to make everything level. This step helps you create proper door and drawer alignment.
- Working Around Heating Vents: If your window seat covers a heating vent, you’ll need to extend the ductwork. Consider hiring a professional to reroute the vent to the front of the toekick base, ensuring proper heat circulation in the room.
Window Seat Maintenance and Care
Proper maintenance will keep your window seat looking great.
- Cleaning Your Window Seat: Regularly dust and clean your window seat with appropriate products for the finish. For upholstered cushions, follow the fabric care instructions, and consider using removable, washable covers for easy cleaning.
- Repairing Wear and Tear: Address any scratches, dents, or loose hardware promptly to prevent further damage. Touch up paint or stain as needed, and tighten any loose screws or hinges periodically.
Our Conclusion
Building a window seat is a rewarding project that can enhance your home’s interior. By following this step-by-step guide, you can create a beautiful, functional space that serves as both a cozy nook and a storage solution.