Transforming a plain table into a stylish piece of furniture is easier than you might think. With some basic tools, decorative molding, and a bit of creativity, you can elevate the look of any ordinary table in just a few hours. This guide will walk you through the process of trimming out a plain table, from selecting the right materials to applying the finishing touches. Whether you’re looking to update a bedside table or revamp a living room centerpiece, these steps will help you create a custom, one-of-a-kind piece that reflects your personal style.
The Basics of Table Trimming
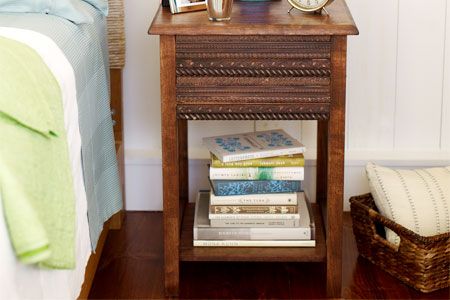
Table trimming is simply adding decorative molding or trim to the apron of a table. The apron is the vertical band that runs along the edge of the table, just below the top surface. By applying molding to this area, you can transform a basic table into a more visually interesting and sophisticated piece of furniture.
Benefits of Trimming Out a Plain Table
Trimming out a plain table offers several advantages:
- Customization: It allows you to personalize your furniture to match your decor.
- Cost-effectiveness: Updating an existing table is often cheaper than buying a new one.
- Versatility: You can change the style of your table to suit different rooms or design themes.
- Value addition: A well-trimmed table can increase the furniture’s perceived value.
- Creativity: It provides an opportunity to express your artistic side through furniture design.
Tools and Materials for Table Trimming
To trim out your table, you’ll need the following tools:
- Clamps
- Clean rags
- Measuring tape
- Miter box or miter saw
- Paintbrush or foam brush
- Pencil
- Safety glasses
- Sandpaper
- Work gloves
Gather these materials for your table trimming project:
- Decorative molding
- Finish nails
- Painter’s tape
- Primer (if painting)
- Stain or paint (depending on your desired finish)
- Wood filler (if needed)
- Wood glue
Preparing Your Table for Trimming
Proper preparation achieves a professional-looking result. Take the time to clean and prepare your table before adding the trim.
Cleaning and Sanding the Table
Start by thoroughly cleaning the table to remove any dirt, dust, or grease. Once clean, lightly sand the apron area where you’ll be applying the trim. This will help the glue adhere better and create a smoother surface for the molding. Sanding also opens pores in the wood, allowing finishes to adhere and penetrate more fully.
Measuring and Marking the Apron
Accurate measurements are critical for the best fit. Carefully measure the apron’s width and height. Use these measurements to mark the lengths of molding you’ll need to cut. For the best fit, measure each side individually, as there may be slight variations. Mark twice and cut once to minimize waste and ensure precision.

Selecting and Cutting the Molding for Table Trimming
Choosing the right molding and cutting it accurately are crucial steps in the trimming process. Take your time to select a style that complements your table and cut the pieces precisely.
Choosing the Right Molding Profile
Select a molding profile that matches your table and room decor style. For the best look and fit, choose profiles that are about the same depth as your table’s apron. Ornate moldings, such as rope and astragal patterns, can add elegant detail to your table. Contemporary moldings, such as clean lines or geometric patterns, may suit a modern table better, while simple quarter-round or cove moldings work well with a minimalist style. The molding profile will significantly influence the overall appearance of your project.
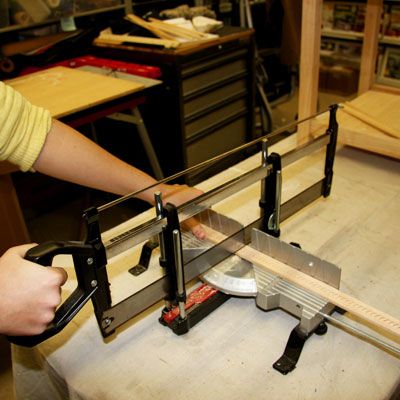
Cutting Techniques for Perfect Fits
Use a miter box or miter saw to cut the molding pieces to the correct length. To ensure consistent cuts, use a stop block. This simple tool can help you cut multiple pieces to the same length quickly and accurately. Remember to wear safety glasses when cutting the molding. Angle cuts should be precisely measured for 45-degree corners, ensuring that each piece of molding fits snugly together without exposing gaps.
Attaching the Trim to Your Table
With your molding cut to size, it’s time to attach it to your table. This process requires patience and precision to get a seamless look.
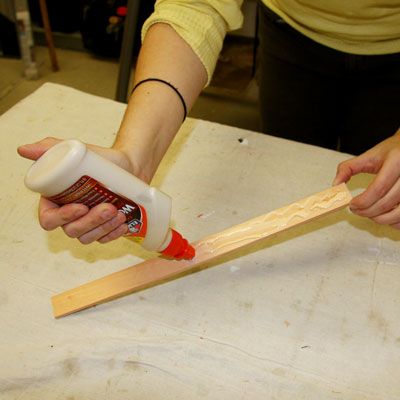
Applying Wood Glue
Lay out your cut molding pieces on a work surface and arrange them in the pattern you’ve chosen. Starting at the top of the apron, apply a thin, even layer of wood glue to the back of the first piece of molding. Be careful not to use too much glue, as excess can seep out and mar the finish. An even application ensures full adherence along the molding’s contact surface.
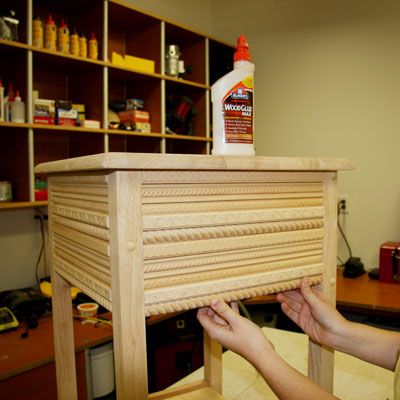
Securing the Molding in Place
Press the glued molding firmly into place on the table’s apron. Work your way around the table, attaching each piece of molding in turn. Use painter’s tape or clamps to hold the molding in place while the glue dries if necessary. Drive finish nails through the molding into the table apron to secure it further. This extra step will keep the molding in place over time. Allow the glue to dry completely according to the manufacturer’s instructions before moving on to the finishing stage. Ensure all molding pieces align perfectly, maintaining the design flow.
Finishing Touches for Your Trimmed Table
The finishing process is where your newly trimmed table really comes to life. Whether you choose to stain or paint, this step will protect your work and enhance the table’s appearance. Prepping the surface before finishing and ensuring you use the appropriate techniques will lead to a more professional look.
Staining Options
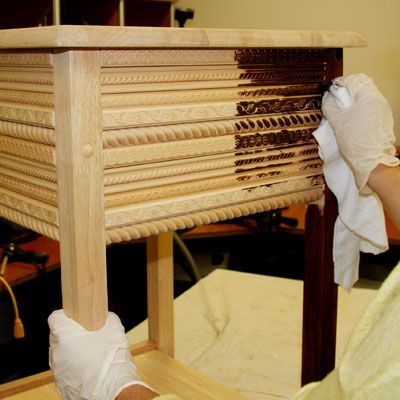
If you want to maintain a natural wood look, staining is a great option. Choose a stain color that complements or matches the existing table finish. Apply the stain with a clean, dry rag, working in the direction of the wood grain. Allow the stain to dry completely before applying a clear protective topcoat. Consider using a gel stain for a more consistent color application on uneven surfaces or different wood types.
Painting Techniques for a Pop of Color
For a bold, modern look, consider painting your trimmed table. Start by applying a primer to ensure good paint adhesion. Once the primer is dry, apply two coats of your chosen latex paint color, allowing each coat to dry thoroughly. For an extra pop of color, you might paint just the trim in a contrasting shade to the table body. Using painter’s tape can help you achieve clean lines and professional-looking edges.
Detailing and Enhancements for Table Trimming
Adding detailed enhancements can elevate your trimmed table further, making it even more appealing and unique. Think beyond just trimming for a comprehensive makeover.
Adding Inlays or Accents
Consider incorporating inlays or additional accents to your table to add a custom touch. This might include metallic strips, mosaic tiles, or carved wood pieces. These enhancements will add character and make your table a true centerpiece in any room.
Protecting the Surface
Applying a protective finish like polyurethane or varnish can add a layer of protection to your work, keeping it looking new for longer. Opt for finishes that offer UV protection if your table will be placed where it will get significant sun exposure.
Troubleshooting Common Table Trimming Issues
Here are solutions to common problems you might face during your table trimming project.
Dealing With Gaps and Misalignments
If you notice small gaps between the molding pieces or between the molding and the table, use wood filler to smooth them out. Once the filler is dry, sand it flush with the surrounding surfaces before finishing. A second pass with filler and a final sanding can create an even smoother appearance.
Fixing Uneven Stain or Paint Application
If your stain or paint appears uneven, lightly sand the affected areas and reapply the finish. For stain, you may need to use a wood conditioner before reapplying to ensure even absorption. For paint, make sure each coat is fully dry before applying the next to avoid streaks or blotches. Adding a final top coat can help blend and protect the finish.
Addressing Warped or Twisted Molding
Sometimes, molding can become warped or twisted during storage. Straighten it out by slightly dampening it, then clamping it flat overnight. Applying gentle heat can speed up this process and help it maintain shape.