Vinyl flooring remains a popular choice in American homes due to its affordability, durability, and versatility. However, vinyl flooring isn’t invincible. Common issues include snags from furniture, gouges from dropped objects, and punctures from shoes such as high heels. Fortunately, repairing vinyl flooring is a straightforward process that typically requires only a utility knife and some basic skills, and is manageable for any DIYers. This article will guide you through the techniques for repairing both sheet vinyl and vinyl tile, the two primary types of vinyl flooring.
Assessing the Damage
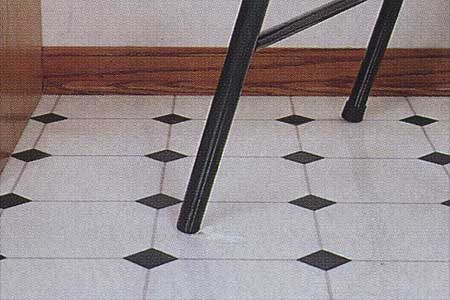
The method for repairing vinyl flooring depends on the type of flooring and the nature of the damage. For vinyl tile, the most effective approach is usually to replace the damaged tiles entirely. Sheet vinyl repairs often involve fusing the surface or patching in new material. Small cuts and scratches can be effectively repaired using liquid seam sealer, a clear compound available at flooring retailers. For more significant damage like tears or burns, you’ll need to cut out the affected area and replace it with a patch.
To begin the repair process, clean the damaged area with a soft cloth dipped in lacquer thinner. For minor damage, apply a thin bead of seam sealer and allow it to dry. For larger repairs, you’ll need an extra piece of identical flooring. Installers often leave scrap pieces for this purpose, but if none are available, you may be able to find a match at a flooring dealer or lift a piece from an inconspicuous area like a closet or under appliances.
How To Patch Sheet Vinyl
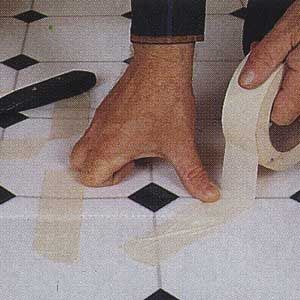
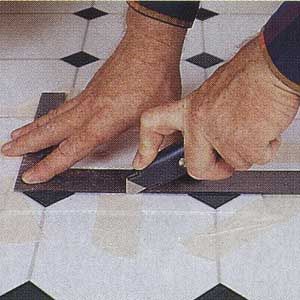
The double-cutting technique is an effective method for patching sheet vinyl. Begin by securing the replacement patch over the damaged area with two-inch wide masking tape, ensuring the pattern aligns perfectly with the surrounding flooring. Use a straightedge and utility knife to cut through both the patch and the existing flooring, following the pattern lines for a seamless repair.
After cutting, remove the patch and damaged section. For perimeter-bonded floors, the piece should come up easily. For fully adhered floors, use a putty knife or scraper to remove the damaged section. Apply mastic to the subfloor using a notched trowel. For perimeter-bonded floors, also lift the surrounding flooring and apply mastic under the edges.
Press the patch into place, cover it with wax paper, and weigh it down with heavy books. Allow at least 24 hours for the mastic to dry before applying liquid seam sealer to all joints around the patch. This method results in a nearly undetectable repair.
Replacing Vinyl Tile
Replacing a damaged vinyl tile is generally simpler than repairing sheet vinyl. Start by using an electric heat gun to warm the damaged tile, softening the adhesive underneath. Carefully pry out pieces of the tile using a stiff-blade putty knife or dull wood chisel, taking care not to damage surrounding tiles.
Once the entire tile is removed, thoroughly scrape the subfloor to remove any residual adhesive or tile fragments. If you’re using a new adhesive-back tile, simply peel off the protective paper from the back. For tiles lifted from another area, apply mastic to the subfloor.
Press the replacement tile firmly into place. If you used mastic, cover the tile with wax paper and weigh it down. Allow 24 hours for the adhesive to set before walking on the newly repaired area. This ensures a solid bond and prevents future issues.
Preventive Measures
To extend the life of your vinyl flooring and minimize the need for repairs, consider implementing these preventive measures:
- Use furniture pads under heavy items to prevent scratches and indentations.
- Clean spills promptly to avoid staining and potential damage to the adhesive.
- Avoid dragging heavy objects across the floor.
- Use doormats at entrances to reduce dirt and grit that can scratch the surface.
Cleaning and Maintenance
Proper cleaning and maintenance can significantly extend the life of your vinyl flooring. Here are some easy steps you can take to keep the vinyl clean:
- Sweep or vacuum regularly to remove dirt and debris.
- Mop with a damp cloth or mop using a mild cleaning solution designed for vinyl floors.
- Avoid using harsh chemicals or abrasive cleaners that can damage the flooring.
- For stubborn stains, use a soft-bristled brush and a vinyl-safe cleaner.
- Periodically apply a vinyl floor polish to restore shine and protect the surface.