Installing your own floodlight is a completely manageable do-it-yourself task, and an excellent way to illuminate your outdoor space and improve your home’s security. Homeowners who select the right fixtures, take the right safety precautions, and install their systems carefully can get the job done in no time. Read our step-by-step guide on how to install a floodlight below to add this safety measure to your home without breaking the bank.
Understanding Electrical Safety for DIYers
Making sure you can install a floodlight safely is the most important part of this project. Working with electricity carries inherent risks, but you can minimize these dangers with proper precautions. Always turn off the power at the main service panel before you start working, and use a circuit tester to confirm that your power is off.
Familiarize yourself with local building codes, and obtain any necessary permits before you start working. If you’re unsure about any part of the installation, consult a licensed electrician. Electrical work isn’t difficult for experienced DIYers, but the consequences of related mistakes can be severe.
Essential Tools and Materials for Floodlight Installation
Gather the tools and materials below before you begin installation:
Tools
- Electric drill with various drill bits
- Fish tape or wire snake
- Ladder
- Pliers
- Safety glasses and work gloves
- Screwdrivers (flathead and Phillips)
- Voltage tester
- Wire strippers
Other Materials
- 12/2 nonmetallic sheathed electrical cable
- Electrical box that’s appropriate for outdoor use
- Electrical tape
- Floodlight fixture
- Mounting screws and anchors
- Wall switch
- Weatherproof silicone caulk
- Wire connectors (wire nuts)
How To Choose the Right Floodlight for Your Home
You must select the right floodlight to get your desired lighting effect. The model you choose must be compatible with your home’s electrical system.
Types of Floodlights
- Halogen Floodlights: Bright light but less energy-efficient than other models
- LED Floodlights: Energy-efficient and long-lasting
- Motion-Sensor Floodlights: Activate when movement is detected
- Solar-Powered Floodlights: Eco-friendly option that doesn’t require wiring
Factors To Consider When Selecting a Floodlight
- Brightness
- Color temperature (warm or cool light)
- Coverage area
- Durability and weather resistance
- Energy efficiency
- Smart features
Wired vs. Plug-In Floodlight Options
There are two main options when it comes to powering your floodlight: hardwiring into your home’s electrical system or using a plug-in fixture. Each has its advantages and disadvantages.
Hardwired Floodlights
Hardwired floodlights are permanently connected to your home’s electrical system. They offer a clean look and there are no exposed cords, which makes them more secure. This option is ideal for permanent installations, and you can control these types of floodlights with a wall switch.
Plug-In Floodlights
Plug-in floodlights are easier to install and don’t require extensive electrical work. They’re a good choice for renters or those who want a temporary solution. You don’t have as much flexibility when it comes to placement, though, and attached cords make this option less visually appealing than hardwired floodlights.
Step-by-Step Guide To Installing a Floodlight
Follow the steps below to install your hardwired floodlight safely.
Preparing the Installation Site
- Choose a location for your floodlight that will offer optimal coverage.
- Turn off the power to the circuit you plan to work on at the main service panel.
- Use a voltage tester to confirm the power is off.
- Mark the spot at which you’ll mount the electrical box, and drill a pilot hole.
Running Electrical Cable
- Drill a hole that has a 1-inch diameter through the exterior wall into the attic or interior space.
- Feed the 12/2 electrical cable through the hole, and leave enough slack for connections.
- If you’re working in the attic, drill 5/8-inch holes in floor joists through which you can run the cable to the switch location.
- Use a fish tape or wire snake to pull the cable through the walls.
Mounting the Floodlight Fixture
- Install the electrical box securely to the exterior wall.
- Apply weatherproof silicone caulk around the box to prevent water infiltration.
- Attach the mounting bracket for the floodlight fixture to the electrical box.
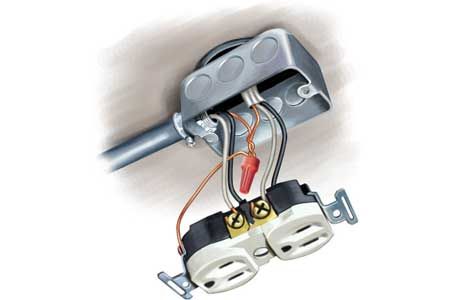
- Connect the wires according to the manufacturer’s instructions, and match colors.
- Secure the bare copper ground wire to the grounding screw in the electrical box.
Wiring the Floodlight
- Strip about 6 inches of outer sheathing from the cable ends.
- Strip about 3/4 inch of insulation from each individual wire.
- Connect the black (hot) wires with a wire connector.
- Connect the white (neutral) wires with a wire connector.
- Connect the bare copper (ground) wires to the green ground screw on the fixture.
- Carefully tuck all wires into the electrical box.
- Mount the floodlight fixture to the bracket and tighten all screws.
How Do You Connect a Floodlight to a Wall Switch?
Installing a wall switch allows you to control your floodlight easily.
Locating the Switch
- Choose a location for the switch that’s near the door, and leads to the area you plan to illuminate with the floodlight.
- Cut a hole in the drywall for a single-gang electrical box.
- Run the cable from the floodlight to this location.
Wiring the Switch
- Connect the black (hot) wire from the power source to one terminal on the switch.
- Connect the black wire that leads to the floodlight to the other terminal on the switch.
- Join the white (neutral) wires with a wire connector.
- Connect the ground wires to the green ground screw on the switch.
- Mount the switch in the electrical box and attach the cover plate.
Troubleshooting Common Floodlight Installation Issues
You might encounter some issues even if you install the floodlight carefully. Below are some solutions to common problems:
- Flickering light: This could indicate a loose connection. Turn off the power and check all wiring.
- Floodlight doesn’t turn on: Check all connections and make sure you’ve properly seated the bulb.
- Switch doesn’t work: Make sure you’ve wired the switch correctly and that there’s power going to the circuit.
- Water getting into the fixture: Make sure all seals are intact and that you’ve properly caulked the fixture.
Important Electrical Code Considerations
Abide by electrical codes to make sure your project is legal and to keep your family safe. Consider the points below.
Grounding Requirements
- You must connect the ground wire to the grounding terminal in the electrical box and the fixture.
- You must ground all metal components, including the fixture and electrical box.
Wire Connection Standards
- Make sure all connections are tight and secure.
- Make sure the wires connectors you use are the right size.
- Wrap electrical tape around connections for more protection.
Drilling and Cable Protection Rules
- When you’re drilling through wood framing for electrical cable, make sure the edge of the hole is at least 1 1/4 inch from the nearest edge.
- If this isn’t possible, protect the cable with a 1/2-inch-thick metal plate.
Always consult your local building department for specific code requirements in your area.
When To Call a Professional Electrician
Installing a floodlight is a manageable DIY project for many homeowners, but you should consult professionals if any of the following apply to you:
- Local codes require a licensed electrician for the work.
- The project requires running new circuits or upgrading your electrical panel.
- You’re dealing with high-voltage systems (more than 120 volts).
- You’re unsure about any aspect of the installation process.
- You’re working with aluminum wiring or knob-and-tube wiring.
How Much Does It Cost To Install a Floodlight?
You can install floodlights for between $75 and $250. Motion-sensor options cost about $425. Hiring professionals to install your floodlight will increase the project’s cost, but they can guarantee proper and safe installation.
*Cost data in this article sourced from Angi.
How Can You Enhance Your Outdoor Space With a Floodlight?
A floodlight that you install correctly can enhance your outdoor living space and increase your home’s curb appeal. Consider the tips below to maximize the impact of your new floodlight:
- Combine floodlights with other types of outdoor lighting for a layered effect.
- Create ambient lighting for outdoor entertaining areas.
- Illuminate pathways and stairs for safety and aesthetics.
- Use the floodlight to highlight architectural features of your home.