Creating an eerie Halloween mirror is a fun DIY project that can turn any space in your home into a haunted attraction. By distressing a mirror’s surface and adding a ghostly image, you can craft an unsettling illusion that will startle and delight your Halloween guests. This guide will take you through each step, from selecting the right mirror to displaying your finished creation.
Materials Needed for Your Haunted Mirror
Here are the materials you’ll need for this project, plus optional enhancements for your mirror.
Materials
- Drop cloth or protective covering
- Fine-grade steel wool (1 or 0 grade)
- Latex gloves
- Old photograph or printout of a creepy face
- Paper towels
- Screwdriver
- Transparent tape
- Wall mirror (preferably with a removable back)
Optional Enhancements
- Acetone (for stubborn paint removal)
- Cobwebs or other Halloween decorations
- LED lights
Choosing the Perfect Mirror for Your Project
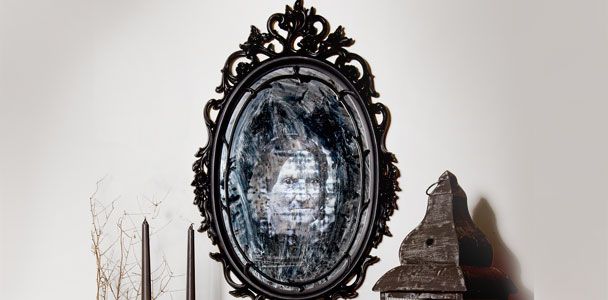
Choose a mirror with an ornate or antique-style frame for the best eerie Halloween feel. This will add to the overall spooky aesthetic. It should also have a removable back, which will make the distressing process much easier.
Also, consider mirror size when deciding where to display it. A larger mirror can create a more dramatic effect, while a smaller one might be perfect for a subtle scare in a guest bathroom or hallway. Thrift stores, garage sales, and online marketplaces are excellent places to find affordable mirrors suitable for this project.
Preparing Your Workspace and Safety Precautions
Choose a well-ventilated area, preferably outdoors or in a garage, to avoid inhaling fumes from the distressing process. We recommend wearing a mask if using acetone. Lay down a drop cloth to protect your work surface and make cleanup easier. Always wear latex gloves to safeguard your skin from chemicals and sharp edges. Keep your workspace clear of clutter to prevent accidents, and have a first aid kit nearby just in case.
Step-by-Step Guide to Aging Your Mirror
The key to creating a spooky Halloween mirror is in the aging process. By removing some of the mirror’s reflective coating, you can achieve a ghostly, aged appearance that sets the stage for your eerie image. Follow these steps to achieve the perfect distressed look.
Remove the Mirror’s Back
Start by removing the mirror from its frame. If your mirror has a removable back, unscrew it carefully. For mirrors without removable backs, you may need to pry off the backing material gently. Place the mirror face-down on your protected work surface.
Distress the Mirror’s Surface
Put on your latex gloves and grab your fine-grade steel wool. Gently rub the back of the mirror in circular motions, applying light pressure. The goal is to remove some, but not all, of the paint and reflective coating. Work slowly and check your progress by holding the mirror to the light.
Remember, you can always remove more, but you can’t add it back once it’s gone. To enhance the ghostly effect, focus on creating an uneven, mottled pattern. Pay extra attention to the areas where your spooky image will be placed.
Apply Chemical Treatments, If Needed
If the paint and coating don’t come off easily, you may need to use acetone to help loosen them. Pour a small amount of acetone onto a paper towel and test it on an inconspicuous area of the mirror first. If it effectively loosens the paint without damaging the glass, you can use it sparingly as you work.
Apply the acetone-soaked paper towel to small sections at a time, then use the steel wool to gently remove the loosened paint and coating. Be careful not to oversaturate the mirror, which could lead to over-stripping.
Selecting and Preparing Your Spooky Image
The ghostly image you choose will be the centerpiece of your eerie Halloween mirror. Take time to select a photo that will create the desired effect. Use the tips below to find the right image.
Find the Right Ghostly Photo
Look for vintage photographs or create your own spooky image. Old-fashioned portraits work particularly well, especially those with stern or somber expressions. You can find public domain images online or use photo editing software to create a custom ghostly figure.
Size and Print Your Image
Measure your mirror and size your chosen image accordingly. The photo should be large enough to be clearly visible but not so large that it overwhelms the mirror. Print the image on high-quality paper for the best results. If possible, use slightly translucent paper to enhance the ghostly effect.
Incorporate Additional Effects
To heighten the eerie ambiance, try adding additional visual effects to your image. Use photo editing software to add spectral elements such as shadowy figures or faded script. These additions can enhance the unsettling quality of the image and make your Halloween mirror even more captivating.
Assemble Your Haunted Mirror
With your distressed mirror and spooky image ready, it’s time to bring your eerie Halloween mirror to life. Follow the steps below to complete your mirror project.
Attach the Ghostly Image
Clean the back of the mirror thoroughly with a lint-free cloth to remove any debris from the distressing process. Position your printed image on the back of the mirror, adjusting it until you’re satisfied with its placement.
Use small pieces of transparent tape to secure the image to the mirror. Be sure to tape down all edges to prevent the image from shifting or curling over time.
Reassemble the Mirror Frame
Once your image is securely attached, place the mirror back in its frame. If you removed a backing board, replace it carefully, making sure that it doesn’t damage or move your ghostly image. Screw the backing in place if applicable.
If your mirror doesn’t have a removable back, you may need to create a new backing using cardboard or a thin piece of wood to protect the image and complete the look.
Add a Finishing Touch
To give your haunted mirror a polished look, add a layer of clear varnish to the frame. This can add a subtle sheen and help protect the frame from wear and tear. If you prefer a more aged appearance, you can lightly sand the edges of the frame after applying varnish to create a distressed look.
Creative Display Ideas for Your Eerie Mirror
Your eerie Halloween mirror can be the centerpiece of your holiday decor. Here are some creative ways to display your spooky creation and maximize its scare factor.
- Bathroom scares: Place the mirror in a guest bathroom. The close quarters will make the ghostly image even more startling.
- Bedroom terrors: For a truly unsettling experience, hang the mirror in a bedroom. The ghostly face peeking out in the dim light will send shivers down anyone’s spine.
- Entryway frights: Hang your haunted mirror in the entryway to greet guests with an unexpected scare. Position it so that people see their reflection first before noticing the ghostly image lurking behind them.
- Living room haunt: If you want to make a bold statement, hang the mirror prominently in your living room. Surround it with other Halloween decorations to create a focal point that draws attention and sets the mood for your spooky decor.
- Outdoor display: Add your haunted mirror to your outdoor Halloween setup. Place it on a porch or garden to spook trick-or-treaters as they approach your home.
Troubleshooting Common Issues When Creating a DIY Halloween Mirror
Below are some common problems you might face while creating your eerie Halloween mirror.
- Correcting image placement: If the image appears misaligned or crooked, carefully remove the tape and adjust its position. Take your time to line up the image with the distressed areas of the mirror for the best effect.
- Image visibility problems: If your image isn’t visible enough, try using a brighter print or experimenting with different paper types. You can also add small LED lights behind the mirror to illuminate the image more effectively.
- Overstripping the mirror: If you’ve removed too much of the reflective coating, don’t panic. You can create a more subtle effect by placing a piece of sheer fabric over the mirror to diffuse the reflection and enhance the ghostly image.
- Preventing moisture damage: If you’re displaying your mirror in a humid environment, consider sealing the edges of the mirror with silicone to prevent moisture from seeping in and damaging the image. This is especially useful if you display your mirror outdoors or in a bathroom.
Maintaining Your Halloween Mirror
Your eerie Halloween mirror can remain a unique decorative piece all year. Store it in a dry place to prevent moisture damage, and dust it gently with a soft cloth. Regularly check the frame and backing for any signs of wear or damage. Tighten loose screws and touch up distressed areas with paint or varnish as needed.
You can also swap out the ghostly image seasonally for festive pictures during holidays like Christmas or Valentine’s Day, allowing you to enjoy your DIY project throughout the year.