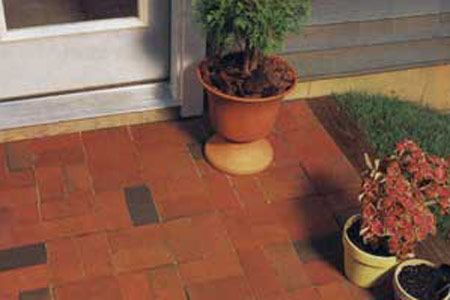
Adding a brick patio can transform your outdoor space and improve your home’s resale value. While you might think this project requires professional masonry skills, it’s surprisingly DIY-friendly.
In this guide, we’ll show you how to lay a brick patio, from site preparation to finishing touches. With determination and attention to detail, you can complete this project over a couple of weekends.
Understanding Patio Options and Materials
Before diving into the construction process, you should understand your design options and learn how to choose the right materials for your project.
Flexible Pavement vs. Mortared Pavement
There are two primary methods for building a brick patio: flexible pavement and mortared pavement.
Flexible Pavement
Flexible pavement, also known as the dry-laid method, is the quicker and easier option. This technique involves laying pavers directly on a bed of compacted sand or crushed stone. You’ll place the pavers together tightly and sweep sand between the joints.
One advantage of this method is that it makes removing and replacing individual pavers easy.
Mortared Pavement
Mortared pavement provides a flatter, more durable surface but requires more skill and installation time. This method involves laying a 4-inch-thick concrete slab over a crushed-stone base. Once the concrete cures, you’ll press pavers into a 1/2-inch-thick mortar bed that you trowel onto the slab. Then, you fill the spaces between pavers with mortar.
Choosing the Right Pavers
We recommend using concrete pavers instead of traditional clay bricks for durability and longevity. Concrete pavers are harder and less likely to crack, making them better for patios. Look for pavers measuring about 2-1/4 inches thick, 3-3/4 inches wide, and 7-1/2 inches long. These dimensions allow for easy installation and pattern creation.
Tools and Materials Needed
To complete your brick patio project, you’ll need the following tools and materials:
- 4-foot level
- Broom
- Circular saw with masonry blade
- Clear masonry sealer
- Concrete pavers
- Crushed granite
- Fine-grain play sand
- Framing square
- Hand tamper or plate compactor
- Handsaw
- Knee pads
- Landscaping fabric
- Measuring tape
- Paint roller or garden sprayer
- Pressure-treated 6×6 landscaping timbers
- Rake
- Rubber mallet
- Shovel
- String and stakes for layout
- Wheelbarrow
Preparing the Site of Your Patio
Proper site preparation is crucial for a long-lasting, level patio. Here are the steps to prepare your site.
Staking Out and Measuring Your Patio Area
Begin by staking out batterboards and stretching strings between them to establish the patio outline. Adjust the strings to represent the outer edges of the 6×6 timbers. Use a framing square to ensure the strings form perfect 90-degree angles with the house and at exterior corners.
Excavating and Leveling the Ground
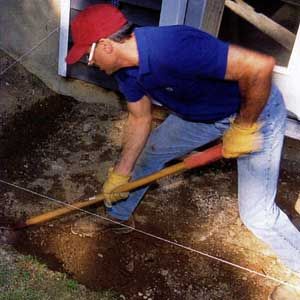
Using the strings as guides, dig a trench around the patio’s perimeter to a depth of about eight inches. If the ground slopes, start excavating at the high end and keep the trench bottom level as you dig. This step creates a stable foundation for your patio, and getting the ground even helps prevent future settling issues.
Creating a Solid Patio Border
A solid border contains the pavers and prevents them from spreading over time. Pressure-treated 6×6 landscaping timbers provide an attractive and durable option.
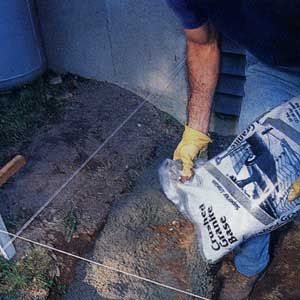
Installing Pressure-Treated Timbers
Line the trench with two inches of crushed granite. Sprinkle the surface with water and compact it using a hand tamper. Repeat this process with another 2-inch layer of granite. Check the trench bottom with a 4-foot level, adjusting as necessary to get it perfectly level.
Cutting and Joining Timbers
Cut the 6x6s to length using a handsaw or circular saw. For corners where timbers join, cut half-lap joints in the 6×6 ends. Mark the 2-¾ X 5-½-inch joint and cut along the lines with a circular saw. Use a handsaw to remove the remaining wood and free the waste piece. Apply a generous coat of wood preservative to all fresh cuts.
Laying the Base for Your Patio
A proper base makes for a stable and long-lasting patio. Crushed granite provides a solid foundation that compacts tighter than sand or gravel.
Compacting the Base Layer
Cover the patio area with landscaping fabric to prevent weed growth. Add a 3-inch layer of crushed granite, rake it out, sprinkle it with water, and thoroughly compact the entire area. Repeat this process, adding another inch of crushed granite and compacting again.
Using a Screed for Even Distribution
Create a grading tool, or screed, by face-nailing a 1×6 to a 2×4, keeping the top edges flush to create a 2-inch overhanging lip. Use this tool to smooth out the granite layer, and confirm it’s 2 inches lower than the top of the timbers. This step gets you a level surface for your pavers.
Professional Paver Techniques
Now that you have a solid foundation in place, it’s time to lay the pavers and create the pattern you want. Here’s how.
Creating a Basket-Weave Pattern
Start setting pavers in a corner of the patio near the house. For a basket-weave pattern, set the pavers in alternating right-angle pairs: two pavers parallel to the house followed by two pavers perpendicular to it.
Ensuring Proper Alignment and Spacing
Use a rubber mallet to pound the pavers flush with the top of the border. Maintain tight spacing between pavers for a professional look. If a paver chips, flip it over. Replace any pavers that crack in half during installation. Keeping a close eye on alignment will result in a clean and structured layout.
Finishing Touches
The final steps in your patio project involve securing and protecting the pavers from the elements.
Filling Joints with Sand
Once you have set all the pavers, cover them with a layer of fine-grain play sand. Sweep the sand back and forth across the surface with a broom to drive it down between the pavers. This process helps lock the pavers in place and prevents weed growth between them.
Applying Masonry Sealer
To protect your new patio from stains and weather damage, apply a clear masonry sealer using a paint roller or garden sprayer. This step will make the pavers less porous and more resistant to the elements.
Brick Patio Maintenance
To keep your brick patio looking its best, perform these maintenance tasks regularly:
- Inspect the patio for any damage or wear, making repairs as necessary
- Reapply sand between pavers as needed
- Rinse with a garden hose to remove dirt and prevent staining
- Seal the patio every 2–3 years to maintain protection
- Sweep the patio regularly to remove debris
Troubleshooting Common Patio Problems
Even well-built patios can develop issues over time. Here are some common problems and solutions:
- Erosion: Address any drainage issues to prevent further erosion and damage
- Loose pavers: Reset affected pavers and add sand to stabilize
- Settling: Add sand or crushed granite under affected areas to level
- Stains: Clean with a mild detergent and scrub brush, or use a pressure washer for tough stains
- Weed growth: Remove weeds and apply a weed preventer between pavers
Our Conclusion
Building a brick patio is a rewarding DIY project that can significantly enhance your outdoor living space. With careful planning, proper materials, and attention to detail, you can create a beautiful and durable patio without professional help.
However, if you’re unsure about any step in the process or lack the necessary tools, we recommend consulting with or hiring a professional to help you make your new brick patio.