We may be compensated if you purchase through links on our website. Our team is committed to delivering honest, objective, and independent reviews on home products and services.
Building a slate patio can transform your outdoor living space. Slate is a durable, natural stone that offers a timeless appeal and can withstand various weather conditions. This guide will walk you through the process of creating your own slate patio, from planning to finishing touches.
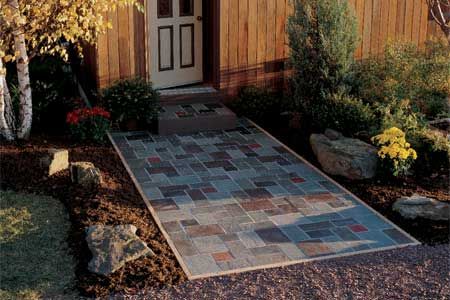
The Beauty of Slate Patios
Slate is known for its rich colors and textures, which can range from deep blues and greys to warm reds and browns. This variety allows you to create a patio that complements your home’s architecture and landscaping.
One of the primary benefits of slate patios is their longevity. When properly installed and maintained, a slate patio can last for decades, making it a worthwhile investment for your home. Slate is also slip-resistant when wet, making it a safer option for outdoor spaces. Additionally, slate is low-maintenance and resistant to fading, ensuring that your patio will retain its appearance for years.
Planning Your Slate Patio Project
Before you begin construction, you’ll first need to plan your slate patio project carefully to see how it will fit into your landscape.
Assessing Your Space
Start by evaluating the area where you want to build your patio. Consider factors such as the size of the space, existing landscaping, and how you plan to use the patio. Take measurements and create a rough sketch of your design. This will help you visualize the final product and make informed decisions about materials and layout.
Calculating Materials Needed
Once you have a design in mind, calculate the amount of materials you’ll need. This includes slate stones, gravel, sand, and any additional materials for edging or joint filling. To determine the number of slate stones required, measure the total square footage of your patio area and add 10% for cuts and waste. For the base materials, you’ll typically need about four inches of gravel and one inch of sand.
Budgeting for Your Slate Patio
The cost of building a slate patio can vary widely depending on factors such as the size of the patio, the quality of materials used, and whether you choose to hire professionals or do it yourself. On average, you can expect to spend between $16 and $35 per square foot, according to Homeguide. If you’re tackling the project yourself, you may be able to reduce costs significantly but be sure to factor in the cost of any tools you’ll need to purchase or rent.
Tools and Materials for Slate Patio Construction
Before getting started on slate patio construction, be sure to have on hand the following tools and materials.
Must-Have Tools
- Shovel and rake for excavation and leveling
- Plate compactor for compacting the base
- Level and string line for ensuring proper slope and alignment
- Rubber mallet for setting stones
- Wet saw or angle grinder with a diamond blade for cutting slate
- Wheelbarrow for transporting materials
- Safety gear (gloves, safety glasses, dust mask)
Required Materials
- Slate stones
- Gravel for the base layer
- Sand for the setting bed
- Landscape fabric to prevent weed growth
- Edging material (if desired)
- Joint filler or polymeric sand
Preparing the Ground for Your Slate Patio
Before you start laying stones, you’ll need to clear the ground and set it up for drainage.
Excavating the Site
Begin by marking the patio area with stakes and string. Excavate the area to a depth of about six inches, plus the thickness of your slate stones. Remove any grass, roots, or debris from the site. If you’re building against your house, ensure that the patio slopes away from the foundation to prevent water damage.
Creating Proper Drainage Slope
A slight slope is necessary to ensure proper drainage. Aim for a slope of about one inch per eight feet, sloping away from your house or any other structures. Use a level and string line to check and maintain the correct slope as you work.
Setting the Base for Your Slate Patio
A solid base is essential for preventing settling and shifting of your slate stones over time.
Laying and Compacting the Gravel Base
Spread a four-inch layer of gravel over the excavated area. Use a rake to level the gravel, then compact it using a plate compactor. Make several passes with the compactor to ensure a firm, even base. Check the slope periodically to maintain proper drainage.
Adding the Sand Layer
Once the gravel is compacted, add a one-inch layer of sand. Level the sand with a screed board, maintaining the proper slope. Lightly mist the sand with water and compact it with the plate compactor.
Installing Your Slate Patio
With the base prepared, you’re ready to start laying your slate stones.
Creating a Setting Bed
Spread a thin layer of sand or stone dust over the compacted base to create a setting bed for the slate. This layer helps to level out any minor imperfections and provides a stable surface for the stones.
Laying and Leveling Slate Stones
Begin laying the slate stones at one corner of the patio, working your way outward. Use a rubber mallet to tap the stones into place, checking for level as you go. Maintain consistent joint spacing between stones, typically about 1/4 to 1/2 inch.
Cutting Stones To Fit
For a professional finish, you’ll also need to cut some stones to fit around edges or obstacles. Use a wet saw, circular saw, or angle grinder with a diamond blade to make precise cuts.
Finishing Touches for Your Slate Patio
The final steps in building your slate patio involve filling joints and adding edging for a polished look.
Choosing and Applying Joint Filler
Once all stones are in place, fill the joints with either sand or a polymeric sand product. Sweep the filler into the joints, ensuring they are completely filled. If using polymeric sand, follow the manufacturer’s instructions for wetting and curing.
Edging Options for Your Patio
Consider adding edging to your patio for a finished appearance and to help contain the stones. Options include plastic edging, metal edging, or a row of larger stones set vertically. Choose an option that complements your patio design and overall landscape.
Maintaining Your New Slate Patio
Proper maintenance will help your slate patio last longer and stay looking brand new for years to come.
Sweep your patio regularly to remove debris. Occasionally, use a mild detergent and water to clean the surface. Avoid using harsh chemicals or pressure washers, as these can damage the stone or joint filler.
Inspect your patio periodically for any loose or damaged stones. Address these issues promptly to prevent further damage. If you notice any settling or unevenness, you may need to lift the affected stones and adjust the base beneath.
DIY vs. Professional Patio Installation: Pros and Cons
While building a slate patio can be a rewarding DIY project, it’s important to consider your skills and available time before deciding to tackle it yourself. DIY installation can save money, but it requires significant physical labor and attention to detail. Professional installation ensures a high-quality result and can be completed more quickly, but it comes at a higher cost. Consider your budget, timeline, and confidence in your abilities when making this decision.
Enhancing Your Slate Patio with Landscaping
Once your slate patio is complete, consider enhancing it with additional landscaping elements. Add potted plants, outdoor furniture, or a fire pit to create a welcoming outdoor living space. Consider installing outdoor lighting to extend the usability of your patio into the evening hours. Well-chosen landscaping can highlight the natural beauty of your slate patio.
Sealing Your Slate Patio
Applying a sealer to your slate patio can enhance its appearance and protect it from stains and weathering. Sealers come in various finishes, such as matte, satin, and gloss, allowing you to choose the one that best suits your aesthetic preferences.
Selecting the Right Sealer
When choosing a sealer, consider the level of protection you need and the type of finish you desire. Some sealers offer superior stain resistance, while others enhance the stone’s natural color and texture. Look for a breathable sealer that allows moisture to escape, preventing potential damage from freeze-thaw cycles.
Applying the Sealer
Before applying the sealer, make sure your patio is clean and dry. Follow the manufacturer’s instructions for application, typically using a paintbrush, roller, or sprayer. Apply the sealer evenly to ensure complete coverage. Depending on the product, you may need to apply multiple coats. Allow the sealer to dry according to the manufacturer’s specifications before using your patio.
Seasonal Care Tips for Your Slate Patio
Different seasons bring different challenges for your slate patio. Following these seasonal care tips can help keep your patio looking its best year-round.
Spring and Summer Maintenance
In the spring, give your patio a thorough cleaning to remove any dead leaves, branches, and other debris and start the season fresh. Inspect the joints and stones for any damage that may have occurred over the winter and address any issues promptly. During the summer, provide regular cleaning and avoid letting dirt and debris accumulate. If you have potted plants, use saucers to prevent water stains on the slate surface.
Fall and Winter Maintenance
In the fall, remove any fallen leaves and organic material to prevent staining and moss growth. As winter approaches, consider covering your patio furniture to protect it from the elements. Avoid using salt or harsh chemicals for de-icing, as these can damage the slate and joint filler. Instead, use sand or a non-corrosive de-icer.