We may be compensated if you purchase through links on our website. Our team is committed to delivering honest, objective, and independent reviews on home products and services.
After turning her basement storage room into a modern home gym, This Old House do-it-yourself (DIY) expert Jenn Largesse wanted a pop of color on the walls. She decided to build a wooden plank wall planter to bring in some greenery and liven up the space. Below, she shows how she did it, using some vinyl plank flooring and plywood.
Materials for a Plank Wall Planter Build
Largesse used almost all leftover materials for this project except for the faux stems and foam blocks to hold them. If you’re starting from scratch, we suggest sizing the planter down to accommodate a 2-by-4-foot plywood project panel or using a standard 1-by-6 board for the planter’s face, so you don’t have to buy full sheets of plywood.
- 1/2-inch-by-4-foot-by-8-foot plywood to create the backer board
- 1/4-inch-by-4-foot-by-8-foot plywood to make the face and sides of the planter
- 1-by-4-by-8-foot board to create the planter base and cleat
- 1 1/4-inch wood screws to attach the base of the planter
- 1/4-inch by 1 1/4-inch trim molding to conceal the edges
- 5/8-inch pin nails
- 3 faux snake plant stems
- Floral foam blocks
- Moss to cover the foam blocks
- Paint
- Paintbrush
- Wood glue
- Wood planks
Tools Needed To Build a Plank Wall Planter
To complete this project, you’ll need the following tools:
- Circular saw
- Combination square
- Drill/driver
- Measuring tape
- Miter saw
- Paintbrush
- Pneumatic pin nailer


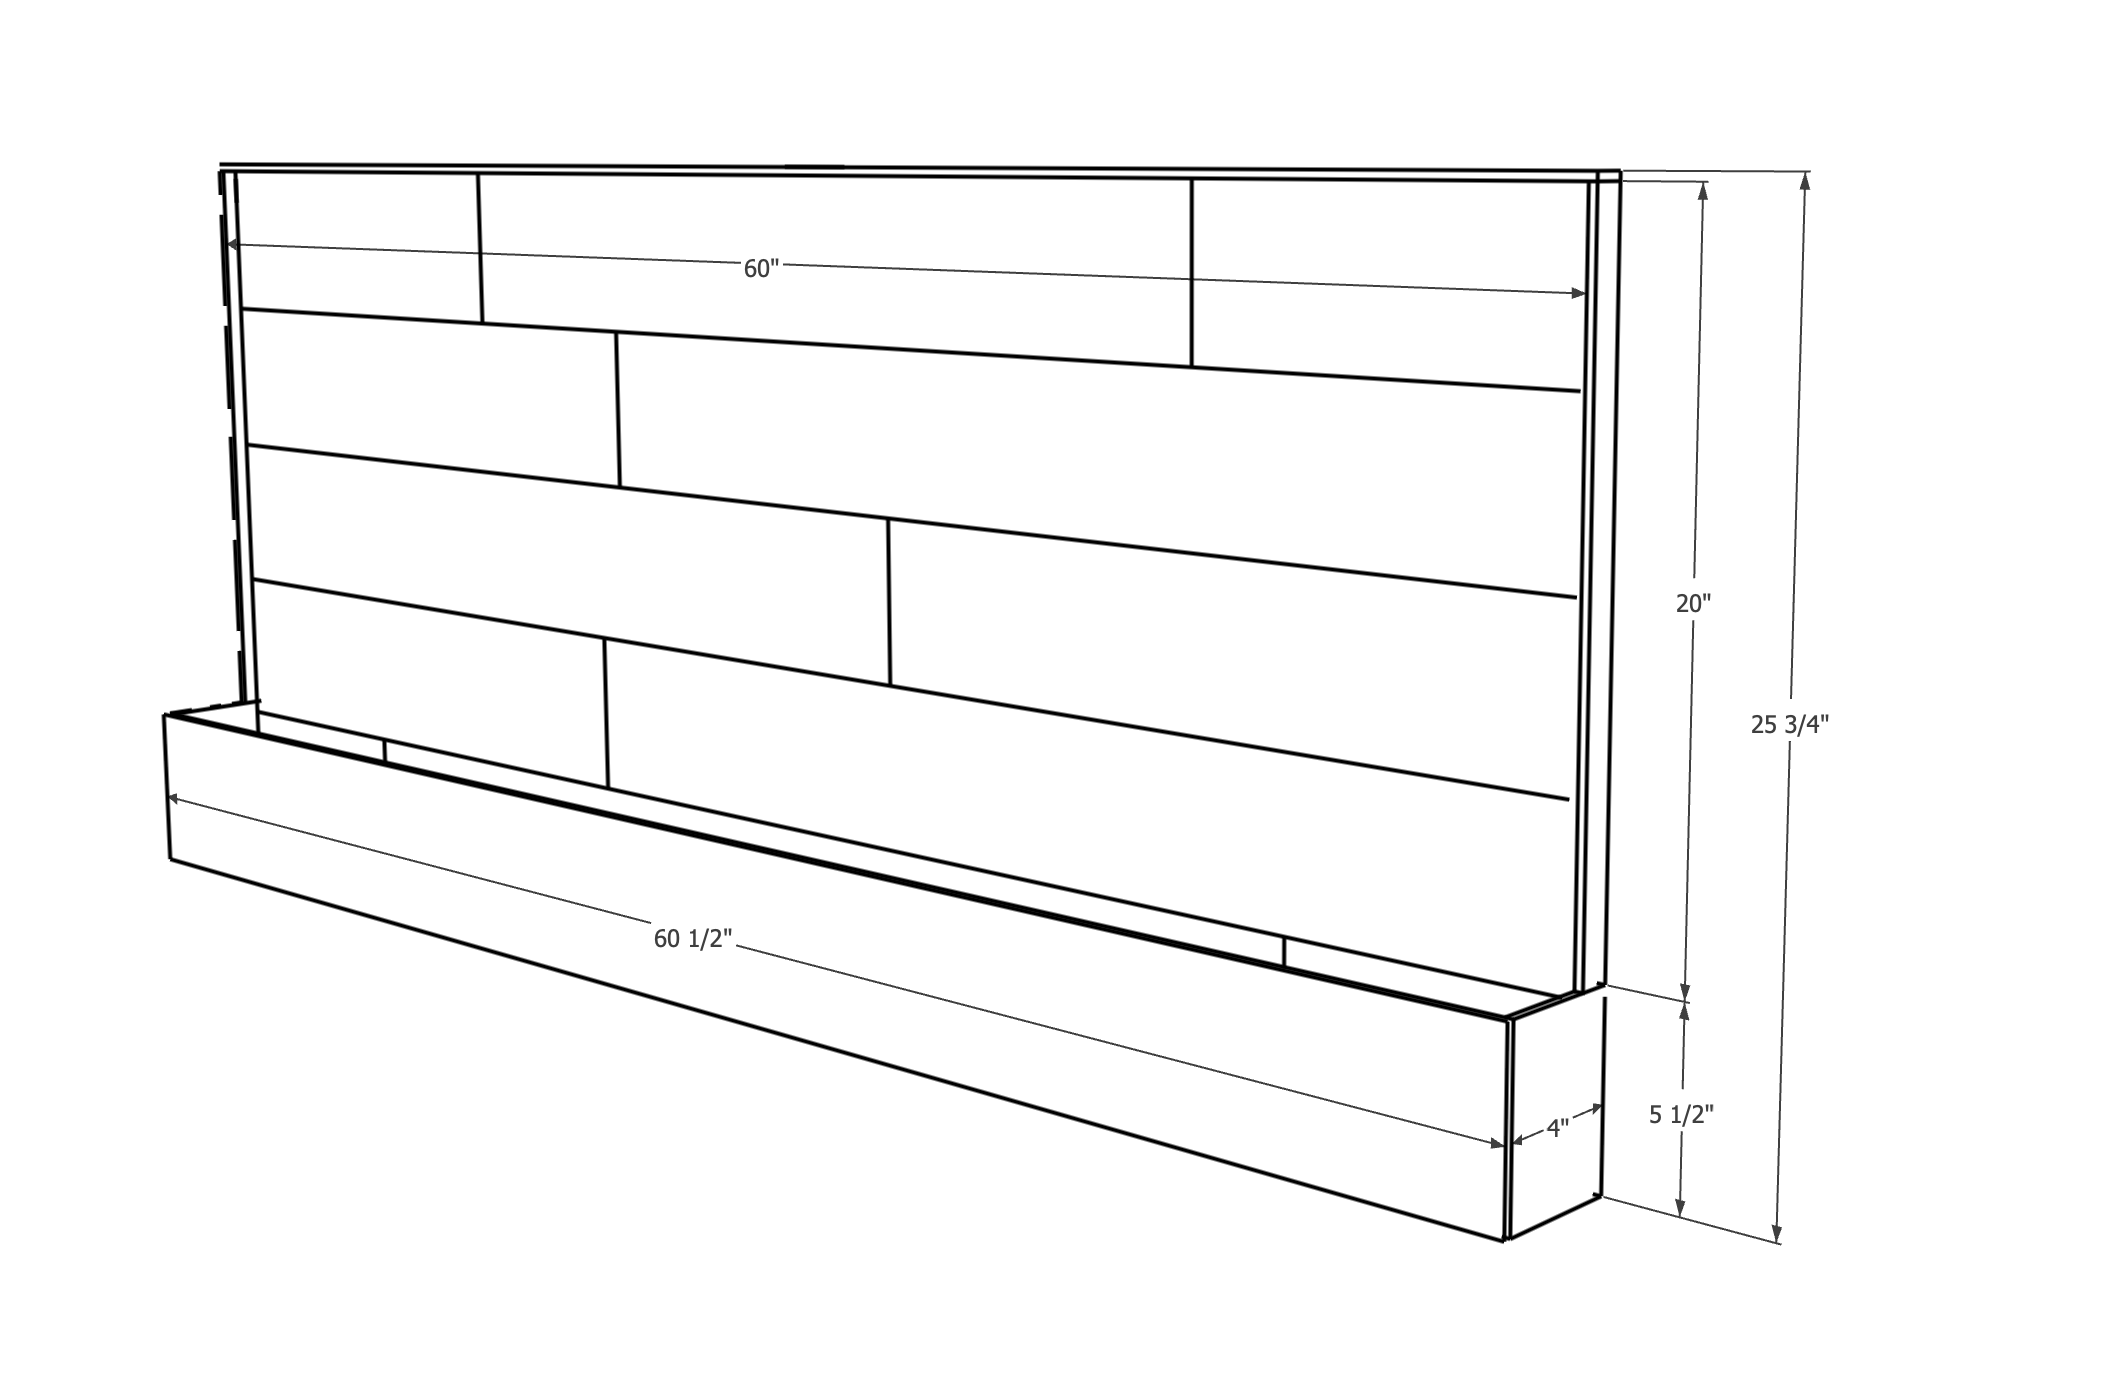
Cut List
- 1/2-inch plywood backer board at 60 inches wide by 25 1/2 inches high
- 1-by-4 cleat at 24 inches ripped in half at a 45-degree bevel
- 1/4-inch-by-5-inch wood planks at about 11 square feet or enough to cover the plywood backer
- 1-by-4 planter base at 60 inches
- 1/4-inch-by-5 1/2-inch planter (front) at 60 1/2 inches
- Two 1/4-inch-by-5 1/2-inch planter (sides) at 4 inches
- 1/4-inch-by-1 1/4-inch trip (top) at 60 1/2 inches
- Two 1/4-inch-by-1 1/4-inch trim (sides) at 20 inches
Preparing the Plywood Backer
The first step in creating your wood plank wall planter is preparing the plywood backer. Lay out the vinyl plank flooring to determine the height of the planter using five rows of flooring. Mark the height on a piece of 1/2-inch-thick plywood. Cut the plywood to the marked height and width using a circular saw.
Work on a stable surface for accurate measurements and cuts.
Creating the French Cleat
A French cleat is what securely hangs the planter on the wall. Use a scrap board to create the French cleat. Tilt the angle of your circular saw blade and rip the length of the board to create two beveled pieces that nest together.
Position the cleat on the back of the plywood so that the top board attaches to the planter and the bottom board attaches to the wall. Apply glue and adjust the height of the cleat using a combination square to ensure it’s level. Screw through the strips and into the plywood, then flip the assembly and screw through the plywood into the strips for a secure connection.
When creating the French cleat, the precision of the beveled edge is key. Carefully tilt your circular saw blade to achieve the desired angle. The cleat’s beveled edges will lock the planter onto the wall, providing a sturdy and reliable mount, supporting the assembly’s weight.
Installing the Vinyl Plank Flooring
The vinyl plank flooring adds an attractive backdrop for your planter. Apply glue to the plywood backer. Click the planks together as you install them. Use a pin nailer to face nail the planks to the plywood for added security.
The plank installation requires some finesse. Because vinyl planks lock together, ensure each plank is fully seated before nailing. The glue will hold the planks in place, but the pin nails will provide additional security, keeping them in place as the glue cures. Opt for a pattern that fits your style, be it a classic horizontal layout or a modern staggered look.
Building the Planter Box
Now it’s time to create the actual planter. Flip the assembly over to install the 1-by-4 base of the planter. Predrill holes and connect the parts with screws. Glue and nail a strip of 1/4-inch plywood to the face of the 1-by-4 board. Enclose the ends with the same material. Conceal the edge of the plywood and planks by gluing and nailing a strip of 1/4-inch thick molding to the top and side edges.
Building the planter box requires careful measurement and cutting for precise fitting. The 1-by-4 base serves as the foundation, with all other parts mounted to it. Pre-drilling the holes helps prevent the wood from splitting, ensuring a clean and secure connection. Molding on the top and sides provides a finished look and hides any rough edges.
Filling the Planter
To complete your wood plank wall planter, insert floral foam blocks into the planter box. Arrange faux plant stems in the foam blocks. Using individual stems allows for a more uniform look and is often more cost-effective than prearranged faux plants. Cover the foam blocks with moss to create a natural-looking plant base.
Hanging the Planter
The final step is hanging your newly created planter. Install the bottom part of the French cleat on the wall, ensuring it’s level. Lift the planter and hook it onto the wall-mounted cleat.
Having a friend assist with the hanging can make the process smoother and safer. Use a level to ensure your cleat is perfectly horizontal. Carefully lift and hook the planter onto the cleat, making sure it’s firmly seated.
Customizing Your Planter
You can customize your wood plank wall planter to suit your preferences.
- Different finishes: Instead of vinyl planks, try painted wood, stained wood, or even wallpaper for the backer board. Choose a finish that complements your room’s decor.
- Lighting: Enhance it by installing subtle LED lights around the planter. Ensure that the lighting complements the planter without overshadowing the plants.
- Plant choices: Mix and match faux plant varieties, adding trailing vines or colorful flowers for added visual interest.
- Size adjustments: Modify the height and width of the plywood or change the number of vinyl planks to fit your wall space.