Garage door springs are essential components that support your garage door’s weight and make it easy to open and close. But over time, these springs can wear out or break. While many homeowners opt to call a professional, replacing garage door springs can be a do-it-yourself (DIY) project for those with the right skills and tools.
This guide will walk you through the process of replacing garage door springs so that your garage is running smoothly. We’ll also cover safety considerations, cost factors, and maintenance tips to help extend the life of your new springs.
Types of Garage Door Springs
There are two main types of garage door springs: extension springs and torsion springs.
Extension Springs
Extension springs are more common on older garage doors, and are located just above the door tracks that parallel the ceiling. They look kind of like a Slinky and attach to one or two pulleys that keep tension on the cables that raise and lower the door.
Extension springs function by stretching, thereby keeping tension on the pulley and cables. This type of spring can last for about 10,000 cycles (one opening and closing equals a cycle), though you can also buy extension springs with an extended life of up to 20,000 cycles.
Torsion Springs
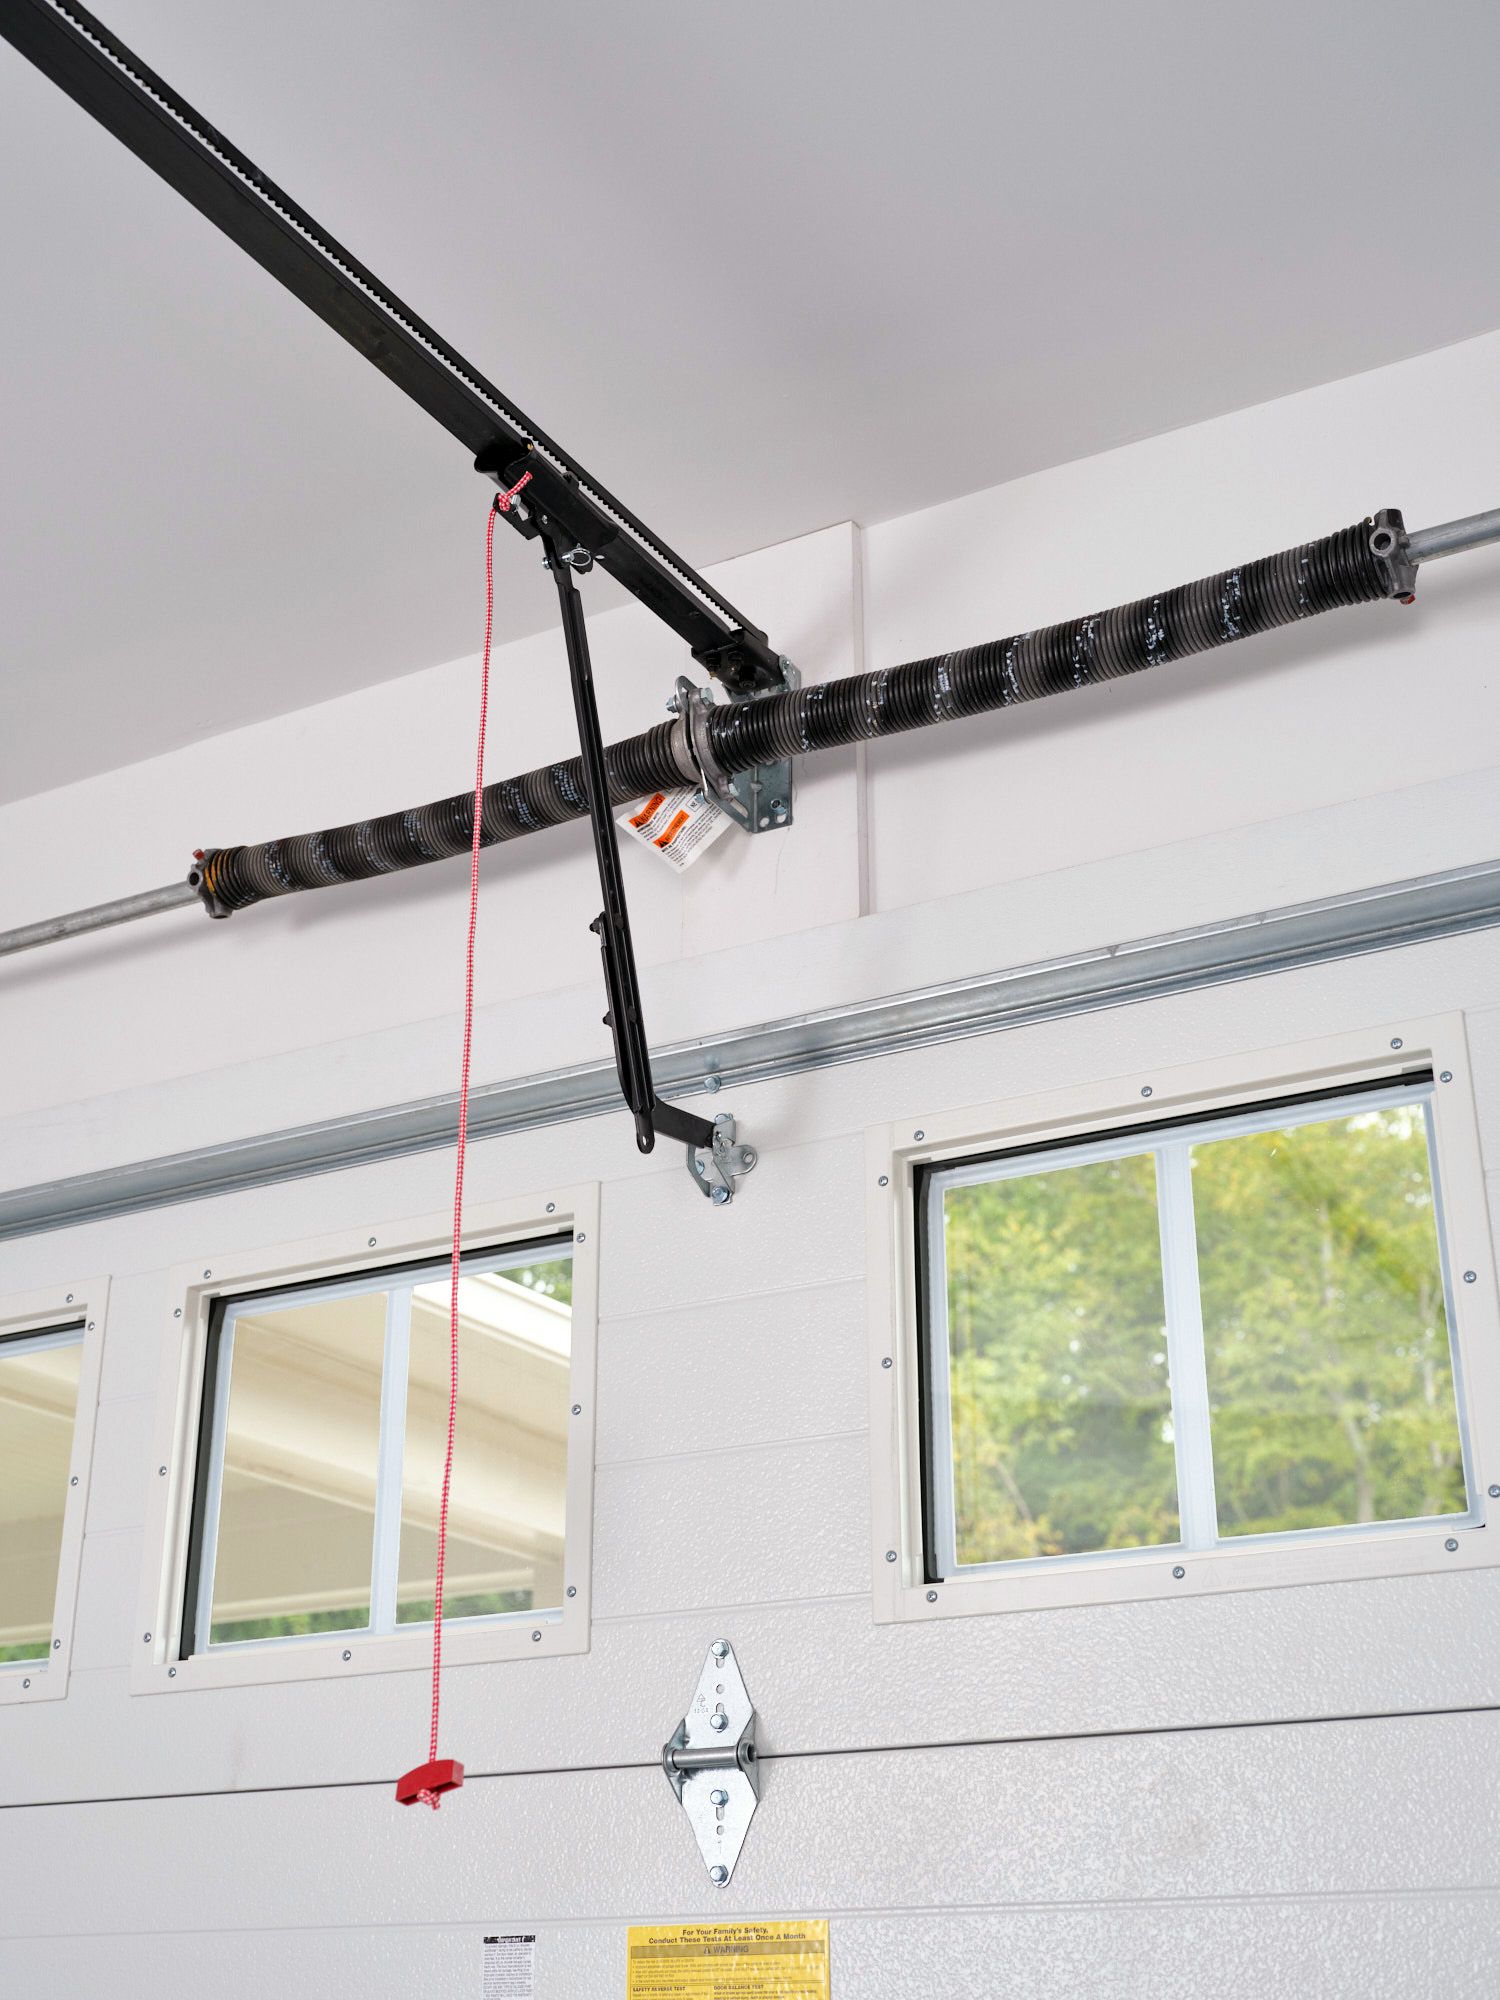
Torsion springs sit above and parallel to the doors. They look like a threaded screw and mount in pairs onto a horizontal shaft connected to a cable drum at either end. Instead of stretching, torsion springs work by tension.
They are installed under tension and wound up tightly on the shaft. The tension is gradually released when the garage door opens, and the spring unwinds. Torsion springs generally have a longer service life than extension springs, averaging 15,000–20,000 cycles.
Both types of springs are color-coded with a touch of paint at either end to indicate pulling strength and length. These specifications should match the garage door weight and height.
Signs Your Garage Door Springs Need Replacement
Recognizing when your garage door springs need replacement is crucial for maintaining the safety and functionality of your garage door system. There are several visual and performance indicators to watch for.
Visual Indicators
- Visible gaps or separations in the springs
- Rust or corrosion on the springs
- Stretched or deformed coils in extension springs
- Broken cables or pulleys associated with the spring system
If you notice any of these visual signs, it’s time to consider replacing your garage door springs. Regular inspections can help you catch these issues early before they lead to more significant problems.
Garage Performance Issues
Performance problems can also indicate that your garage door springs need replacement:
- The door feels heavier than usual when manually lifting
- Uneven movement or jerking when opening or closing
- The door closes too quickly or slams shut
- Noticeable gaps at the bottom when the door is closed
- The garage door opener struggles to lift the door
If you experience any of these issues, address them promptly to prevent potential damage to your garage door system or injury to yourself or others.
Safety Considerations for DIY Garage Spring Replacement
Replacing garage door springs can be dangerous if not done correctly. These springs are under high tension and can cause serious injury if mishandled. Before you attempt to replace your garage door springs, ensure you have proper safety equipment.
Protective Gear
When replacing garage door springs, at a minimum, you should wear:
- Safety glasses or goggles
- Heavy-duty work gloves
- Closed-toe shoes with non-slip soles
- Long sleeves and pants to protect your skin
If you’re unsure about your ability to safely replace the springs, it’s always better to call a professional. The cost of professional garage installation is often worth the peace of mind and safety it provides.
How To Replace Extension Springs on a Garage Door
Replacing extension springs is generally considered easier than replacing torsion springs. However, it still requires careful attention to detail and safety precautions.
Tools and Equipment Needed
In addition the the safety equipment mentioned in the section above, you’ll need the following tools to replace extension springs:
- Two C-clamps
- Adjustable wrench
- Stepladder
- Replacement springs
Measure and Purchase New Springs
Your existing springs should be color-coded to designate their length. Check for a spot of paint at the ends of old springs. If your old springs are not color-coded, you’ll need to measure for new springs manually.
New springs should correspond to the weight height of your door. Measure the garage door height in inches and divide by half to give you the necessary spring length. You can measure garage door weight by sliding a bathroom scale underneath it and releasing springs. Be sure you choose springs capable of supporting this weight.
Installing New Extension Springs
- Raise the garage door to the fully opened position.
- Tighten a C-clamp onto each side of the upper portion of the vertical door track to prevent the door from accidentally coming back down.
- Unplug the garage door opener and disconnect it from the door.
- Unbolt the far end of the spring from the rear track stanchion, then unbolt the pulley and disconnect the cable.
- Disconnect the safety cable, slide it out from the inside of the spring, and remove the spring.
- Connect the far end of the new spring to the stanchion.
- Thread the safety cable through the spring and attach it to the stanchion.
- Attach the free end of the spring to the pulley, and reattach the cable to the door.
- Repeat the process on the other side.
- Reconnect the garage door to the opener and plug it in.
Always work on one side at a time to maintain stability and prevent the door from falling.
After installation, the door should stay in place when raised halfway. If it doesn’t, adjust the spring tension as needed. Remember to reconnect the garage door opener once you’re satisfied with the door’s balance.
How To Replace Torsion Springs on a Garage Door
Replacing torsion springs is more complex and potentially dangerous than replacing extension springs. If you’re not confident in your abilities, it’s best to call a professional. However, if you decide to proceed, follow these steps carefully.
Tools and Equipment Needed
To safely replace torsion springs, you’ll need the following tools:
- Stepladder
- Winding bars
- Vise-grip
- Adjustable wrench
- Replacement springs
Measure and Buy New Springs
As with extension springs, you must choose torsion springs with the appropriate length and strength. You’ll also need to know the wind direction (right or left) and the number of turns required. It’s crucial to match these specifications exactly when purchasing new springs. If you’re unsure, consult a professional or the garage door manufacturer for guidance.
Installing New Torsion Springs
- First, close the garage door and disconnect it from the garage door opener. Assuming that one of the two springs are broken, you’ll need to relieve the tension on the intact spring before replacing the broken spring.
- Set up the ladder near the winding cone at the end of the spring. Engage one end of a winding bar into one of the holes in the edge of the cone, so the winding bar is horizontal, then use a wrench to loosen the two bolts that secure the cone to the bar.
- Keeping a firm grip on the winding bar, allow the spring to slowly unwind until the winding bar is vertical below the spring. Now insert the second winding bar into the cone, lift it slightly, remove the first bar, and allow the spring to unwind another quarter-turn. Repeat the process until there is no remaining tension in the spring.
- Go to the opposite end of the spring and loosen the bolts on one half of the stationary cone that straddles the center bracket. Separate the two halves of the stationary cone. Clamp the vise grips onto the shaft at the center bracket to keep the shaft from slipping out of the bracket.
- Now go to the end of the torsion shaft and loosen the bolts on the cable drum. Remove the cable end from the drum and slide the drum back towards the center bracket. Repeat the process with the other cable drum at the opposite end of the shaft, slide the shaft out of the end bracket, and set aside the cable drum.
- Slide the old spring off of the shaft. And while you’re at it, this is the best time to replace the center bearing that sits in the center bracket and keeps the shaft and bracket from wearing each other down.
- Slide the new spring onto the shaft. (Pairs of torsion springs are made of right- and left-hand springs, so make sure you’re replacing the correct side. The end of the spring wire near the center bracket should come up and over from back to front on each side.) Go to the opposite end of the shaft and remove and replace the spring. Now slide both springs into the center, remove the vise-grips, and bolt the stationary cone halves together.
- Replace the cable drums at either end of the shaft, reinstall the cable onto the drums, make sure the cable is taut, and tighten the drum bolts back onto the shaft.
- The last step in this procedure is to put the tension back into the springs. Each spring may require 30-35 quarter-turns to be brought back to tension, but check the manufacturer’s recommendations for each model of spring. Each turn will be made in increments of a quarter-turn, just like the procedure you used to loosen the springs, but in reverse.
Note: The tricky part is that, until the bolts on the winding cone are secured, the spring will want to unwind. - Insert a winding bar into the winding cone and lift up on the end of the bar. While holding the first bar up, insert a second winding bar into the cone and lift, at the same time removing the first bar. Always remember to keep pressure on the upper bar until you’ve engaged the lower bar.
- When you’ve reached the required number of turns, maintain pressure on the winding bar and grab the wrench that you’ve cleverly stored in your back pocket and tighten the bolts on the winding cone. Repeat the process for the other spring.
- Reconnect the door to the opener and check the door’s operation. If the garage door doesn’t close all the way or won’t stay closed, you may have to readjust the tension on the cable drums.
Troubleshooting Common Issues After Garage Spring Replacement
Even with careful installation, you may encounter some issues after replacing your garage door springs. Here are some common problems and how to address them.
Garage Door Balance Problems
If the door feels heavy or doesn’t stay open when raised halfway, the spring tension may need adjustment. For extension springs, move the S-hook to a different hole on the track hanger. For torsion springs, you may need to add or remove a quarter turn of tension.
Spring Tension Adjustments
Take these steps to adjust torsion spring tension:
- Close the door and clamp it shut.
- Loosen the set screws on the winding cone.
- Use winding bars to add or remove a quarter turn of tension.
- Retighten the set screws and test the door.
Remember, small adjustments can make a big difference. Always err on the side of caution and make gradual changes.
When To Call a Professional for Your Garage
While DIY garage door spring replacement can save money, there are situations where professional help is necessary. Recognizing these scenarios is crucial for your safety and the proper functioning of your garage door.
Complex Installation Scenarios
Here are some situations that warrant professional assistance to prevent potential damage or injury:
- Doors with multiple springs or unusual configurations
- High-tension industrial springs
- Doors with non-standard sizes or weights
- Systems with specialized or proprietary components
Safety Concerns
If you feel uncomfortable during the replacement process, stop and call a professional. This is especially important in the following situations:
- You lack the proper tools or safety equipment
- You’re unsure about the correct spring size or type
- The door is particularly heavy or large
- You have physical limitations that make the job difficult or dangerous
Maintenance Tips To Extend Garage Spring Life
Proper maintenance can significantly extend the life of your garage door springs and improve the overall performance of your garage door system.
Regular Garage Inspections
Conduct visual inspections of your garage door springs at least twice a year:
- Look for signs of wear, rust, or damage.
- Check for loose hardware or brackets.
- Ensure cables are properly seated in their drums.
- Test the door’s balance by disconnecting the opener and manually operating the door.
Catching issues early can prevent more serious problems and extend the life of your springs.
Lubrication and Cleaning Garage Springs
Regular cleaning and lubrication can reduce wear on the springs and other components, leading to a longer-lasting garage door system.
- Use a silicone-based lubricant on the springs every six months.
- Clean the springs and surrounding areas to remove dirt and debris.
- Wipe down, then lubricate, the tracks and rollers.
- Avoid using WD-40 or other petroleum-based products, as they can attract dirt.
Garage Door Spring Replacement Cost
The cost of replacing garage door springs varies widely depending on your particular garage door setup. Understanding these costs can help you make an informed decision about whether to tackle the job yourself or hire a professional.
DIY vs. Professional Costs
If you’re performing a DIY replacement and already own the necessary tools, your only expense will be the new springs. A set of two extension springs for residential garages typically costs between $20 and $50. A torsion spring for residential garages typically costs between $50 and $80. If you need to buy a set of winding bars, these usually cost less than $30.
Professional installation generally costs $180–$350, according to Angi. This includes parts and labor. While more expensive, professional installation can be a safer option.
Factors Affecting Replacement Expenses
Several factors can influence the cost of garage door spring replacement:
- Type of springs (torsion are more expensive)
- Quality and durability of the springs
- Size and weight of the garage door
- Number of springs needed
- Additional hardware or components requiring replacement
- Your location and local labor rates (for professional installation)
When budgeting for spring replacement, weigh the long-term benefits of investing in higher-quality components or professional installation.
Our Conclusion
Replacing garage door springs requires careful consideration of safety, skill level, and cost. While DIY replacement can save money, assess your abilities honestly and prioritize safety above all else. If you choose to replace the springs yourself, follow the steps outlined in this guide meticulously, using proper tools and safety equipment. It may also be worth researching step-by-step videos to better understand the process.