Mitering corners in a laminate countertop is a skill that helps you achieve a professional-looking finish in your kitchen. This technique creates a seamless joint where two pieces of laminate meet at a 90-degree angle, resulting in a clean and elegant appearance. Whether you’re a DIY enthusiast or a homeowner looking to understand the process, this guide will walk you through how to miter laminate countertop corners from preparation to final installation.
What Is Laminate Countertop Mitering?
Mitering involves cutting two pieces of laminate at complementary angles to create a tight, nearly invisible seam where they meet. While it’s possible to simply butt two factory-cut pieces together in an L-shaped countertop, a mitered joint offers a more refined look and doesn’t rely on the counter being perfectly square. The key to a successful miter is ensuring both edges line up exactly, which is achieved through a technique called “mirror-cutting.”
Tools and Materials for Mitering Laminate Countertops
To miter laminate countertop corners effectively, you’ll need specific tools and materials. Having the right equipment on hand ensures a smooth and accurate mitering process. Here’s what you’ll need:
- Laminate trimmer: A laminate trimmer is a specialized tool that makes precise cuts in laminate sheets. It’s similar to a router but designed specifically for working with thin materials like laminate.
- Straight-cut bit: A straight-cut bit is used with the laminate trimmer to create clean, straight edges on the laminate sheets. It achieves the precise cuts needed for a tight miter joint.
- Contact adhesive: Contact adhesive is used to bond the laminate to the countertop substrate. It provides a strong, permanent bond for a durable countertop surface.
Other Necessary Tools
Additional tools you’ll need include the following:
- Cutting table
- Dowels
- J-roller
- Plywood scrap (for creating a guide)
- Sandpaper (medium-grit)
- Spring clamps
- Straightedge or ruler
Preparing Your Laminate Sheets
Preparing your laminate sheets sets the foundation for a successful mitering process. Follow these steps to prepare your sheets:
- Rough-cut the laminate: Begin by rough-cutting your laminate sheets to size. Each piece should be large enough to cover an entire leg of the L-shaped countertop, with some overlap in the corner where you plan to create the miter joint.
- Ensure proper overhang: Each laminate sheet should overhang the countertop edges by exactly 1 inch. This consistent overhang allows for precise trimming and alignment during the mitering process.
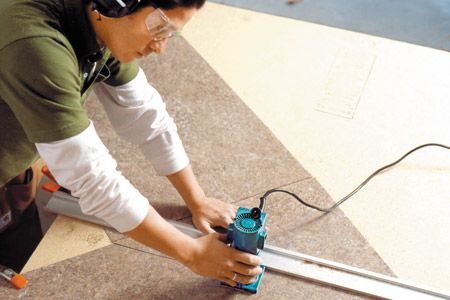
The Mirror-Cutting Technique for Mitering
The mirror-cutting technique is the heart of creating a perfect miter joint in laminate countertops. This method ensures that both edges of the laminate sheets align perfectly when joined.
- Set up your workspace: Start by creating a triangular guide from a scrap piece of plywood. This guide should fit snugly against the inside corner of your countertop, replicating the angle at which the laminate sheets will meet.
- Align the laminate sheets: Position your laminate sheets on the cutting table, overlapping them so their outside corners meet at the same point. Butt the inside edges against your plywood guide, then clamp the sheets securely to the table.
- Make the miter cut: Remove the plywood guide and use a straightedge to mark a line from the outside corner to the inside corner on the top sheet. Set your laminate trimmer’s straight-cut bit to a depth that will cut through both sheets. Clamp a straightedge parallel to your marked line to guide the trimmer, then make the cut in a single, smooth pass down the center of the line.
Applying the Mitered Laminate
With your laminate sheets cut, it’s time to apply them to the countertop substrate. This step requires precision and patience to ensure a tight, seamless joint.
- Prepare the countertop substrate: Before applying the laminate, draw a line on the countertop substrate between the inside and outside corners of the L-shape. This line will serve as a guide for positioning your mitered laminate sheets.
- Position the first sheet: Apply contact adhesive to both the countertop substrate and the laminate sheets. Once the adhesive is dry to the touch, use dowels placed on the substrate to position the first sheet without it sticking immediately. This allows you to adjust its position for perfect alignment.
- Attach the second sheet: Press the first sheet’s outside corner into place along your guide line, then pivot the sheet until its mitered edge aligns with the line on the counter. Work from the outside to the inside corner, pressing the edge firmly into place. Remove the dowels as you go, hand-pressing and using a J-roller to secure the sheet.
For the second sheet, follow the same process, aligning its mitered edge with the first sheet’s edge. Work from corner to corner, ensuring a tight butt joint along the entire mitered edge.
Finishing Touches and Edge Treatment
After applying both laminate sheets, a few finishing steps will ensure a professional-looking result.
- Bevel the cut edges: Before applying the laminate, bevel the underside of the cut edges. Use medium-grit sandpaper to make two light swipes along the underside of each cut edge. This slight bevel helps prevent chipping and ensures a tight seam.
- Secure the laminate: Once both sheets are in place, use a J-roller to apply firm, even pressure across the entire surface. Pay special attention to the mitered joint and edges, ensuring there are no air bubbles or loose spots.
- Trim excess laminate: Trimming the excess laminate off the edges can be done using a laminate trimmer. Ensure you maintain steady, even pressure to avoid chipping or cracking. Smooth the edges with sandpaper to ensure a clean finish.
Troubleshooting Common Mitering Issues
Even with careful preparation and execution, you may encounter some challenges when mitering laminate countertops. Here are some common issues and how to address them:
- Dealing with uneven cuts: If your miter cut isn’t perfectly even, you may notice a slight gap or misalignment at the joint. Sanding can help smooth out minor imperfections. For larger issues, you may need to recut the laminate sheets or double-check your cutting guide’s alignment and depth settings.
- Fixing gaps in the miter joint: Small gaps in the miter joint can sometimes be filled with color-matched laminate filler or epoxy. However, prevention is always better than a cure, so take your time during the cutting and alignment stages to avoid gaps. Repeat measuring steps if necessary to ensure precise cuts.
- Addressing air bubbles under the laminate: Air bubbles can form under the laminate if it’s not pressed down firmly. Use a pin to puncture the bubble and press it out with a J-roller, making sure the glue beneath adheres properly.
Alternative Methods for Joining Laminate Countertops
While mitering is often the preferred method for joining laminate countertops at corners, there are alternative approaches that may be suitable in certain situations.
Butt Joints
For perfectly square corners, a simple butt joint can be effective. This involves butting two factory-cut edges together without mitering. While not as elegant as a mitered joint, it can be a quicker solution for some projects.
Laminate Strips
Another option is to use laminate strips to cover the joint between two pieces of laminate. This method can be useful for covering imperfections or for creating a decorative accent at the joint.
T-Molding Installation
T-molding is another alternative for joining laminate countertops. This technique involves installing a T-shaped molding between two laminate pieces, providing a clean, professional finish. T-molding comes in various colors and finishes, allowing you to choose one that matches or complements your countertop.
Overlapping Edges
Overlapping edges resemble butt joints but add a layer of detail. You can add a strip of contrasting laminate over the seam, either as a decorative feature or to hide imperfections at the joint.
Our Conclusion
Mitering corners in a laminate countertop requires precision, patience, and the right techniques. By following the mirror-cutting method and taking care with each step of the process, you can achieve professional-looking results in your laminate countertop installation. If you’re new to the process, practice on scrap pieces before working on your actual countertop. For those less confident in their DIY skills, consulting or hiring a professional can ensure a flawless finish for your laminate countertop project.