Installing decorative tiles can transform any space into a work of art, but it requires careful planning and execution. Whether you’re adding a pop of color to your kitchen backsplash or creating an intricate mosaic in your bathroom, proper installation is essential to showcase the beauty of these unique tiles. This guide walks you through the process of installing decorative tiles, from preparation to finishing touches, ensuring your project results in a stunning and long-lasting feature in your home.
Decorative Tiles and Their Appeal
Decorative tiles are versatile design elements that can add personality and charm to any room. They come in various materials, shapes, sizes, and patterns, allowing for endless creative possibilities. From hand-painted ceramic tiles to intricate glass mosaics, decorative tiles can serve as focal points or subtle accents in your home decor.
The appeal of decorative tiles lies in their ability to combine functionality with aesthetics. They can protect walls from moisture and stains while simultaneously elevating the visual interest of a space. When installed correctly, decorative tiles can become a lasting testament to your personal style and craftsmanship.
Popular Types of Decorative Tiles
To choose the right decorative tiles for your project, it’s helpful to understand the options available:
- Ceramic tiles: These are widely used for backsplashes and countertops due to their durability and variety of designs
- Porcelain tiles: Known for being dense and water-resistant, making them suitable for bathroom walls and floors
- Glass tiles: Offer a shiny, translucent appearance perfect for modern designs and colored accents
- Natural stone tiles: Such as marble, granite, and slate, these tiles provide a luxurious and timeless look
- Cement tiles: Often featuring bold patterns and colors, these are great for creating statement floors and walls
The Benefits of Using Decorative Tiles
Incorporating decorative tiles in your home comes with numerous benefits:
- Durability: High-quality tiles can last for decades with minimal maintenance
- Easy cleaning: Most decorative tiles have smooth surfaces that are easy to wipe and clean
- Versatile design: With endless patterns, colors, and materials, tiles can be customized to fit any aesthetic
- Increased home value: Stylish tile installations can boost the resale value of your property
Essential Tools and Materials for Decorative Tile Installation
Before embarking on your decorative tile installation project, gather all the necessary tools and materials. Having everything on hand will ensure a smooth and efficient installation process.
Adhesives and Grouts
Selecting the right adhesive and grout is essential for a successful tile installation. For most decorative tile projects, you’ll need:
- Latex-modified thinset mortar
- Grout (sanded or unsanded, depending on tile spacing)
- Grout sealer
Cutting and Shaping Tools
To accommodate various tile shapes and sizes, you’ll need:
- Tile cutter or wet saw
- Tile nippers
- Rubbing stone
Safety Equipment
Prioritize safety with these essential items:
- Safety goggles
- Work gloves
- Dust mask
Additional Tools for a Seamless Installation
Additional tools include a notched trowel, grout float, grout bag, sponges, and a level. Having these tools ready will help you tackle any challenges that arise during the installation process.
Preparing the Surface for Decorative Tiles
Proper surface preparation ensures a successful decorative tile installation, with better adhesion and a more durable finish.
Clean and Level the Wall
Start by thoroughly cleaning the surface to remove any dirt, grease, or old adhesive. For uneven surfaces, use a leveling compound to create a smooth base. Allow the compound to dry completely before proceeding.
Patch Holes and Cracks
Before priming and applying tiles, it’s important to patch any holes or cracks on the surface:
- Fill holes: Use a patching compound to fill any large holes.
- Seal cracks: Apply a sealant specifically designed for your wall material to close up any cracks.
- Smooth surface: Sand down patched areas to ensure an even surface.
Apply a Suitable Primer
Apply a primer suitable for your surface type. This step improves adhesion and prevents moisture absorption, which is especially important for porous surfaces like drywall or concrete.
Setting the Decorative Tiles
With your surface prepared, it’s time to begin setting the tiles. This process requires patience and precision to ensure a beautiful final result.
Apply Thinset Mortar
Begin by applying latex-modified thinset mortar to the wall using a 1/4-inch notched trowel. Work in small sections to prevent the mortar from drying before you can set the tiles.
Back-Buttering Technique for Uneven Tiles
For handmade or uneven tiles, use the back-buttering technique. This method ensures a complete bond between the tile and the surface. Apply a smooth coat of thinset to the back of each tile before pressing it into place on the wall.
Ensure Proper Tile Alignment
To achieve a professional finish, ensure each tile is perfectly aligned:
- Mark guidelines: Use a level and pencil to mark horizontal and vertical lines on the wall.
- Tile spacers: Place spacers between tiles to maintain consistent grout lines.
- Check frequently: Continuously check alignment with a level as you work.
Grouting Techniques for Decorative Tiles
Grouting is a critical step in tile installation, especially for decorative tiles with intricate designs or uneven surfaces. The right technique can enhance the beauty of your tiles while ensuring a durable finish.
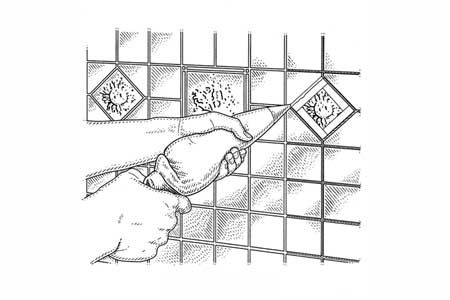
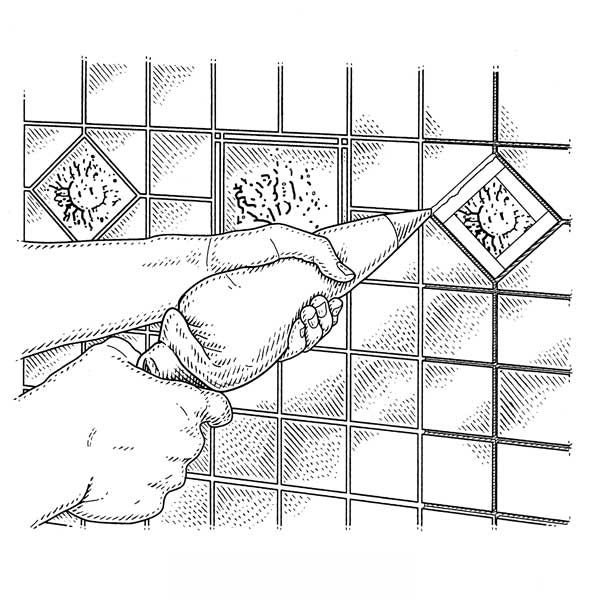
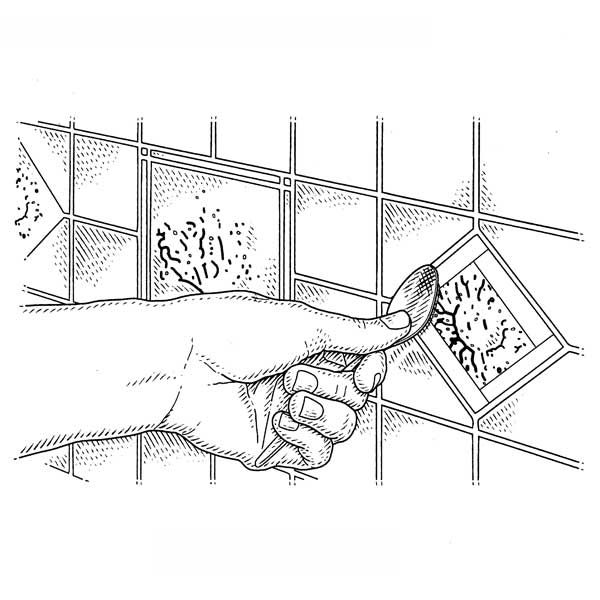
Use a Grout Bag for Precision
For decorative tiles with detailed patterns or uneven surfaces, a grout bag offers more control than traditional grouting methods. To use a grout bag:
- Cover the edges of the art tiles with blue painter’s tape, leaving only the grout line exposed.
- Mix the grout according to the manufacturer’s instructions and scoop it into the grout bag.
- Twist the open end of the bag closed and squeeze it with one hand to control the flow while guiding the nozzle with the other hand.
- Fill the joints around the tiles completely, ensuring even coverage.
Tool and Smooth the Grout
After applying the grout, tool and smooth it for a professional finish:
- Use the edge of a grout float or a plastic teaspoon to pack the grout into the joints carefully.
- Remove the painter’s tape and clean up any grout residue with a damp sponge.
- Allow the grout to set according to the manufacturer’s instructions before proceeding with sealing.
Clean Excess Grout
After the grout has set, remove any excess to prevent hazy tiles:
- Wipe tiles with a clean, damp sponge in a circular motion.
- Rinse the sponge frequently to avoid spreading grout residue.
- Polish tiles with a dry cloth to remove any remaining grout haze.
Special Considerations for Unique Tile Shapes
Decorative tiles often come in unique shapes and sizes, requiring special attention during installation.
Working with Mosaic Tiles
Mosaic tiles add intricate patterns and textures to your space but can be challenging to install. To ensure a successful installation:
- Use a thin layer of thinset mortar to avoid overfilling the grout lines.
- Press the mosaic sheets firmly into place, using a grout float to ensure even pressure.
- Allow the thinset to dry completely before grouting to prevent shifting.
Installing Odd-Shaped Decorative Pieces
For odd-shaped tiles or decorative pieces:
- Create a layout plan before beginning installation to ensure proper placement.
- Use tile spacers to maintain consistent gaps between pieces.
- Consider using a clear silicone adhesive for delicate or three-dimensional pieces that may be difficult to set with traditional mortar.
Handling Fragile Tiles
Some decorative tiles are especially fragile and need careful handling:
- Use a soft pencil: Mark cuts and placements with a soft pencil to avoid scratching.
- Cut slowly: Use a wet saw with a diamond blade to make slow, precise cuts.
- Protect edges: Handle tiles gently to avoid chipping or breaking.
Sealing and Protecting Your Decorative Tiles
Sealing your decorative tiles is crucial for maintaining their beauty and extending their lifespan.
Choosing the Right Sealer
Select a sealer appropriate for your tile material. For example:
- Use an impregnating sealer for unglazed or crackle-finish tiles to prevent discoloration.
- Choose a penetrating sealer for natural stone tiles to protect against stains and moisture.
Application Process and Drying Time
To properly seal your decorative tiles:
- Ensure the tiles and grout are completely clean and dry before applying the sealer.
- Apply the sealer according to the manufacturer’s instructions, typically using a brush or roller.
- Allow the sealer to penetrate for the recommended time before wiping off any excess.
- Let the sealer cure for the specified period before exposing the tiles to water or heavy use.
Reapplying Sealer
To maintain the protection of your tiles, reapply sealer as needed:
- Check the sealer’s longevity based on the product recommendations.
- Reapply sealer every one to three years, depending on usage and exposure to moisture.
Maintaining Your Decorative Tile Installation
Proper maintenance will keep your decorative tiles looking beautiful for years to come.
Regular Cleaning Practices
To maintain your decorative tiles:
- Clean regularly with a pH-neutral cleaner suitable for your tile material.
- Avoid harsh chemicals or abrasive cleaning tools that could damage the tile surface or grout.
- Wipe up spills promptly to prevent staining, especially on unsealed or porous tiles.
Addressing Grout Discoloration
If you notice grout discoloration:
- Clean the grout lines with a specialized grout cleaner.
- For stubborn stains, consider using a grout colorant to refresh the appearance.
- Reapply grout sealer annually to prevent future discoloration and staining.
Preventing Water Damage
Water damage can compromise the beauty and durability of decorative tiles:
- Seal grout lines: Ensure all grout lines are properly sealed to prevent moisture penetration.
- Fix leaks promptly: Address any plumbing issues or leaks quickly to avoid water damage.
- Use bath mats: In bathrooms, use bath mats to absorb excess water and protect tile floors.
Our Conclusion
Installing decorative tiles is a rewarding project that can dramatically enhance the beauty of your home. By following this guide, you can achieve professional-looking results that will stand the test of time. Remember to take your time, plan carefully, and use the appropriate tools and techniques for each step of the process.