A soggy shower wall can quickly turn from a minor inconvenience to a major headache. Water damage behind ceramic tiles compromises the integrity of your shower and can lead to more extensive structural issues if left unaddressed. Our guide will walk you through the process of identifying, repairing, and preventing shower wall damage.
Understanding Shower Wall Damage
Water damage in shower walls often starts subtly but can rapidly escalate if not addressed. Learn to recognize the signs and understand the causes to maintain a healthy bathroom environment.
Common Causes of Water Damage
Several factors can contribute to shower wall damage:
- Cracked or loose tiles
- Deteriorating grout or caulk
- Improperly installed waterproofing membranes
- Inadequate ventilation that causes excess moisture buildup
- Plumbing leaks behind the wall
These issues allow water to seep behind the tiles, which can damage the underlying structure and create an environment ripe for mold growth.
Signs of a Soggy Shower Wall
Early detection can save you time, money, and stress in the long run. Be on the lookout for these telltale signs of water damage:
- Discolored or stained tiles or grout
- Musty odors
- Peeling paint or wallpaper adjacent to the shower
- Soft or spongy areas when pressing on the wall
- Visible mold or mildew growth
Assessing the Extent of Shower Wall Damage
Before diving into repairs, you need to understand the scope of the water damage. Start with a thorough visual examination:
- Check for loose or hollow-sounding tiles by tapping gently with a rubber mallet.
- Look for cracked, discolored, or missing grout lines.
- Inspect the caulk around the shower base for gaps or deterioration.
- Examine adjacent walls and floors for signs of water stains or warping.
For a more precise evaluation, use a moisture meter:
- Test dry sections of the bathroom wall for a baseline.
- Test the affected area using the correct setting on the meter.
- Check behind baseboards and in corners where moisture tends to accumulate.
- If possible, test the subfloor near the shower for elevated moisture levels.
Preparing for Shower Wall Repair
Proper preparation is the key to successful shower wall repair. Gather the right tools before you start and follow all safety precautions along the way.
Tools and Materials Needed
Assemble these items before beginning your repair:
- Cement backerboard
- Grout float and sponge
- Notched trowel
- Protective gear (gloves, safety glasses, dust mask)
- Pry bar
- Putty knife
- Silicone caulk
- Tile adhesive and grout
- Tile spacers
- Utility knife and drywall saw
- Waterproofing membrane (if needed)
Safety Precautions
Prioritize safety throughout the repair process:
- Ensure proper ventilation in the work area.
- Turn off the water supply and electricity to the bathroom if necessary.
- Use caution when handling sharp tools and broken tiles.
- Wear protective gear to guard against dust and debris.
Removing Damaged Tiles and Drywall
With preparations complete, it’s time to remove the damaged materials and expose the extent of the water damage.
Techniques for Tile Removal
Start by removing the affected tiles:
- Begin with loose tiles, carefully prying them off by hand.
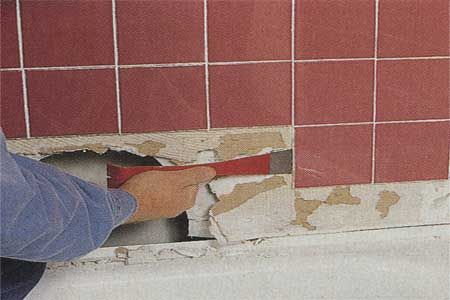
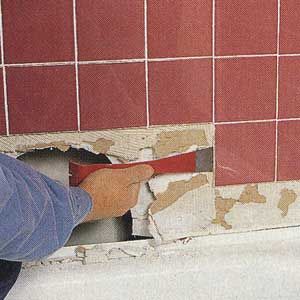
- For firmly adhered tiles, use a flat pry bar or putty knife to gently lift them from the wall.
- Work slowly to avoid damaging the surrounding tiles you intend to keep.
- If you plan to reuse any of the tiles you’ve removed, first drop them in a bucket of hot water to separate the gypsum backing from the tiles.
- Sand off all the old grout and caulk, then remove the mortar and drywall paper. Don’t sand the mastic—it could contain asbestos. Instead, use a sharp knife to clean around the edges.
Cutting and Removing Damaged Drywall
Once you’ve removed the tiles, address the damaged drywall and remove excess grout:
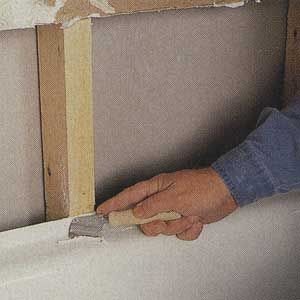
- Use a utility knife to score the drywall along the edge of the damaged area.
- Cut out the damaged section with a drywall saw. Be careful not to cut into any plumbing or electrical components.
- Remove any remaining drywall and insulation until you reach dry, undamaged material.
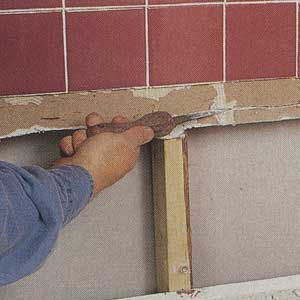
- Use a utility knife to scrape the grout from all joints immediately above the repair.
- Remove the grout from any joints that are cracked or discolored by mildew.
Drying and Treating the Affected Area
Before installing new materials, thoroughly dry the exposed area and treat it to prevent mold.
Using Fans and Dehumidifiers
We recommend using fans and dehumidifiers to help speed up drying. Position fans to circulate air across the damp areas, and use a dehumidifier to remove excess moisture from the air. Allow the area to dry completely, which may take several days.
Applying Anti-Mold Treatments
Once dry, treat the area to inhibit mold growth. Clean the exposed surfaces with white distilled vinegar or commercial anti-mold product, then apply a mold-resistant paint or primer. Allow the treatment to dry completely before moving on.
Installing Water-Resistant Backing on Your Shower Wall
Next, you’ll want to install water-resistant backing to prevent future damage.
Choosing the Right Backerboard
We recommend cement backerboard for its moisture resistance, though some homeowners prefer foam backerboard because it’s lightweight and waterproof. Avoid using standard drywall, even water-resistant types, as they can deteriorate with time.
Follow these steps to install the backerboard:
- Cut the board to fit the repair area, leaving a 1/8-inch gap between the board and the top edge of the bathtub or shower.
- Apply a waterproofing membrane to the studs before installing the board.
- Install the backerboard with the smooth side out.
- Secure the board with corrosion-resistant screws or nails, spacing them every six–eight inches.
- Tape the seams with fiberglass mesh tape and apply a thin layer of thinset mortar.
Retiling the Shower Wall
With the new backerboard in place, you’re ready to install new tiles.
Selecting Appropriate Tiles and Adhesives
Choose materials that will stand up to the moist environment:
- Select tiles rated for wet areas. Look beyond visual appeal and consider the tile’s durability and water resistance.
- Use a high-quality, waterproof tile adhesive.
- Consider large-format tiles to minimize grout lines and reduce potential water entry points.
Tiling, Grouting, and Sealing
Proper grouting and sealing are essential for a waterproof finish:
- Spread a generous coat of mortar over the backerboard’s surface with a notched trowel. Then press each tile into place, being careful to maintain uniform joints.
- Wait 24–48 hours for the mortar to cure before grouting.
- Mix grout according to manufacturer instructions, using a latex additive for added water resistance.
- Apply grout with a grout float, making sure to completely fill the joints.
- Let the grout set for 15–20 minutes, then clean the excess with a damp sponge.
- Once the grout has cured (usually 24–48 hours), apply a penetrating sealer to protect against moisture infiltration.
- Apply caulk along the tub or shower and protect with a liquid silicone sealer.
Preventing Future Water Damage of Your Shower Wall
After repairing your shower wall, take steps to prevent future issues. We recommend these maintenance routines:
- Clean tiles and grout regularly to prevent mold and mildew buildup.
- Use exhaust fans during and after showers for proper ventilation.
- Inspect grout and caulk lines monthly and repair cracks or gaps promptly.
- Use a squeegee or towel to remove excess water from tiles after each use.
Consider these upgrades for enhanced protection:
- Reapply penetrating sealer to grout lines annually to maintain water resistance.
- Install a waterproof membrane behind your tiles.
- Upgrade to a modern shower mixing valve to prevent temperature fluctuations and reduce the risk of leaks.
DIY vs. Professional Shower Wall Repair
While many homeowners can successfully repair shower wall damage, some situations call for professional expertise.
DIY is appropriate if the following apply:
- The damage is limited to a small area
- You have experience with tile work and basic plumbing
- There are no signs of structural damage or extensive mold growth
We recommend hiring a pro in these circumstances:
- You’re concerned about asbestos
- The damage extends beyond the shower area
- You suspect issues with the home’s structure or plumbing
- There’s extensive mold
- You lack the time or tools to complete the job properly