Grout helps tiled surfaces last longer, protecting against moisture damage and strengthening stability. Without proper grouting, tiles can shift, crack, or become loose, leading to costly repairs. Below, we’ll explore everything you need to know about grout, from the different types to applications to maintenance and troubleshooting.
Types of Grout
There are four main types of grout, each with its own characteristics and application methods. Understanding these differences is key to choosing the right one for your project.
Cement-Based Grout
Cement-based grout is the most common and traditional type. It comes in two varieties: sanded and unsanded. Sanded grout is used for wide joints, while unsanded grout is ideal for narrower joints. Modern cement-based grouts often include polymer additives for improved flexibility and color consistency.
This type of grout is porous and requires sealing to prevent staining, but it’s popular because it’s affordable and easy to use. It works for most residential applications, including floors, walls, and backsplashes.
Epoxy Grout
Epoxy grout is a high-performance option made from epoxy resins and a filler powder. It’s known for its superior strength, chemical resistance, and inability to stain. While more expensive than cement-based grout, epoxy grout works well for areas exposed to harsh chemicals or high moisture, such as commercial kitchens, swimming pools, and high-traffic areas. However, it can be more challenging to apply because of its thickness and quick-setting time
Furan Grout
Furan grout is a specialized type of grout made from chemical-resistant resins. It’s primarily used in industrial settings where extreme chemical resistance is required. Furan grout is not typically used in residential applications due to its strong odor during installation and high cost.
Ready-to-Use Grout
Ready-to-use grout is a premixed option that makes small projects or quick repairs more convenient. It doesn’t require mixing and can be applied directly from the container. While it’s easy to use, ready-to-use grout may not be as durable as other types and is best suited for small areas or touch-ups.
Choosing the Right Grout for Your Project
Joint width, location, tile material, maintenance, and budget are all important considerations when choosing grout for a project. The width of the gaps between tiles determines whether you need sanded or unsanded grout. You should also consider how much time you’re willing to spend on grout maintenance, as some types require more care than others.
Sanded vs. Unsanded Grout
The choice between sanded and unsanded grout depends on your tile joints’ width. Sanded grout contains fine sand particles that help prevent shrinkage in wider joints, while unsanded grout is smoother and better suited for narrow gaps. Consider the tile material, as sanded grout may scratch soft surfaces like polished marble
The Grouting Process
Before grouting, ensure the adhesive beneath the tiles has fully cured, and the joints are clean and free of debris. Remove any spacers used during tile installation and vacuum the area thoroughly to remove dust and particles.
Mix the Grout
If using powdered grout, mix it according to the manufacturer’s instructions. Aim for a consistent, lump-free mixture with a putty knife consistency. For epoxy grout, carefully combine the resin and hardener components as directed.
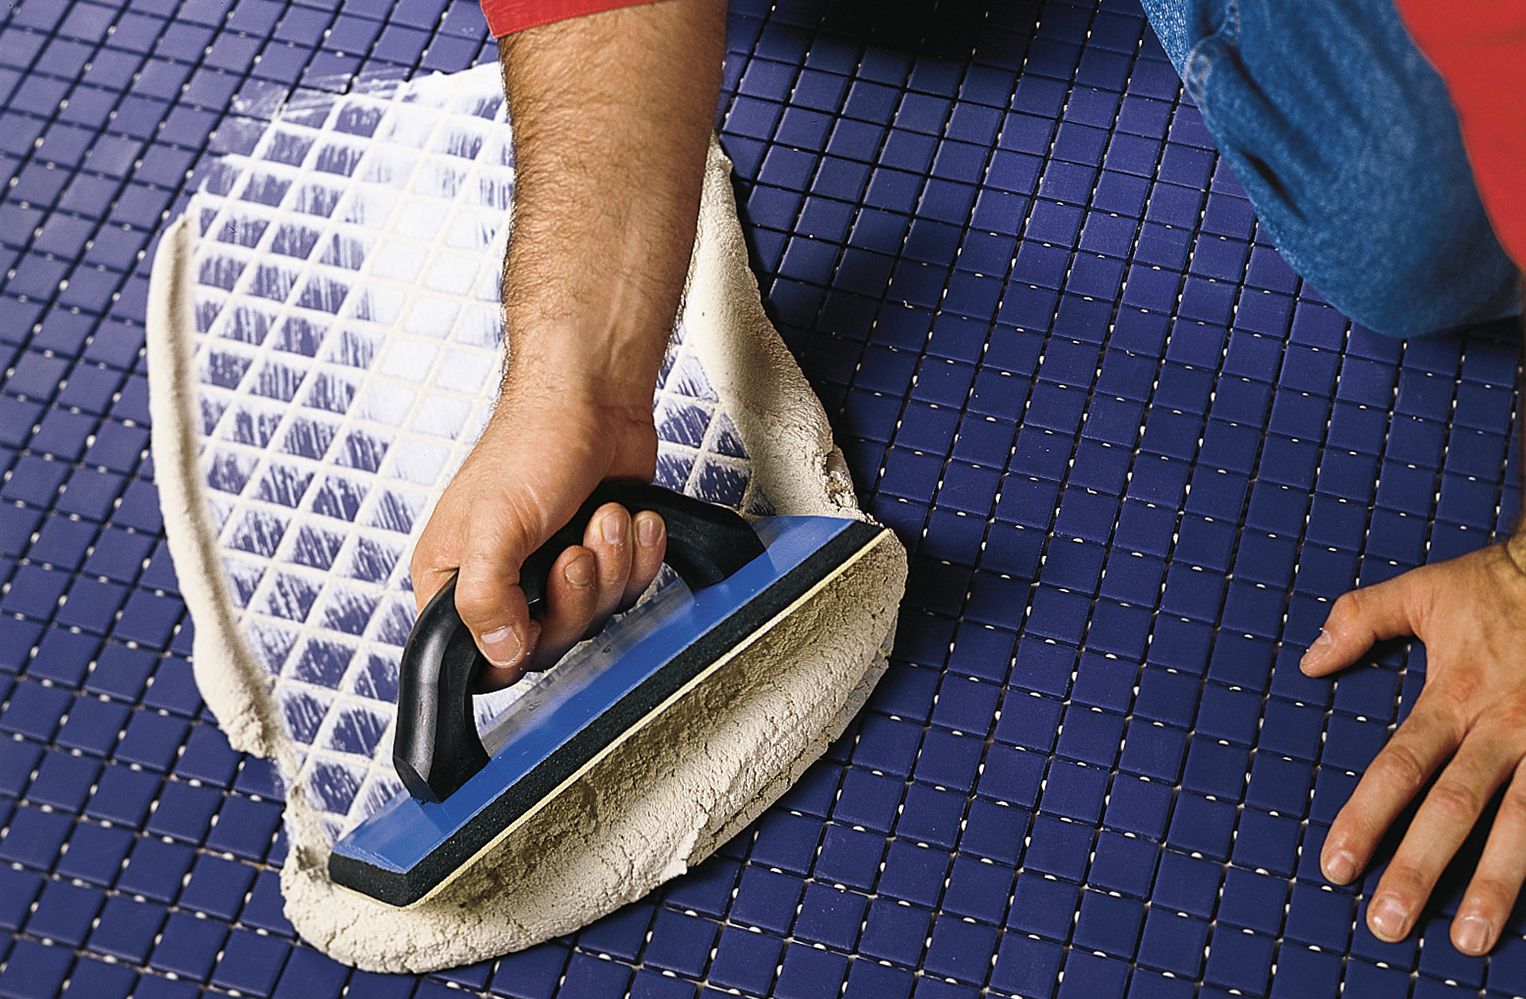
Apply the Grout
Using a rubber float, spread the grout diagonally across the tile surface, pressing it firmly into the joints. Work in small sections, removing excess grout from the tile surface as you go. Check that the joints are filled without gaps or voids.
Clean Up
After the grout has set slightly (usually about 15–30 minutes), use a damp sponge to clean the tile surface and shape the grout lines. Rinse the sponge frequently and change the water as needed to avoid smearing grout. Once the grout has fully cured, remove any remaining haze with a clean, dry cloth to get a polished finish.
Grout Colors and Design Options
Grout color impacts the overall look of your tiled surface. Consider the following approaches when selecting grout color.
Match Grout To Tile
Choosing a grout color that closely matches your tile creates a seamless, uniform appearance. This option is great for creating a calm, cohesive look and can make a space appear larger and more open.
Contrast Grout Colors
Using a contrasting grout color can highlight the tile pattern and add visual interest to your design. For example, white grout with black tiles can create a striking, graphic effect. However, be cautious with bold choices, as they can be difficult to change later if you decide to update your decor.
Neutral Grout Choices
Neutral grout colors like light gray or beige are versatile options that complement a wide range of tile colors and styles, making them a safe and attractive choice for many homeowners.
Why Seal Grout?
Cement-based grouts are porous and can absorb liquids, leading to staining and potential mold. Sealing creates a protective barrier that repels water and stains, making cleaning easier and prolonging the life of your grout.
Types of Grout Sealers
There are two main types of grout sealers:
- Penetrating sealers: These soak into the grout, providing protection without changing its appearance.
- Membrane-forming sealers: These create a visible coating on the grout surface, but may peel or become cloudy over time.
For most applications, penetrating sealers are the preferred choice due to their durability and breathability.
How To Apply Grout Sealer
To apply grout sealer, follow these steps:
- Make sure the grout is clean and completely dry.
- Apply the sealer using a small brush or applicator bottle, working in small sections for even coverage.
- Allow the sealer to penetrate the grout for the recommended time.
- Wipe away any excess sealer from the tile surface to prevent residue build-up.
- Apply a second coat if recommended by the manufacturer for added protection.
- Allow the sealer to cure fully before exposing the surface to water or heavy use.
Common Grout Problems and Solutions
Even with proper installation and maintenance, grout can develop issues over time. Here are some common problems and how to address them:
Stained Grout
Stained grout is a common issue, especially in high-traffic areas or kitchens. To address this problem, try a homemade grout cleaner made from baking soda and water. For tougher stains, use a commercial grout cleaner or consider hiring a professional cleaning service.
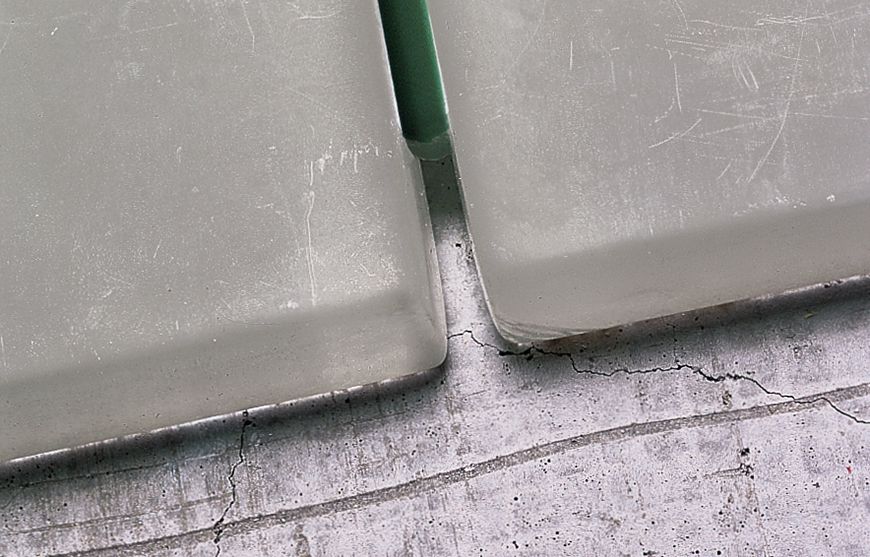
Cracked Grout
Cracked grout can result from settling, temperature changes, or improper installation. Small cracks can be filled with new grout, but larger or recurring cracks may indicate a more serious underlying issue that should be assessed by a professional.
Moldy Grout
Mold in grout is common in damp areas like bathrooms. To fix it, clean the affected area with a mixture of equal parts water and white vinegar. For persistent mold, use a commercial mold remover and think about improving ventilation to prevent future growth. Regularly cleaning and keeping surfaces dry can also help mitigate mold issues.
Grout Maintenance and Cleaning
Stubborn dirt can easily build up on grout. Here are some tips for keeping grout looking clean.

Daily Care
Wipe down tiled surfaces regularly with a damp cloth to prevent dirt and grime buildup. Avoid using harsh chemicals or abrasive cleaners that can damage the grout or strip its sealant, as these can lead to more serious issues down the line.
Deep Cleaning Techniques
For periodic deep cleaning, use a pH-neutral cleaner specifically designed for grout. Apply the cleaner, allow it to sit for the recommended time, then scrub with a soft brush before rinsing thoroughly. This helps maintain the integrity and appearance of both the grout and the tiles.
Professional Cleaning Services
For heavily soiled or stained grout, consider hiring a professional cleaning service. They have special equipment and cleaning products that can restore your grout to its original appearance. Professional cleaners can also provide advice on maintaining grout and preventing future issues.

Regrouting: When and How
Sometimes, cleaning and repairing grout isn’t enough, and you’ll need to regrout.
Signs It’s Time To Regrout
Consider regrouting if you notice these issues:
- Extensive cracking or crumbling grout
- Persistent mold or mildew that doesn’t respond to cleaning
- Grout that’s worn below the tile surface
- Discoloration that doesn’t improve with cleaning efforts
DIY Regrouting Steps
Follow these steps to regrout a tiled surface:
- Remove the old grout using a grout saw or oscillating tool, being careful not to damage the tiles.
- Clean the joints thoroughly to remove any remaining debris.
- Apply new grout, following the manufacturer’s instructions for mixing and application.
- Clean excess grout from the tile surface to prevent haze or residue.
- Allow the new grout to cure fully, then seal if necessary for added protection.
When To Call a Professional
While regrouting can be a DIY project, it’s wise to hire a professional for large areas, intricate patterns, or if you’re unsure about the process. A pro can remove old grout and apply new grout, saving you time and potential frustration.
Grout in Different Environments
Depending on where you’re putting your grout, you should consider the following factors.
Bathroom Grout Considerations
In bathrooms, moisture resistance is a top priority. Consider using epoxy grout or a high-quality cement-based grout with a penetrating sealer. Install proper ventilation to reduce moisture buildup and prevent mold growth. Regularly clean the grout to maintain its appearance and functionality.
Kitchen Grout Best Practices
Kitchen grout should be stain-resistant and easy to clean. Epoxy grout or a sealed cement-based grout works well in this high-traffic, spill-prone area. Avoid using grout colors that may show food stains more readily, and clean it often to prevent the build-up of dirt and grease.
Outdoor Grout Solutions
For outdoor applications, choose a grout that can withstand temperature fluctuations and exposure to the elements. Look for products specifically designed for exterior use, and consider darker colors that are less likely to show dirt and weathering. Regular maintenance and sealing can help protect outdoor grout from the elements.