You’ve seen their creations in our Inspirational Pro Pumpkin Carving gallery. Now, here are the expert carvers’ tips for every step of the pumpkin-carving process. Follow their advice to create a potentially award-winning pumpkin, and enter our annual Pumpkin-Carving Contest for your chance to win prizes and be featured on This Old House website.
SELECT IT
Want to go traditional and carve a gourd straight from the patch? Or would you like your creation to last forever by carving a synthetic pumpkin? Whichever one you choose, make sure you consider your design or pattern when selecting a gourd. Get one large enough and in a shape that will accommodate the length and width of whatever design you’re going to carve into it. And before you leave the pumpkin patch, Ryan Wickstrand of ZombiePumpkins.com recommends the following: “Make sure it can stand well on its own, and never carry a pumpkin by its stem.”
If you dread seeing your hard work turn to mush—even with good care, a carved pumpkin will last only a couple of weeks (see “Preservation,” below)—consider an artificial pumpkin, such as those available from Funkins. They have precut holes in the bottom to accommodate a flameless light source, the pumpkin walls have already been “shaved” down to a thickness of ½-inch (ideal for carving).
CARVE IT
The key to safe carving? Sharp tools. With properly sharpened carving saws and knives, you won’t have to use as much force while carving, which reduces the chances of accidental slips that can result in injury. When carving artificial pumpkins, don a mask and goggles to protect yourself from carving dust.
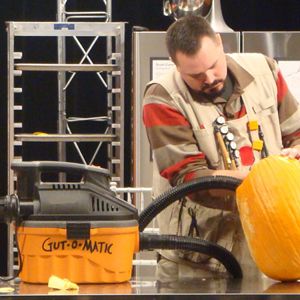
“Nothing slurps out messy pumpkin guts like a good, strong wet/dry Shop-Vac,” says Scott Cummins of PumpkinGutter.com (image 1). But if yours is out of reach, he recommends scraping out pumpkin guts with a margarine container lid or an empty tuna can. Wickstrand is a fan of the Pumpkin Gutter (not affiliated with Cummins’s site), a special drill bit that grips pumpkin gunk and quickly shaves down the inner pumpkin wall.
For increased stability, carve out the smallest pieces first, then work your way up to the larger cutouts. “In fact, it’s wise to leave the cut shapes wedged in place until you are finished cutting all the lines. This will provide added support until you’re done carving,” says Wickstrand. Once all the cuts have been made, pop out the sections with your finger.
Some pros carve freestyle. But using a template to lay out your design on your pumpkin prior to carving can help ensure the look of your jack-o’-lantern. For a This Old House-style pumpkin, you can download our templates:
LIGHT IT
You can create an opening at the bottom of the pumpkin to place over a light source. But if you opt for cutting out a lid, make sure you include a notch for hassle-free replacement and angle your cuts inward to prevent the lid from falling in.
The light source you choose can affect the life span of your pumpkin. “Using a low-watt electric light instead of candles will reduce shriveling,” says Gene Granata of MasterpiecePumpkins.com. Try the Pumpkin Powered Light or Ultimate Strobe Light available from Pumpkin Masters.
Lighting is the key to simple designs such as the pumpkin “disco ball,” created by drilling holes of various sizes into the wall of a pumpkin, then lighting it from within (image 2). According to former TOH editorial assistant Harry Sawyers, who wrote about tools on our blog The Hardware Aisle: “Irwin’s Seedbor bits have a deep blue recess beneath the cutting blade that channels the waste material up and out of the hole, while other bits leave messy orange tendrils.” (See image 3)
PRESERVE IT
Thoroughly gutting and cleaning the pumpkin before you carve will make for a longer-lasting carving. But after you carve, Wickstrand suggests “sealing in moisture on cut edges by applying a coat of white glue.” Both Wickstrand and JP of JamminPumpkins.com say you can also apply petroleum jelly to carved edges to prevent moisture loss. “I like to spray Lysol on the whole carving and inside the whole pumpkin to keep the pumpkin-killing bacteria away,” says Stoney of Stoneykins.com. Granata recommends Pumpkin’ Dunk’n, a preservative soak that promises to add as much as two weeks to the life of your carving. Meanwhile, 3D carver Scott Cummins recommends bagging and cooling your work. “After your pumpkin has been displayed for a few hours and you notice some drying, you can temporarily revive it by completely submerging it in chilled water for a couple of hours. I put a tiny bit of bleach in the water, mainly to make sure its not contaminated,” he says.
PHOTOGRAPH IT
The best way to preserve your pumpkin is to take a good picture of it. But photographing lighted objects can be tricky. Eric Wilhelm, CEO of Instructables.com, who photographs his own jack-o’-lanterns every year, says there are three keys to the perfect capture: a steady camera, longer than usual exposure times (he photographs his carvings using 0.8 to 2.5 seconds of exposure time), and no flash (image 4). A tripod is best for keeping the camera steady, because even the slightest movement will blur your image. But if you’re just going to put the camera on a table or other surface, Wilhelm advises using the delayed shutter function (or timer) to give the camera a chance to stop shaking after you hit the button and before the picture is taken.
Wilhelm also recommends eliminating any background light. Minimal light sources in front of the pumpkin can be helpful, though. “I photograph in a dark room with two side-mounted, low-wattage flood lights pointing toward reflective surfaces,” Granata adds (image 5). This gives the pumpkin a presence in the photo, as opposed to shooting a lit carving in total darkness.
DON’T FORGET! Enter the TOH Pumpkin Carving Contest for your shot at $500