
Glazed ceramic tile is an ideal material for tub and shower walls. It’s impervious to moisture, easy to clean and durable enough to withstand a lifetime of hot, sudsy soakings. Tile isn’t maintenance-free, however. Every tiled wall is only as strong as the thin grout joints between the tiles. Once the grout starts to soften and crack, it’s only a matter of time before water seeps in and damages the mortar and drywall behind the tile.
Don’t wait for an entire wall of grout to fall out before taking action. The best way to avoid major wall repair is to regrout any joint when the first crack or stain appears. When it comes to maintaining grout joints, an ounce of prevention is worth a ton of cure. It’s also easy and inexpensive.
Restoring a tiled wall requires only a few hours’ work and about $35 for tools and materials. The four main steps of the tile repair are: regrouting the tile; recaulking between the tub and tile; caulking around the shower handle and tub spout; and protecting the grout joints with silicone sealer.
Removing Old Grout
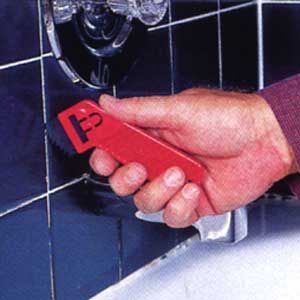
The first step is to clean out the damaged joints with a grout saw, which is available at hardware stores for about $5. The plastic handle of the saw is fitted with a steel blade that has either sharp serrated teeth or an abrasive carbide grit. Both work well.
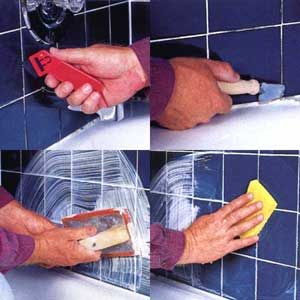
Draw the blade along the joint to scratch out the old grout (photo below, left). Press firmly on the tool, but be sure it doesn’t pop out of the seam and mar the tile. It usually takes only two or three passes to reach clean, sound grout beneath, though you may have to remove the entire section. In either case, cut the joint slightly beyond the damaged area and into healthy grout to be sure you removed all the old stuff.
After you’ve cleaned out all the damaged grout joints, use a straight-blade scraper to cut the caulk bead from between the top edge of the tub or shower pan and the first course of tile (photo above, right). Pull out as much of the old caulk as possible. If necessary, use a putty knife or thin-blade screwdriver to extricate any stubborn blobs.

Regrouting Techniques
Two types of grout are commonly available: premixed and powdered. Easy-to-use premixed grout ($3 for a half-pint) works well for small repairs. Scoop some out of the container and press it into the seams between tiles with your finger.
For large regrouting jobs, buy a 5-lb. carton of powdered grout ($5) and a quart of liquid latex additive ($7). This make-it-yourself approach allows you to mix up fresh batches of grout as you need it.
Dump a cup or two of grout into a small, clean plastic bucket, and then pour in enough latex additive to hydrate the powder. You could mix the powder with plain water, but the liquid latex makes the grout more water-resistant and much stronger. Mix the grout thoroughly with a paint stirrer or putty knife. Add more powder or liquid latex if necessary until the mixture is the consistency of mayonnaise. Before moving onto the next step, let the grout sit for three or four minutes.
Use a rubber float (about $7) to force the grout into the joints (photo above, left). Push the float diagonally across the tile and be sure not to miss any spots. Wait about five minutes, then use a clean, damp sponge to wipe the excess grout from the tile (photo above, right). Rinse the sponge frequently in clean water and continue wiping until only a light haze remains. Allow the grout to set overnight, then buff off the haze with a soft, dry cotton cloth.

Caulking Out Trouble
Recaulking the horizontal joint between the tub or shower pan and the first course of tiles is the next step after regrouting. A 100 percent silicone caulk is best for sealing out water. Silicone isn’t the easiest caulk to use — it skins over quickly and isn’t easy to smooth out — but it grips with bulldog tenacity and is very flexible. What’s more, it won’t tear free from the surface as latex caulk often does, nor will it crack like grout.
To make recaulking less arduous, buy a small squeeze tube of silicone ($4). It’s much easier to control than a cartridge in a caulking gun. Cut the tip of the tube at a 30-degree angle, making sure the opening is as wide as the joint. Squeeze the caulk into the joint (photo below, left), but be careful not to overfill it. Apply 10 to 12 inches of caulk at a time, and only enough to bring the joint out flush with the tile. Then quickly smooth the bead with the tip of your finger before a skin forms over the surface. Squeeze in another short bead and repeat the process.
It’s essential to caulk around the shower handle and tub spout. Remove the shower handle by prying off the decorative cover with a thin-blade screwdriver. Then back out the retaining screw (photo above, right) and pull off handle. Remove the trim plate and apply a continuous bead of silicone caulk around its rubber gasket (photo below, left). Press the plate back into position and replace the handle. Then apply a thin bead of caulk all the way around the tub spout (photo below, right).
Don’t use the shower for two to three days so the grout and caulk can cure. If you must use the shower you just worked on, tape up plastic sheets to keep the walls dry. Once everything has cured, apply a liquid silicone sealer ($3.50) to all the grout joints, both old and new (below). The sealer will make the grout more water-resistant and less porous so it lasts longer and stays cleaner.