When laminate flooring first arrived in this country in 1994, it was greeted with both curiosity and skepticism. A totally new product, this Swedish import intrigued homeowners and builders alike because of its beautiful wood-grain patterns and easy floating floor installation. What’s more, because the color and pattern are literally a photograph under tough, clear wear layers, patterns from tiny flower borders to classic marble were soon on the market in every color of the rainbow.
Only a few years later, the laminate flooring business was in full bloom. In fact, more than 258 million square feet of the flooring was sold in the U.S. and Canada in 1998 alone. Business is so good, each year manufacturers create dozens of new designs to make the product even more appealing. That gives homeowners every opportunity to design a floor that incorporates individual choice and style. But where to begin?
One problem with all these choices: It’s easy to create a floor that’s as busy as a TV test pattern viewed through a kaleidoscope. So we asked industry experts for tips on selecting colors and designs.
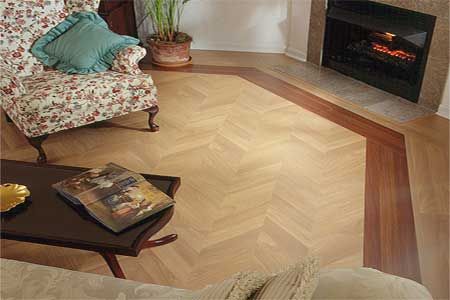
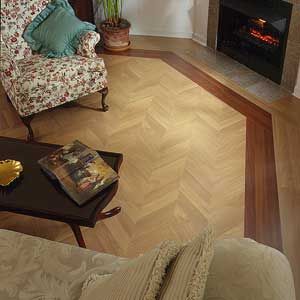
The easy installation of laminate floors has also grown more complicated with the introduction of tiles and blocks, and the trend toward mixing colors and designs. To get the latest on installation, we worked with a professional to install the herringbone floor with teak border shown above. His insight will help make any laminate floor in your home last, whether you install it yourself or call in a pro.
Planks, Tiles, and Blocks
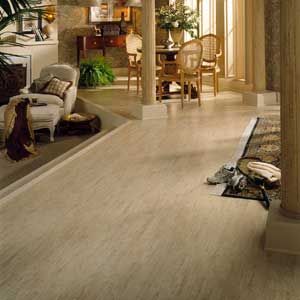
A vast majority of the laminate flooring sold today is a plank product with a wood-grain pattern. But unlike traditional hardwood strip flooring, which typically is 3/4 inch thick x 2 1/4 inches wide, laminate planks
measure 5/16 to 1/2 inch thick x 7 to 8 inches wide x 47 to 50 inches long.
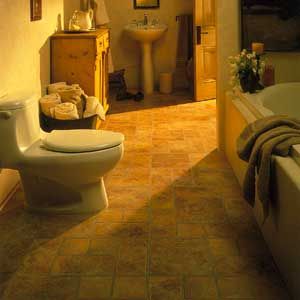
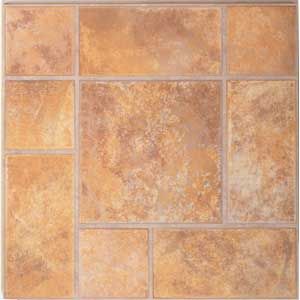
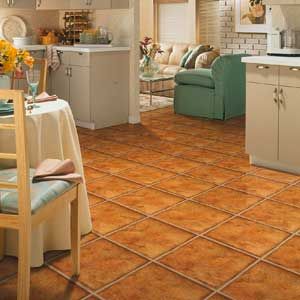
They also come in a dizzying array of wood species and colors, including natural maple, distressed heart pine, Brazilian cherry, weathered barn oak, bleached driftwood, and Australian cypress. However, wood-grain planks are only part of the story. Over the past few years, every major manufacturer — Armstrong, Bruce, Formica, Mannington, Pergo, Tarkett ,and Wilsonart, to name a few — has expanded its product line to include an exciting assortment of new patterns that feature realistic images of tumbled stone, polished marble, antique bronze, terra cotta, weathered slate, and many other materials. Most of these new patterns come in planks, but they’re also widely available in large square tiles, rectangular blocks, and small diamond accents.
The major benefit of all these new sizes, colors, and patterns is that you can mix and match planks with tiles and wood grains with stone patterns to create a truly original floor.
When using planks and tiles in the same design, “You can create a stunningly beautiful floor by mixing and matching various patterns,” says Kevin Boothe, marketing manager for Formica Flooring. “Just make sure that all the flooring comes from the same manufacturer.” Boothe adds, “The pieces are precisely made in compatible sizes, which allows you to lay out a design without trimming or cutting.” For example, when using Formica flooring, three planks are as wide as one tile, and two tiles are as long as one plank.
To avoid vertiginous designs, use bold colors sparingly, and don’t mix more then three colors or patterns in a single room. As a general rule, use smaller patterns in small rooms and larger patterns in large, open spaces. Checkerboard patterns, which are made up of tiles or blocks, can be used to visually break up spaces that are long and narrow.
Another common design dilemma occurs when working with laminate tiles, which are made as large as 24 inches square. The tiles look great in a large space but are too big for use in a smaller space, such as an adjacent hallway, foyer, or powder room. Ron Gagnon, the director of product design for Wilsonart, offers a solution: “Look for a line of tiles that offers the same color in both large- and small-scale pattern designs.” Gagnon continues, “Set large-scale tiles in big, open spaces, but when you get to a smaller space, switch to a small-scale tile that has images of four or more smaller ‘ceramic tiles.’ All the pieces in the flooring design will be the same size and color; only the size of the pattern is different.”
Exciting Floor Show
The more complicated the design, the trickier the installation. Recently, we went along with Pergo’s Paul Serene, regional training coordinator, and professional installer Jeff Burstein, of JB Floors in Framingham, Massachusetts, as they laid one of these new upscale floors in a formal living room. They installed Pergo Select ($6 per square foot), a premium product that carries a 20-year warranty against wear-through, stains, fading, and water damage. The floor design features a herringbone pattern in the center of the room done in Medium Fishbone Oak. It’s outlined with a contrasting border of Bangkok Teak.
Laminate flooring is usually installed over a plywood subfloor, but it can also be laid over most existing floors. Some laminates are even approved for installation on below-grade concrete slabs. However, before purchasing any laminate floor, check with the manufacturer to determine which product is best suited for your room. For example, some manufacturers do not recommend using their product in wet locations, like bathrooms.
Before the flooring is installed, a thin underlayment is put down to even out sub-floor irregularities and provide a soft cushion for the laminate. In most cases, 1/8-inch-thick foam is used, but other options are available, too. For the job we were on, a 3/16-inch-thick padding called Whisper Walk was used. Still newer are underlayments, such as Pergo’s Silent Step, which reduce the loud click-clack of shoe heels and make it sound as if you’re walking across real wood. Whatever you choose, make sure the flooring manufacturer approves the underlayment; otherwise you’ll void the warranty.
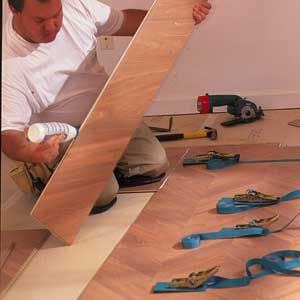
Installation of a laminate floor goes quickly because the flooring isn’t attached to the subfloor at all; the pieces are simply glued together to form a floating floor. An expansion space of 1/4 inch around the perimeter of the room lets the flooring expand and contract with changes in humidity and keeps it from buckling. On a typical job, the installation begins along one wall, but for floors with a border like the installation we were on, the center section is done first. In this case, the first three courses of the Fishbone planks were glued together and left to dry for an hour or so. The delay allows the planks to solidify into a single slab so they won’t separate as the subsequent planks are installed.
The most important part of the job is using the proper gluing technique. Be sure that only glue recommended by the flooring manufacturer is used. It’s specifically formulated for a particular floor and no other type of glue will work as well. Also — and this point can’t be overemphasized — the installer shouldn’t skimp on the glue. Every groove in every plank has to be completely filled with a continuous bead of adhesive. When the planks are tapped together, there should be massive squeeze-out along all of the seams. This may not be the neatest method, but it’s absolutely necessary to create tight, long-lasting joints.
Once the center of the floor is completed, the border is installed. On the job we visited, a 7 3/4-inch wide border was created by installing a course of teak all the way around the 14×22-foot room. But in a smaller room, a border this wide could visually overpower the space. The remedy is to cut the planks lengthwise to form a narrower border. Keep in mind, whenever the flooring is altered, a spline joint must be routed into the cut edge so it can be joined to the adjacent plank.
The size of a room also dictates how far off the walls the border should be. In the installation we visited, it was situated two courses (15 1/2 inches) from the walls. In a smaller room, a single course would look best. For a very spacious room (larger than 400 square feet), the border could be two planks wide or moved three courses off the walls.
Once all the flooring is down, the expansion spaces are hidden by shoe molding nailed to the baseboard — never to the floor.
Any competent do-it-yourselfer can install a laminate floor with a simple, straightforward design, such as a traditional plank or basic checkerboard. But when it involves elaborate borders or mixing and matching components of various sizes, you may want to call in an experienced floor mechanic. Mistakes are costly in both time and money, two commodities that are always in short supply.
Putting the Pieces Together
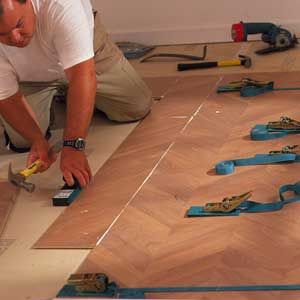
Proper gluing is the key to tight, strong joints. Every groove in every plank should receive a generous amount of glue that’s applied in a long, continuous bead.
A hammer and striking block are used to close up the joint between the 47 1/4-inch-long planks. Note the glue squeezing out along the entire seam — the sign of a good installation.
The center herringbone section gets installed first. Several ratcheting band clamps hold the planks together until the glue dries, which takes about an hour.
The contrasting teak border is installed after a spline joint is routed into the ends of the herringbone planks. Excess glue is wiped off with a damp rag that’s frequently rinsed clean.
Two courses of medium-tone London Oak planks fill in the space between the walls and the 7 3/4-inch-wide Bangkok Teak border. Shoe molding goes down last to hide the expansion gap.
The Cost of Going Custom
A laminate floor with borders and multiple patterns can make any room a showpiece, but if you’re not laying it yourself, costs add up quickly. Though materials don’t cost much more, labor for a custom floor runs about $4 per square foot versus $2 to $3 per square foot for standard work.
Where to Find It:
Abet Laminati, Inc
60 West Sheffield Avenue
Englewood, NJ 07631
800-228-2238
Armstrong World Industries, Inc.
Customer Response Center
Box 3001
Lancaster, PA 17604
888-276-7876
BHK of America
Box 37
Central Valley, NY 10917
800-663-4176
Bruce Laminate Floors
Marketing Dept.
Box 308
Mount Olive, NJ 07828
800-722-4647
Formica Corporation
10155 Reading Road
Cincinnati, OH 45241
800-367-6422
JB Floors
107 Oaks Road
Framingham, MA 01702
508-875-4600
Mannington Laminate Floors
Box 30
Salem, NJ 08079
800-443-5667
Norske Skog Flooring
4701 Washington Avenue
Racine, WI 53406;
414-632-758
Perstorp Flooring
3128 Highwoods Blvd.
Raleigh, NC 27604
800-337-3746.
Tarkett
1139 Lehigh Avenue
Whitehall, PA 18052
800-367-8275
Wilsonart International
2400 Wilson Place
Box 6110
Temple, TX 76503
800-433-3222